![]()
In this lesson you add a new Web page for displaying product information. You also add a hyperlink to the Welcome page to access this new page. Lastly you add a button to the new page that eventually navigates to a Web page in which you can add new product information. Additional features are added to this Web page in a later lesson.
Now you create a Web page for viewing and adding product information. You access the new Web page from the Welcome page.
Right-click the Customer target in the System Tree.
Select New from the pop-up menu.
Click the 4GL JSP Page icon and click OK.
The About the 4GL JSP Page Wizard page displays.
Click Next.
Type the Title Product in
the Title text box and press Tab.
The filename in the File Name text box defaults to Product.jsp.
Click Next until the Define Page Parameters page displays (accept the wizard defaults).
Type ID for the
Parameter Name and leave the Default Value empty.
Click Next.
The Choose EAServer Profile page displays.
Select the Skip EAServer Components check box.
Click Next.
Review the summary of page properties and click Finish.
The Product.jsp page displays in Page view.
Highlight the default text Put
your data here.
Type the words Product Information.
Press Enter.

Select File>Save to save these changes.
Next you add a hyperlink in the Welcome page to access the Product Web page.
Display the Welcome page (Welcome.jsp).
Place the cursor in the paragraph near the bottom of the product picture and press Enter twice.
Select Format>Hyperlink from the menu bar.
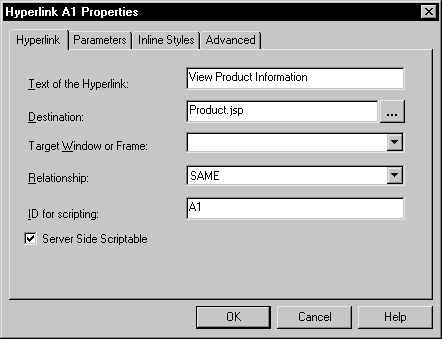
The Hyperlink Properties dialog box displays.
Type View Product Information in
the Text of the Hyperlink text box.
Click the browse (...) button next to the Destination text box.
The Choose URL dialog box opens and displays the Web pages already created in the Customer target.
Select Product.jsp and click OK.

Click OK again to add the hyperlink to the Web page.
The Welcome page displays an underlined View Product Information hyperlink.
Select File>Save from the menu bar.
Close the Welcome page.
Next you add a button to the Product page. Buttons are a typical navigation tool on Web pages. Later in the tutorial, you add navigation logic to this button.
Display the Product page (Product.jsp).
Place the cursor in the paragraph under the heading Product Information.
Select Insert>Form Field>Push Button from the menu bar.
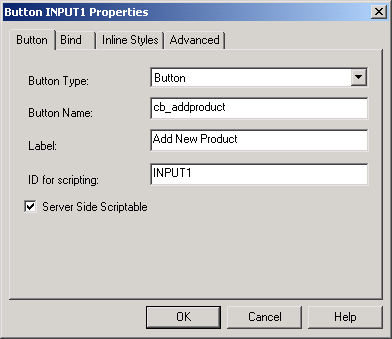
The Button INPUT1 Properties dialog box displays.
Select the Button Type Button from the drop-down list.
Type cb_addproduct in
the Name text box.
Type Add New Product in
the Label text box.

Click OK.
The button displays on the Product.jsp page.

You will connect this button to a Web page in the next lesson.
Select File>Save from the menu bar.
Close the Product page.