![]()
Now you add a Login Web page (Login.jsp) with 4GL capabilities. The login page is a simple design. For the purposes of this tutorial, a server-side validation script determines whether the user name and password are the same. This is determined with validation logic. In production applications you would use more sophisticated validation logic.
Once the login information has passed validation, you add server redirection to move the user to the Welcome page.
The user name and password are saved as session variables that are valid for the entire Web session.
In this lesson you:
First you create a login page using the 4GL JSP Page wizard.
With the Customer target selected, select File>New from the menu bar.
Click the Web tab.
Click the 4GL JSP Page icon.
Click OK.
The About the 4GL JSP Page Wizard page displays.
Click Next.
Type the Title Login in
the Title text box and press Tab.
The file name in the File Name text box defaults to Login.jsp.
Click Next until the Choose EAServer Profile page displays (accept the wizard defaults).
Select the Skip EAServer Components check box.
Click Next.
Review the summary of page properties and click Finish.
The Login.jsp page displays in Page view.
Select File>Save from the menu bar.
A session variable can keep track of user login information and other data that you want available to all the pages in your Web application during a user's browser session.
In Page view, highlight the default text Put
your data here.
Replace this highlighted text with the following:
Log in, please:
Press Enter.
On a new line, type the following text, pressing Enter after each line.
Name
Password

Right-click the Login.jsp page and select Page Properties from the pop-up menu.
Click the Variables tab.
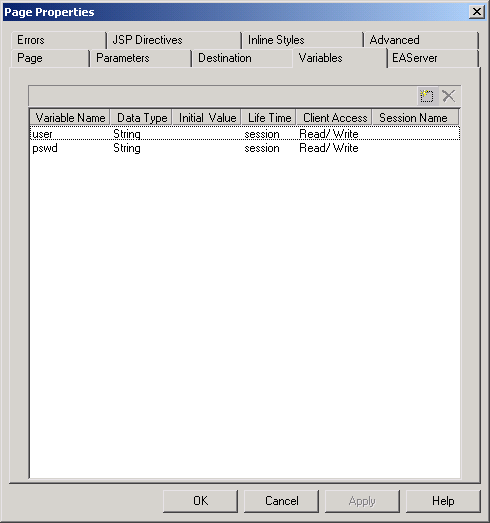
Click under Variable Name, click again, and type user for
the new variable name.
Tab to the Data Type column and select String from
the drop-down list box.
Tab to the Life Time column and select session from
the drop-down list box.
Tab to the Client Access column and select Read/Write from
the drop-down list box.
Click under user in the Variable Name column,
click again, and type pswd for
the new variable name.
Tab to the Data Type column and select String from
the drop-down list box.
Tab to the Life Time column and select session from
the drop-down list box.
Tab to the Client Access column and select Read/Write from
the drop-down list box.
Click OK.
Two session variables for the user login information are now defined.
Text controls are specialized text fields that can be manipulated by server scripts. The client cannot change the value of this text. It is available only on 4GL Web pages.
On the Login.jsp page, place the cursor in the paragraph after the word Name and type two spaces.
Select Insert>Form Field>Single Line Text from the menu bar.
The Text Control INPUT1 Properties dialog box displays.
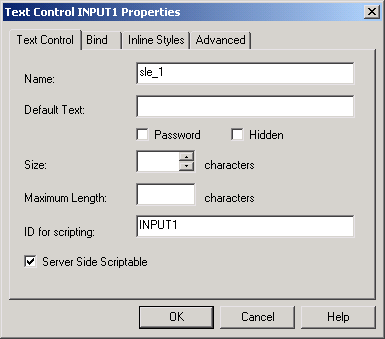
Type sle_user in
the Name text box and make sure the Server Side Scriptable check
box is selected.
Click the Bind tab.
Select <Session Variable> from
the Component name drop-down list box.
Select user from
the Property name drop-down list box and click OK.
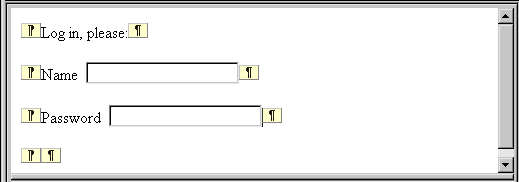
A text box is inserted after the text Name.
In Page view, place the cursor in the paragraph after the word Password and type two spaces.
Select Insert>Form Field>Single Line Text.
Type sle_pswd in
the Name text box.
Select the Password check box.
Make sure the Server Side Scriptable check box is selected.
Selecting the Password check box causes the user-entered password to display as asterisks. You cannot add this ability after the text box is added to the Web page.
Click the Bind tab.
Select <Session Variable> from
the Component Name drop-down list box.
Select pswd from
the Property name drop-down list box and click OK.
A text box is inserted after the text Password.
Select File>Save from the menu bar.
Validation can be done using client-side or server-side scripting. In this exercise, the password validation rule is that the user name must be the same as the password, so you use a server-side script to determine whether the user-entered user name is the same as the user-entered password. This validation code is provided only as an example. Typically you would validate the user name and password against a database.
In the next lesson you will add code to display the Welcome page after login is complete. If the user name and password are not the same, an error message displays, asking the user to try again.
Place the cursor on the page in the paragraph below the Password text box and press Enter.
Select Insert>Form Field>Push Button from the menu bar.
The Button Properties dialog box displays.
Select the Button Type Button from the drop-down list box.
Type cb_login in
the Name text box.
Type Login in the
Label text box.
On a 4GL Web page, a submit button type and a standard button type (button) work in the same way; both have client-side onclick events and server-side Server Action events.
Click OK.
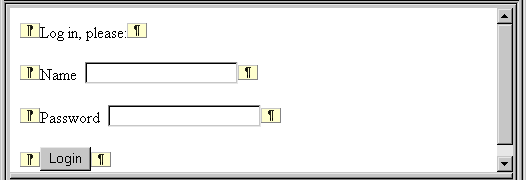
The new Login button displays under the Password text box.
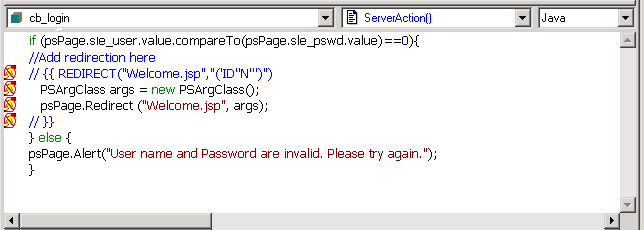
In the Script editor at the bottom of Page view, select cb_login in the first drop-down list box.
In the center drop-down list box, scroll to the bottom of the list and select ServerAction().
Server-side events display in blue text.
Type the following in the Script editor:
if(psPage.sle_user.value.compareTo(psPage.sle_pswd
												 .value)==0){

This script tests to see whether the user name and password are the same. It assigns the client-entered values for user name and password to the session variables.
Press Enter.
Type the following comment line below the script just entered:
//Add
redirection here
You add a redirection call in the next lesson of the tutorial.
Press Enter twice.
Type the else statement as shown below to add the error message:
} else {psPage.Alert("User name and Password are invalid. Please try again.");}
Click the Save button in the PainterBar.
Most 4GL Web pages navigate to other pages by server redirection. Server redirection is the most flexible way to navigate from one page to another.
Server redirection is used when a parameter value passed to another page relies on user input, or when you want to validate user input. Now you alter your 4GL Login page to include a server script that specifies the target (Welcome) page and validates the user-input values of the Login page.
In the Script editor at the bottom of the
Login.jsp page, place the cursor after the comment line //Add
redirection here.
Right-click and select Insert Redirect from the pop-up menu.
The Redirect Properties dialog box displays.
Click the browse button (...) next to the Destination text box.
Select Welcome.jsp from the Contents of Customer tree view.
Click OK twice.
The Script editor inserts a block of code. The ability to modify or remove this block of code using the Edit Redirect or Delete Redirect commands is available in the pop-up menu.
Select File>Save from the menu bar.