Lesson 9: Creating a Sales Application  Lesson 9: Creating a Sales Application


Test the application on the desktop

Note

Before you run your application in PocketBuilder to preview and test it, you need to start the MobiLink server.

NoteDefault protocol and host For ease of testing, the default protocol is TCP/IP and the default host is the machine name or the machine IP number. The default port is 2439 for TCP/IP, 80 for HTTP, and 443 for HTTPS.

  1. Close any painters that are open in PocketBuilder.

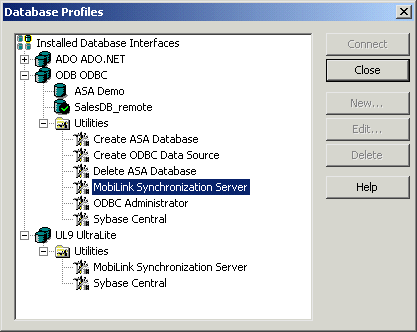
    Select Tools>Database Profile to open the Database Profiles tool.

  2. Expand the ODB ODBC node and then expand the Utilities node.

    Double-click the MobiLink Synchronization Server utility.
    Shown is the Quick Select screen. At top left is a Tables list box with the customer table highlighted. At right is a Columns list box showing all the columns of the customer table, such as i d, f name, and l name. At the bottom is a scrollable blank display area with rows labeled Column, Sort, Criteria, and Or.
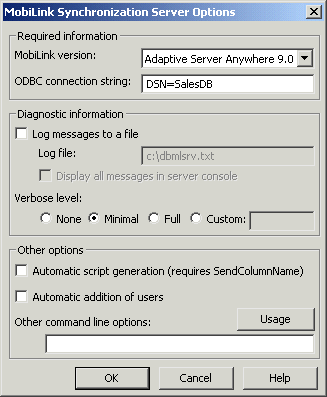
  3. For the ODBC connection string, type DSN=SalesDB.
    Shown is the Quick Select screen. At top left is a Tables list box with the customer table highlighted. At right is a Columns list box showing all the columns of the customer table, such as i d, f name, and l name. At the bottom is a scrollable blank display area with rows labeled Column, Sort, Criteria, and Or.
  4. Click OK.

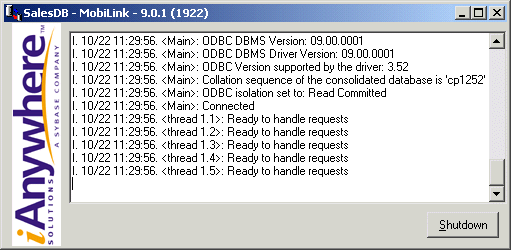
    The MobiLink Synchronization Server runs and is ready to accept requests.
    Shown is the Quick Select screen. At top left is a Tables list box with the customer table highlighted. At right is a Columns list box showing all the columns of the customer table, such as i d, f name, and l name. At the bottom is a scrollable blank display area with rows labeled Column, Sort, Criteria, and Or.
  5. Close the Database Profiles painter.

  6. Select Run>Run from the menu bar.

    The SalesDB application connects to the local copy of the SalesDB_remote remote database and the Sync Options dialog box opens.

    In the Sync Options dialog box, you can type syncronization information including the MobiLink user name and password.

  7. For testing purposes, type 50 as the user name in the MLUser text box, leave the MLPassword text box blank, and maintain the default for all other options.
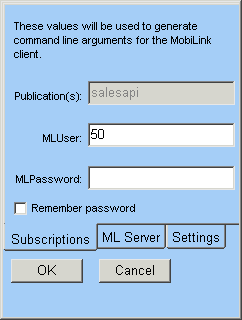
    Shown is the Quick Select screen. At top left is a Tables list box with the customer table highlighted. At right is a Columns list box showing all the columns of the customer table, such as i d, f name, and l name. At the bottom is a scrollable blank display area with rows labeled Column, Sort, Criteria, and Or.

    If you use 50 as the user name now, when you run the application on your device or emulator you should use another user name such as 51 or 52.

  8. Click OK to synchronize.

    First the synchronization completes.
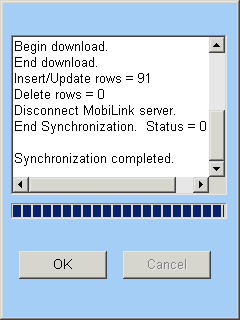
    Shown is the Quick Select screen. At top left is a Tables list box with the customer table highlighted. At right is a Columns list box showing all the columns of the customer table, such as i d, f name, and l name. At the bottom is a scrollable blank display area with rows labeled Column, Sort, Criteria, and Or.

    Then the application runs.

    Shown is the Quick Select screen. At top left is a Tables list box with the customer table highlighted. At right is a Columns list box showing all the columns of the customer table, such as i d, f name, and l name. At the bottom is a scrollable blank display area with rows labeled Column, Sort, Criteria, and Or.

    Since you can run PocketBuilder applications from the design-time environment, it is possible to develop and test applications without a device or emulator.

    Now you test your application.

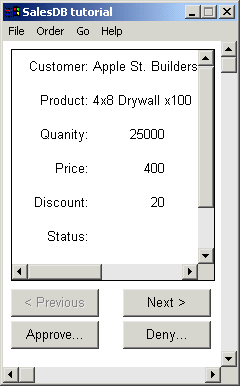
  9. Explore the layout of the application.

    Click the Order menu item and add a new order.
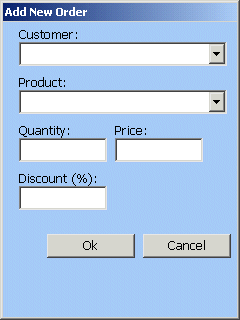
    Shown is the Quick Select screen. At top left is a Tables list box with the customer table highlighted. At right is a Columns list box showing all the columns of the customer table, such as i d, f name, and l name. At the bottom is a scrollable blank display area with rows labeled Column, Sort, Criteria, and Or.

    The application appropriately handles orders that have been modified in the remote database. Every order that has been approved is removed from the remote database when synchronization occurs so that storage space on the device is conserved.

  10. Click the Next, Approve, and Deny buttons.

    Here the Approve button is clicked and the Good Work note is selected.
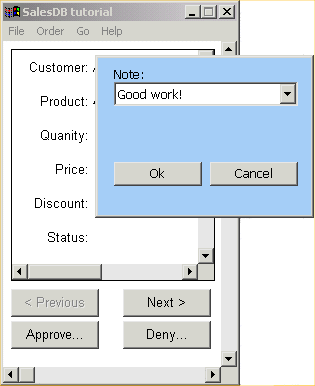
    Shown is the Quick Select screen. At top left is a Tables list box with the customer table highlighted. At right is a Columns list box showing all the columns of the customer table, such as i d, f name, and l name. At the bottom is a scrollable blank display area with rows labeled Column, Sort, Criteria, and Or.
  11. Click the OK button to close the Note.

    Select File>Exit to exit the application and return to PocketBuilder.


Copyright © 2004. Sybase Inc. All rights reserved. Lesson 9: Creating a Sales Application

View this book as PDF