
![]()
Now you create a w_orders window.
Select File -> New.
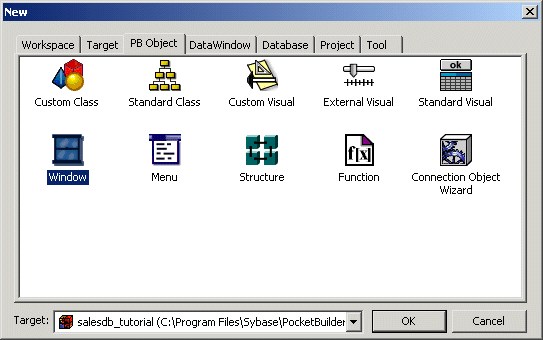
In the PB Object tab, select Window and click OK.

Change the window properties to these values:
Window property |
Value |
|---|---|
Title |
SalesDB tutorial |
MenuName |
m_salesdb |
Show SIP Button |
checked |
Close (OK) |
checked |
HScrollBar |
checked |
VScrollBar |
checked |
Selecting the Show SIP Button property makes the Soft Input Panel in the Pocket PC available to the user. Selecting the Close (OK) property adds an OK icon to the title bar of the window in the Pocket PC; when the user clicks OK, the application closes.
Select File>Save to save the window.
Type w_orders as the name of the window.
Click OK.
Select Insert>Control>DataWindow.
Click the window in the Layout view to insert a DataWindow control in the w_orders window.
Click and drag the borders of the DataWindow object to size it.
Change the DataWindow control properties to these values:
DataWindow control property |
Value |
|---|---|
Name |
dw_orders |
DataObject |
d_orders |
HScrollBar |
checked |
VScrollBar |
checked |
You should now see the static labels inside the DataWindow control.
Select Insert>Control>CommandButton.
Click in the window below the DataWindow control to add the command button.
Name the button cb_prev with command button text < Previous.
Repeat the preceding step with the following settings:
Command button name |
Value |
|---|---|
cb_next |
Next > |
cb_approve |
Approve... |
cb_deny |
Deny... |
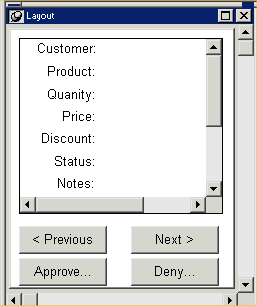
Rearrange the position of the DataWindow control and buttons so the resulting window looks like this:

Next you associate events with the buttons.
Double click the cb_prev button.
Make sure the clicked( ) event displays in the Script view.
Type the following code in the Script view.
f_scroll(-1)
This function scrolls data in the DataWindow back by one row.
In the Script view, select the each of the other command buttons from the first drop-down list and type the code shown below for the clicked event of that command button:
Command button name |
Code |
|---|---|
cb_next |
f_scroll(1) |
cb_approve |
f_approve_deny(APPROVE) |
cb_deny |
f_approve_deny(DENY) |
Select File>Save to save the changes.
Close the Window painter.
Now you must tell the application to open the window when the application starts.
In the System Tree, double-click the salesdb_tutorial application.
In the top drop-down for the Script view, select the open event.
Uncomment the section following the text: Uncomment
the following section after creating w_orders.
(Leave the comments that start with // unchanged.)
![]() Uncommenting code
You can use comments in code to document your scripts or prevent statements
within scripts from executing. In this step and the next few steps,
you uncomment scripts that have been commented to prevent them from
executing. The slash-and-asterisk method of commenting code looks like
this:
Uncommenting code
You can use comments in code to document your scripts or prevent statements
within scripts from executing. In this step and the next few steps,
you uncomment scripts that have been commented to prevent them from
executing. The slash-and-asterisk method of commenting code looks like
this: /* Code */.
You uncomment the code by deleting the /* and
the */ lines that surround the code. You leave
the comments that start
with // unchanged.
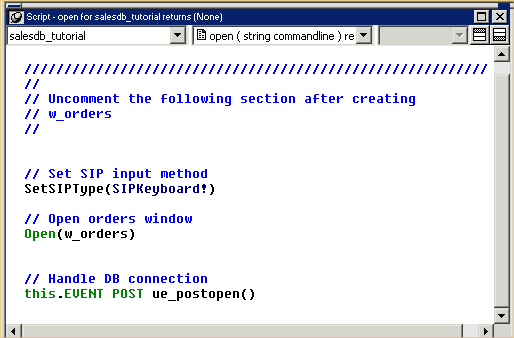
Here is what you should see in the Script view now:

In the top drop-down, select the ue_postopen event.
Uncomment the section following the text: Uncomment
the following section after creating w_orders.
(Leave the comments that start with // unchanged.)
Select File>Save to save the changes.
Close the Application painter.
In the System Tree, double-click the m_salesdb menu.
Expand Order, and double-click the Delete submenu item.
Uncomment the section following the text: Uncomment
the following section after creating w_orders.
(Leave the comments that start with // unchanged.)
Select File>Save to save the changes.
Close the Menu painter.
In the System Tree, double-click the f_scroll function.
Uncomment the section following the text: Uncomment
the following section after creating w_orders.
Select File -> Save to save the changes.
Close the Function painter.
Repeat step 15 for f_scroll_last, f_approve_deny, f_refresh_orders and f_set_dir_btn_enabled.
Take some time to examine the code in the functions that are provided for you.
You will find many embedded SQL calls and MobiLink related operations.
The SalesDB application is ready to be tested.
| Copyright © 2004. Sybase Inc. All rights reserved. |

|
|