![]()
![]()
![]()
![]()
![]()
Now you will create an application, complete with toolbars and menus, and you will create a shortcut for the application. Then you can run it from your desktop, just the way you run InfoMaker or any other application.
The application you create consists of an executable file and an initialization file. The initialization file provides information about the database to the executable file.
For example, InfoMaker itself is an application that has an executable file called im110.exe. This is the file you start running when you start InfoMaker. InfoMaker also has an initialization file called im.ini.
![]() Terms
The executable file is also called an exe file (pronounced exxy).
The initialization file is also called an ini file (pronounced inny).
Terms
The executable file is also called an exe file (pronounced exxy).
The initialization file is also called an ini file (pronounced inny).
If you are continuing from Lesson 7, go to step 2.
Otherwise, go to the Library painter in the H:\ drive with the library named mylib.pbl set to be the current library (File>Select Library).
The Library painter shows the contents of mylib.pbl.

Select Design>Create Executable from the menu bar.
The Create Executable dialog box displays. In this dialog box you specify a title for the application window, a file name for the executable file, the folder for storing the executable file, and an icon for the application.
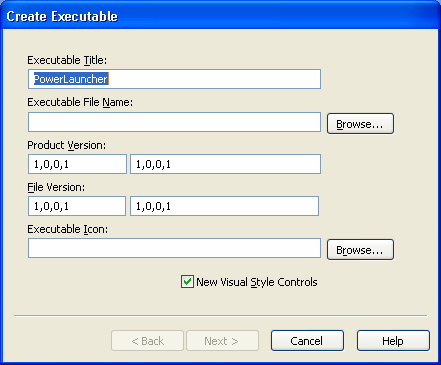
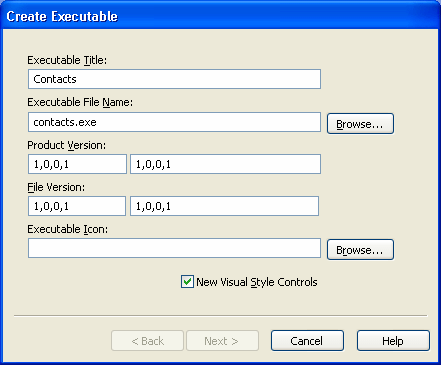
Type Contacts in the Executable Title box.
Later, when you run your application, the title bar displays the word Contacts.
Type contacts.exe in the Executable File Name box.
This assigns a name to your executable file.
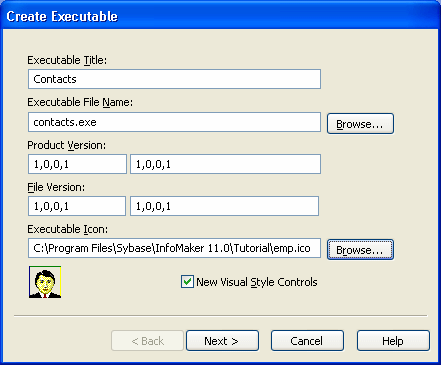
Click the Browse button next to the Executable Icon box to select an icon for your application.
The icon will display in the Windows shortcut. You create a shortcut shortly.
Change to the Tutorial folder (the icon is there).
Click emp.ico.
Click Open to accept the emp.ico file as the icon for your application.
You return to the Create Executable dialog box. The icon and its full name display.
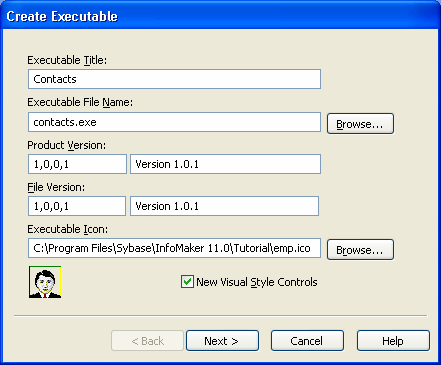
Type Version 1.0.1 in the Product Version and File Version boxes on the right.
Leave 1,0,0,1 in the boxes on the left.
The text you type in the boxes on the right displays on the Version tab page of the Properties dialog box when you look at the properties of the executable file in Windows Explorer. The four numbers separated by commas on the left can be used by installation programs.
Click Next to select items for the application.
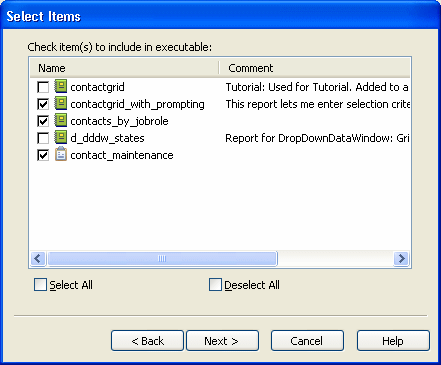
The Select Items dialog box displays. Now you select the form and reports for your application.
Click the check box for contactgrid_with_prompting.
Click the check box for contacts_by_jobrole.
Click the check box for contact_maintenance.
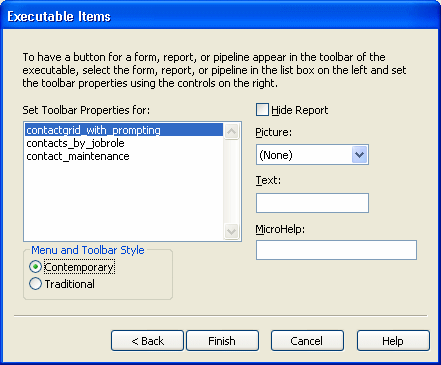
Click Next to define the toolbar items.
The Executable Items dialog box displays. It lists the form and reports to be included in your application. The information you enter in the boxes to the right of the list of items is for the currently selected item.
![]() Traditional and Comtemporary menu styles
In this tutorial, you use the Contemporary menu style. For
information about menu styles, see the InfoMaker User’s
Guide.
Traditional and Comtemporary menu styles
In this tutorial, you use the Contemporary menu style. For
information about menu styles, see the InfoMaker User’s
Guide.
![]() Finish defining all information before you click Finish
Do not click the Finish button or press enter until you have
finished defining information for all the items
you want to include in the application’s toolbar. Once
you click Finish or press enter, InfoMaker generates the executable
file.
Finish defining all information before you click Finish
Do not click the Finish button or press enter until you have
finished defining information for all the items
you want to include in the application’s toolbar. Once
you click Finish or press enter, InfoMaker generates the executable
file.
If you create the executable file before you mean to, select Design>Create Executable again. InfoMaker remembers what you have specified. You can continue where you left off and re-create the executable file.
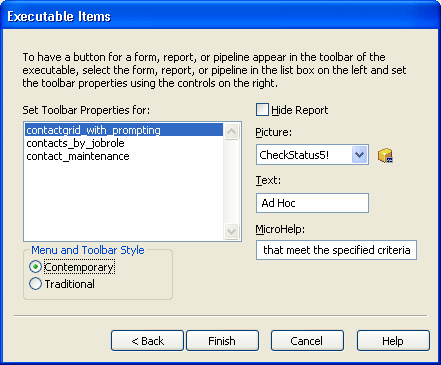
Make sure contactgrid_with_prompting is selected.
In the Picture box, display the list and select CheckStatus5!.
Click the Text box and type Ad Hoc.
Press Tab to go to the MicroHelp box.
Type List contacts that meet the specified criteria.
Select the Contemporary radio button.
The Picture box specifies the picture for the button, which will be in the application’s toolbar.
The Text box provides text for the button and for the menu item that will run contact_maintenance in your application.
The MicroHelp box provides MicroHelp for the button and menu item.
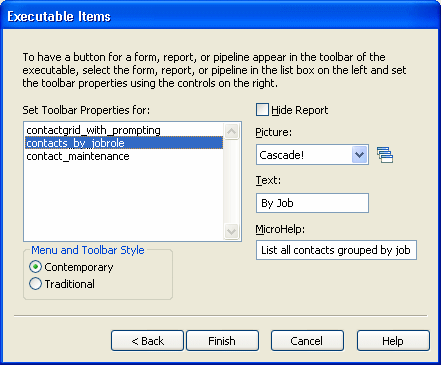
Click contacts_by_jobrole.
In the Picture box, display the list and select Cascade!.
Click the Text box and type By Job.
Press Tab to go to the MicroHelp box.
Type List all contacts grouped by job role.
Select the Contemporary radio button.
Click contact_maintenance.
In the Picture box, select the entry AddWatch5!
Click the Text box and type Data.
Press Tab to move to the MicroHelp box.
Type Maintain contact information in the database.
Select the Contemporary radio button.

Now you have finished providing information for the form and the two reports that are in your application.
Click Finish.
InfoMaker creates the application, which consists of an executable file and an initialization file. These files are in the Tutorial folder.
Now that InfoMaker has finished creating the application, you return to the Library painter.
Before leaving the Library painter, you select tutor_im.pbl as the current library. This is where the samples and the tutorial work are kept.
Select File>Select Library from the menu bar.
Select tutor_im.pbl from the Recent page in the Select File dialog box and click OK.
The current library is tutor_im.pbl again.
Select File>Exit from the menu bar.
InfoMaker closes.
