![]()
![]()
![]()
![]()
![]()
Now you complete the Addproduct.jsp page design by adding button controls to insert a row into the product table of the database and to update the database. You also add a hyperlink to the Product.jsp page.
To complete the page design, you:
So far the Addproduct.jsp page contains a Web DataWindow. Now you add text, link to the database, enable users to add product information to the database, and link to the Product.jsp page where users can view the information they have added.
Right-click on the Addproduct.jsp page and select Page Properties from the pop-up menu.
Select the Enable 4GL Web Server Side Event Model check box and click OK.
The page is now 4GL enabled. This allows you to code server-side events and to bind variables and components to controls on your Web page.
Place the cursor to the left of the DataWindow (in the lower left corner) and press Enter.
Insert the following text in the paragraph above the Web DataWindow:
Click here to add new product information
Under this text you will add a new button which will display a blank row in the DataWindow.
Press Enter after the text.
Select Insert>Form Field>Push Button from the menu bar.
The Button INPUT1 Properties page displays.
Select Button from the Button Type drop-down list box.
Type cb_addproduct in
the Button Name text box.
Type Add New Product Information in
the Label text box.
Click OK to close the Button Properties dialog box.
Select cb_addproduct from the first drop-down list box in the Script editor.
If you click the Add New Product Information button in Page view, the Script editor displays cb_addproduct in the first drop-down list box.
Select ServerAction() from the center drop-down list box.
Type the following script:
psPage.webDW.InsertRow(0);

When the end user clicks the Add New Product Information button on the Web page, the Web DataWindow displays with empty text boxes for user input.
In Page view, place the cursor to the right of the Add New Product Information button and press Enter.
Type the following text:
Add a new product. Enter information into all the text boxes and click Update Database.
Right-click on the Web DataWindow.
Select Sybase Web DataWindow DTC Properties from the drop-down list box.
Click the Control tab and select the Override box next to the Weight panel.
Select all the items in the Weight panel.
The HTML page generated will include JavaScript code that supports all the client-side features selected.
Select the Override check box for Rows Per Page field.
Type 1 in the Rows
Per Page box.

This limits the amount of product information displayed to one record.
Click the Retrieval tab, clear the Automatic Retrieval option, and click OK.
Click the Save button in the PainterBar.
After you add product information, you must update the database, so now you add a button for updating the database.
Place the cursor in the paragraph at the bottom right of the Web DataWindow and press Enter.
Select Insert>Form Field>Push Button from the menu bar.
The Button Properties page displays.
Select Button from the Button Type drop-down list box.
Type cb_update in
the Button Name text box.
Type Update Database in
the Label text box.
Click OK to close the Button INPUT2 Properties dialog box.
Select cb_update in the first drop-down list box of the Script editor.
Select ServerAction() from the center drop-down list box.
In the Script editor window, type:
psPage.webDW.Update();

Pressing the Update Database button from the Web page adds the information entered by the end user to the database.
You now add a link to the Addproduct.jsp page so that a user can view product information that was updated.
In Page view, place the cursor to the right of the Update Database button and press Enter.
Select Format>Hyperlink.
Type Product Information in
the Text of the Hyperlink text box.
Click the browse (...) button next to the Destination text box.
The window opens to display the target list of Web pages already created.
Select the Product Information page (Product.jsp).
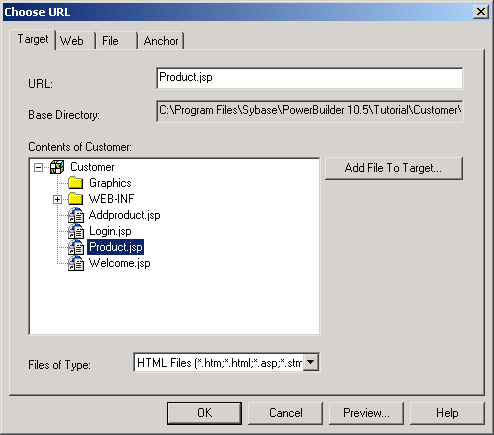
Click OK twice to add the hyperlink to the Web page.
Product Information appears on the Addproduct.jsp page as an underlined hyperlink.
Select File>Save from the menu bar.
