![]()
Before an application can be deployed, a project is needed to specify how the application is deployed.
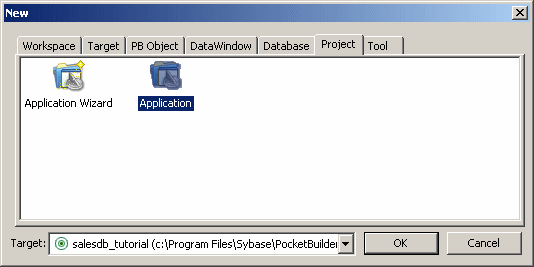
Select File>New.
In the Project tab, select Application and click OK.

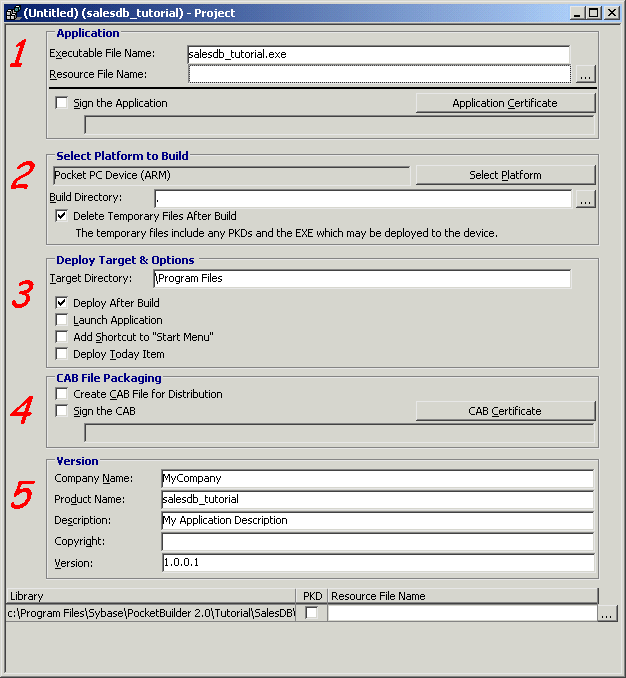
The Project painter displays. The default executable file name is salesdb_tutorial.exe.

Pocket PC Device (ARM) is the platform for deployment to an ARM device. Use the default \Program Files location for deployment to the device. For your own applications, you might want to deploy to an application-specific directory that you create.
Select the Add Shortcut to “Start Menu” check box to add a Start menu item for the deployed application on the device.
Select File>Save to save the project.
Type p_salesdb_tutorial for the project name and click OK.
Before you can deploy SalesDB to a device or emulator, you must deploy the the local copy of the remote database and the DSN file to the Pocket PC or emulator. You do that next.
Now you copy the remote database and log file to the Pocket PC. You copy the log file because synchronization subscriptions were added to the remote database during the initialization phase. Synchronization subscriptions can also be added during the first execution of the application. When adding the subscriptions at runtime, you need to deploy only the database file to the device, not the log file.
On your desktop machine, use a text editor to open SalesDB_remote.dsn in the \Tutorial\SalesDB directory.
This is the name of the DSN file that you scripted for the f_conn function.
Make sure that the paths for the database file and the start line (set to the default location) are correct for your Pocket PC device.
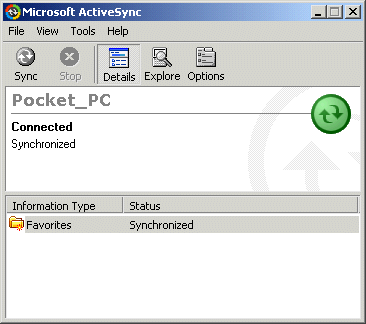
Open ActiveSync while a connection to the device is established.
On Windows Vista, you use the Windows Mobile Device Center instead of ActiveSync.

Click Explore in the ActiveSync toolbar.
Double-click My Pocket PC (or My Device).
My Pocket PC is the root directory on the Pocket PC device.
Open another Windows Explorer window.
Copy SalesDB_remote.DSN from your PocketBuilder 2.5 Tutorial\SalesDB directory to the root directory on your Pocket PC device (My Pocket PC or My Device).
You can drag and drop files from the desktop to the Pocket PC in the same way that you drag and drop files from one directory to another on the Windows desktop.
In the Explorer window for your device, go to the \Program Files\SQLAny10 directory.
This is the default directory for SQL Anywhere 10 on a Pocket PC. If you installed SQL Anywhere in a different directory, be sure to use that directory instead.
Locate the \Tutorial\SalesDB\db\fresh directory on your desktop.
Copy SalesDB_remote.db and SalesDB_remote.log to the SQL Anywhere 10 directory on your device.
Now you can build the application and deploy it to a device or emulator by running the project object you created in “Create a project” of this lesson. However, because the registry location for SQL Anywhere 10 is not the same as the registry location on the device, you must first examine the registry path that you generated with the MobiLink Synchronization for ASA wizard.
In the PocketBuilder System Tree, double-click the nvo_salesdb_tutorial_sync user object that you generated with the MobiLink Synchronization for ASA wizard.
The User Object painter opens.
Click the Function List tab in the main stack view of the User Object painter.
Double-click “determine_asa_regpath () returns integer” in the functions list.
The script for determining the SQL Anywhere registry path displays. Script constants display the registry path for the 8, 9, and 10 versions of the database server. For SQL Anywhere 10, the registry path on the device is different than the registry path on the desktop, which is why there are two separate constants for SQL Anywhere 10 registry paths.
In the MobiLink Synchronization for ASA wizard, you selected 10 as the server version. You can verify this by selecting the Declare Instance Variables tab and examining the value of the is_mlserverversion variable.
Close the User Object painter.
Double-click the p_salesdb_tutorial project object in the System Tree.
The Project painter opens.
Select Run>Build and Deploy Workspace or click the Deploy button on the PainterBar.
The project is built and deployed and the application is copied to the device’s \Program Files directory.
Next you run the application on the Pocket PC device.