Record the value for each dialog item in the following table.
Dialog item |
Data type/length |
Notes |
Value |
|---|---|---|---|
Host name |
CHAR 30 |
Name of the machine where the database engine will run. |
|
Server name |
CHAR 30 |
Server name for the write server. (The server name must be unique across the local area network.) |
|
Raw device local path(s) on UNIX |
CHAR 2048 |
Full path/ directory specification. |
|
Raw device name(s) on Windows |
Varies |
PhysicalDrivenn (unpartitioned device) or assigned letter (partitioned device) See “Specifying an IQ PATH” for details. |
|
Database path |
CHAR 1024 |
Create the database files on a local disk, not a remote location. The Create Database wizard asks for the path to the .DB file. Users cannot specify where the server will be started. |
|
Database name |
CHAR 30 |
Database name |
|
Temporary Store name |
CHAR 30 |
By default, IQ adds the file type .IQTMP. Do not place database files on network drives. |
Refer to this information when you create servers and databases.
For a multiplex database, create a database that has a raw device for the IQ Store. Chapter 4, “Managing Databases” in Introduction to Sybase IQ explains how to create IQ databases.
To enable your database for multiplex capability, add query servers, as described in the following section.
Once you create a database, you can create tables and indexes, which are stored in the IQ Store. For details, see “Creating tables”and “Creating indexes”. You can also create procedures and views, which are stored in the system tables. For syntax, see the Sybase IQ Reference Manual.
To set up data sources for your servers, see Sybase IQ Installation and Configuration Guide. You may also add dbspaces to servers as needed. For details, see “Adding dbspaces”.
Sybase IQ servers and databases are created with latent multiplex capability.
![]() Sybase IQ does not support heterogeneous multiplexes
(UNIX and Windows servers in a mixed multiplex). Write and query
servers must be on the same hardware platform.
Sybase IQ does not support heterogeneous multiplexes
(UNIX and Windows servers in a mixed multiplex). Write and query
servers must be on the same hardware platform.
To activate multiplex capability, simply add one or more query servers to an IQ server.
Start Sybase Central using the method appropriate for your platform.
Connect to a Sybase IQ server.
Open the database and double-click Multiplex.
Choose File > New > Query Server (Alt+F, N, Q).
The first time you add a query server, Sybase Central verifies the server name and the port number for the write server. Usually, you will want to keep the same name and port number that the server is already using. Sybase Central will verify that the Agent is running on the write server’s host.
The server to which you are currently connected becomes the write server for the multiplex by default when you create a query server.
If you wish to use another server for the write server, change the Write Server Name and Port Number now by highlighting and typing over them on the Specify Server Options screen.
The administrative shell scripts are provided as a convenient way to start and stop the IQ server and start the SQL Remote process from the shell. For more information, see “Using administrative shell scripts”.
To create or update the default administrative shell scripts, click the checkbox.
Click Next.
On the Set Connection Parameters screen, the Query Server Name defaults to writeservernameNN, where NN is the number of servers already configured plus one.
To change the Server Name, select and type over it.
Select the host on which the query server will run.
The Port Number defaults to the port number of the current connection plus 1. If desired, type over this number to change it.
Click Next.
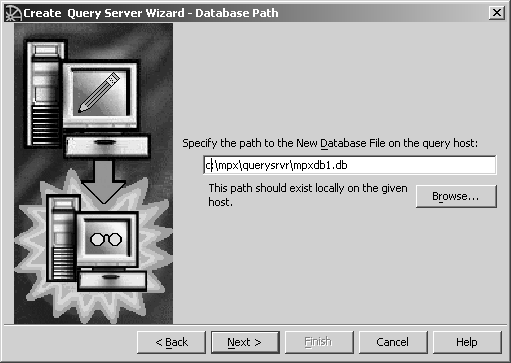
To change the default, type the path to the database file, or use the Browse button below the text box to select a new path. Note that Browse is only enabled if the host specified in the previous screen is the local host. The Browse button can locate either a directory or a file.

![]() Open Client applications connect to IQ servers via unique
labels that map to the database name. In typical multiplex installations,
this can be an issue, because the database name is the same for
all servers in the multiplex. This window allows you to give the
data base a unique name for each query server. These unique names
may then be used to define explicit connection entries in the interface
file.
Open Client applications connect to IQ servers via unique
labels that map to the database name. In typical multiplex installations,
this can be an issue, because the database name is the same for
all servers in the multiplex. This window allows you to give the
data base a unique name for each query server. These unique names
may then be used to define explicit connection entries in the interface
file.
Click Next.
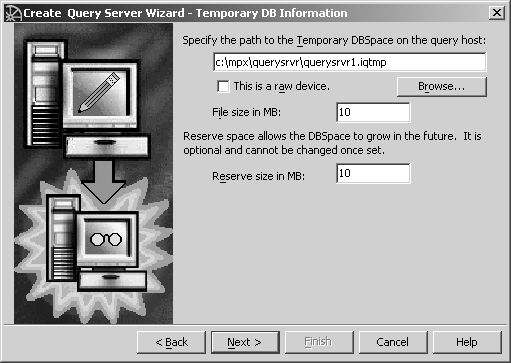
Accept the default for the Temporary Store Path, or select the name and type over it if incorrect.
On Windows, do not supply the “\\.\” in the device name for a raw disk or partition.
On UNIX, each platform has its own format for raw device names. Check the operating system documentation for the correct format or use symbolic links to the raw partitions.

Click the checkbox if the Temporary Store is on a raw device. If it is not, an additional text box displays where you must specify the size of the Temporary Store in MB or accept the default of 10MB.
If you specify a file name without the full path, Sybase Central creates the Temporary Store under the same directory as the catalog store (.DB file).
Specify the optional Reserve Size in MB.
Click Next. Note that the Browse button is only enabled for the local host.
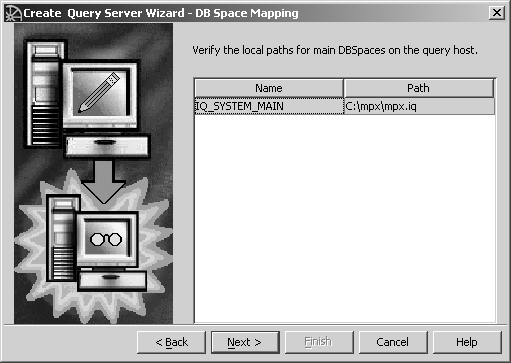
On the DB Space Mapping screen, check that the paths and names listed for the main dbspaces are correct as seen by the new query server’s host. The main dbspaces must be available to each server in the multiplex. If one is incorrect, select the path and type over it. The paths and names default to the values at the write server.

![]() You may find it convenient to arrange drive letter assignments
(on Windows systems) or symbolic links (on UNIX systems) to match
paths and names across the hosts in the multiplex.
You may find it convenient to arrange drive letter assignments
(on Windows systems) or symbolic links (on UNIX systems) to match
paths and names across the hosts in the multiplex.
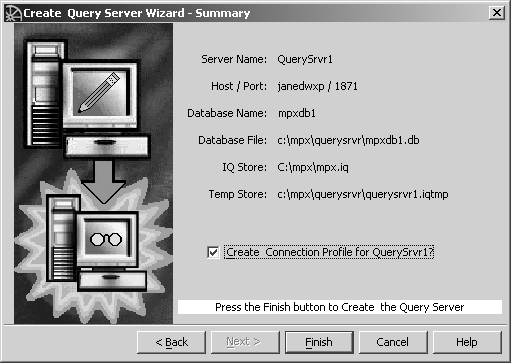
The creation parameters for your query server display. Check the Create Connection Profile option to save the parameters in a file to simplify future connections.

Click Finish to create the query server, or Back to return to a previous screen and change information. A status box at the bottom of the screen shows the progress of create operations.
![]() When the server is on the same host as the Sybase Central
system, and this host is a Windows machine, starting, stopping,
and synchronizing servers displays one or more DOS command windows
on the affected machines. The DOS command window always displays
on the Windows machine where the IQ Agent is performing certain
actions. For example, you may see a window titled DBSPAWN.EXE when
a new server is spawned in the background. The appearance and disappearance
of these windows is normal and requires no action.
When the server is on the same host as the Sybase Central
system, and this host is a Windows machine, starting, stopping,
and synchronizing servers displays one or more DOS command windows
on the affected machines. The DOS command window always displays
on the Windows machine where the IQ Agent is performing certain
actions. For example, you may see a window titled DBSPAWN.EXE when
a new server is spawned in the background. The appearance and disappearance
of these windows is normal and requires no action.
Multiplex creation installs several directories and files.
Folder, Directory, or Filename |
Purpose |
|---|---|
repDirs |
Directory for dbremote message passing. Do not put any files in this directory or remove subdirectories underneath. It contains a logfiles subdirectory for output messages from dbremote, and a subdirectory for each server in the multiplex. |
dbname.db |
File that contains the IQ Catalog Store |
dbname.iqmsg |
File that contains messages from Sybase IQ |
dbname.iqtmp |
File that contains the IQ Temporary Store. (The creator of the database may have placed this file in another location.) |
dbname.log |
File that contains the database transaction log. |
params.cfg |
Contains startup parameters for this particular server. May be customized for performance or specific requirements. |
If you generated administrative scripts, they are created in the database directory. For more information, see “Using administrative shell scripts”.
The query server’s database directory is similar, but does not contain a repDirs directory.
Adding the first query server enables the database for multiplex. The multiplex folder now contains a list of servers in the multiplex. Opening the folder displays the details shown in Table 5-6.
Column |
Description |
|---|---|
Name |
Server name |
Role |
Write or Query server |
Sync State |
Writer, Query, Not Running (Query servers only), Synchronized or not synchronized (Query servers only) |
SQL Remote |
Active or Inactive |
As Of |
When the displayed information was last updated. For example: “8/5/04 7:01:18 PM” |
You can use this display to identify which servers need to be synchronized. Icons beside the server name echo each server’s Sync State, as shown in Table 5-7.
Icon |
Run status |
Synchronization status |
|---|---|---|
Green light (Top light) |
Running |
Synchronized |
Yellow light (Middle light — Query server only) |
Running |
Unsynchronized |
Red light (Bottom light) |
Not running |
Not Running |
Status displays are not instantaneous and depend on network latency. To refresh the status display, select View > Refresh Folder from the main menu bar.