When you create a database, it has only one file for storing permanent IQ data, one file for storing Catalog data, and one file each for the IQ message log and the Temporary Store. Each of these files is a dbspace, as described in “Creating a database with SQL”. Initially, the definitions of all IQ database objects go into the SYSTEM dbspace (the Catalog Store), and all IQ data is placed in the IQ_SYSTEM_MAIN dbspace (the IQ Store).
Each dbspace has a maximum size of 4096GB (4TB) on raw devices. The maximum size for operating system files varies by platform; see Chapter 8, “Physical Limitations” in the Sybase IQ Reference Manual for details. On some platforms you must enable large file system files to reach the maximum size.
The catalog file size maximum for all platforms is 1TB, except for Windows systems with FAT 32 file systems, which have a 4GB limit. Windows systems with NTFS support the 1TB maximum.
You can only specify SIZE and RESERVE for the IQ Store and IQ Temporary Store, not for the Catalog Store.
In the large databases typical of a data warehouse, you will need to add dbspaces to any database. You create a new database file—a dbspace—using the CREATE DBSPACE statement, or the Sybase Central Add Dbspace Wizard. If you are using multiplex functionality, you must use the Add Dbspace Wizard. A new dbspace can be on the same or a different disk drive as the existing dbspaces. You must have DBA authority to create new dbspaces.
When you create a new dbspace, it contains no user data. When you create tables and indexes and load them, Sybase IQ distributes the data as equally as possible among any existing dbspaces that are not already full. This technique optimizes performance.
Because Sybase IQ fills dbspaces in this way, you cannot specify that a particular IQ table be loaded into a particular dbspace. You can only indicate the IQ Store as the dbspace IQ_SYSTEM_MAIN, and the Temporary Store as the dbspace IQ_SYSTEM_TEMP. The only way to control the location of a table within the IQ Store is to make all other dbspaces readonly (using the ALTER DBSPACE command) while loading.
![]() This behavior differs from that of Adaptive Server Anywhere,
which allows you to place tables in a particular dbspace.
This behavior differs from that of Adaptive Server Anywhere,
which allows you to place tables in a particular dbspace.
The maximum number of dbspaces, or files, per database, is an operating system limit that you can adjust; the maximum is 2,047 dbspaces per IQ database, plus a maximum of 12 dbspaces for the Catalog Store. However, you should never allow a situation where you come close to the maximum. Increasing the number of dbspaces has no real impact on memory use or performance.
![]() On HP and AIX platforms, your use of overlapped I/O
improves when you divide data among more dbspaces.
On HP and AIX platforms, your use of overlapped I/O
improves when you divide data among more dbspaces.
When data is stored on raw partitions, you can have one dbspace per drive.
When data is stored in a file system, you can take advantage of striping in the storage system. If you use operating system or hardware striping on a multiuser system, your stripe size should be a minimum of 1MB, or the highest size possible. In any case, your stripe size should be several times your IQ page size. IQ can also be configured to perform software striping.
For more information on disk striping and use of multiple dbspaces, see “Balancing I/O” in Sybase IQ Performance and Tuning Guide.
Before adding any more dbspaces you may want to estimate your space requirements. See “Estimating space and dbspaces required” for details of how to estimate space. For the most efficient resource use, make your dbspaces small enough to fit on your backup media, and large enough to fill up the disk.
The following command creates a new dbspace called library in the file library.iq in the same directory as the IQ_SYSTEM_MAIN dbspace:
CREATE DBSPACE library
AS 'library.iq'
![]() Creating a dbspace in Sybase Central
Creating a dbspace in Sybase Central
The following steps describe how to add a dbspace to a non-multiplex database. To add a dbspace to a multiplex, skip to the next procedure.
Connect to the database.
Click the Dbspaces folder for that database.
From the menu bar, choose File > New > DBSpace.
Enter the dbspace name.
Click the type of data to be stored in this Dbspace: Main IQ Store, Temporary IQ Store or Catalog Store.
Click Next.
Enter the file path and, optionally, the size of the dbspace.
Enter the amount of space to reserve, if you expect to resize the partition at a later time.
Click Finish to create the dbspace.
![]() Adding a main dbspace
to a multiplex
Adding a main dbspace
to a multiplex
Before you add a main dbspace, make sure that the write server is running. It is highly recommended that all servers be running whenever you add dbspaces so that all paths to the new dbspace can be checked.
Connect Sybase Central to the multiplex write server.
Open the DBSpaces folder.
Choose File > New > DBSpace (or Alt+F, N, D), and run the Create DBSpace wizard.
On the Name and Store screen, type the name of the dbspace in the text box.
The dbspace name, an internal name for the dbspace, must be unique in a database. Dbspace names are case sensitive for databases created with CASE RESPECT. (To view the CaseSensitive setting, right-click the database, choose Properties, and view the Extended Information tab.)
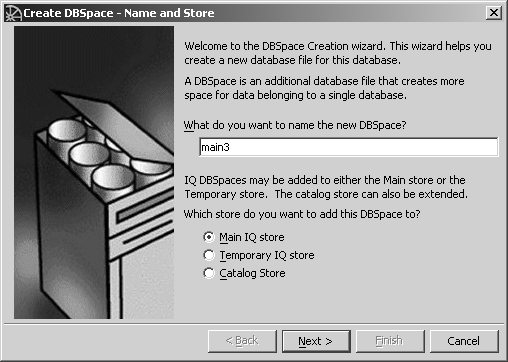
On a write server, the DBSpace wizard creates a dbspace in the IQ Store (Alt+M) by default. If you prefer the IQ Temporary Store, click the Temporary IQ Store option (Alt+T).
Click Alt+N to continue or Cancel to quit.
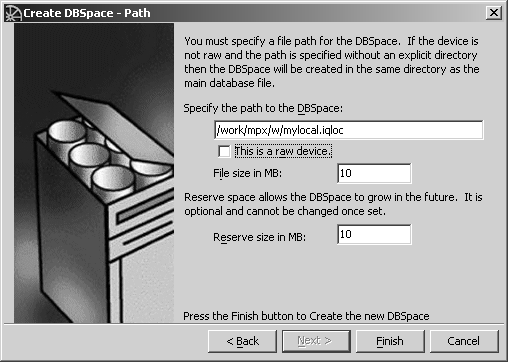
On the Path screen, type the dbspace path in the text box (Alt+D). If the device is not raw and the path is specified without an explicit directory, then IQ creates the dbspace in the same directory as the main database file. Be sure to specify the filename suffix .iq for an IQ Store.
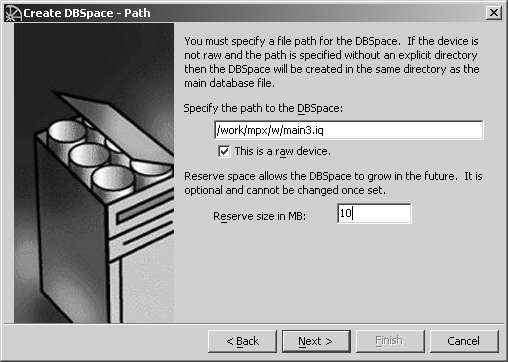
The raw device option is selected by default (Alt+a). Tab or click Alt+e and type the size in MB of reserve space to allow for future growth. Reserve space is optional and cannot be changed once set.
If your dbspace is a file, deselect the raw device option (Alt+a). Type the file size value (number of MB) in the text box (Alt+i), or accept the 10MB default and tab (or Alt+e) to the Reserve size box.
For an IQ Store, you now need to define the path for the new dbspace on each query server. Sybase Central adds the necessary system table entries to make the new main dbspaces visible to all query servers. Sybase Central displays the DB Space Mapping screen with a path for each server. Edit them as needed so that each server uses the correct filename to access the new IQ Store.
On Windows, do not supply the “\\.\” in the device name for a raw disk or partition. Ensure that the drive letters or Physical Drive numbers you provide refer to the same raw partition or disk in the shared disk array.
On UNIX, each platform has its own format for raw device names. Check the operating system documentation for the correct format or use symbolic links to the raw partitions.
If device names are different on different nodes and the nodes are UNIX systems, you may use symbolic links to the differing raw devices. These symbolic link names can then be used as pathnames for the dbspaces on the various servers.
For example, if a UNIX write server has a shared raw device /dev/rdsk/c0t3d0s1which the query server sees as device /dev/rdsk/c1t3d0s1, you may optionally create a symbolic link when adding this to the main IQ Store on the write server:
ln -s /dev/rdsk/c0t3d0s1
/wserver_home/main02
Add a corresponding symbolic link for the query server:
ln -s /dev/rdsk/c1t3d0s1 /qserver_home/main02
This will allow both servers to see the new dbspace using the relative filename main02. Use this as the filename for adding the dbspace to the write server, and leave the optional size field blank since IQ will deduce the proper size for a raw device. The query server can use the same relative filename, main02.
See Sybase IQ Troubleshooting and Error Messages Guide for information on correcting dbspace count mismatches between write and query servers.
Click Finish (Alt+F) to create the dbspace.
![]() Adding a temporary or
local dbspace to a multiplex
Adding a temporary or
local dbspace to a multiplex
You may add one or more temporary and/or dbspaces to multiplex servers as needed.
Connect Sybase Central to a write or query server. (To add a local dbspace, you must connect to a query server.) The write server must be running and available.
Choose File > New > DBSpace (or Alt+F, N, D) or click the Add New DB Space button on the Dbspaces tab. Type the dbspace name and click Next.
You should add temporary dbspaces while the database is running in multiplex mode and the write server is running. Dbspace names and file names must be unique across the multiplex, so you may wish to encode the server name into the dbspace and file names you choose for the temporary dbspaces.
On a query server, the wizard creates a dbspace in the IQ Temporary Store by default. To create it in a IQ Local Store, click that option (Alt+L).
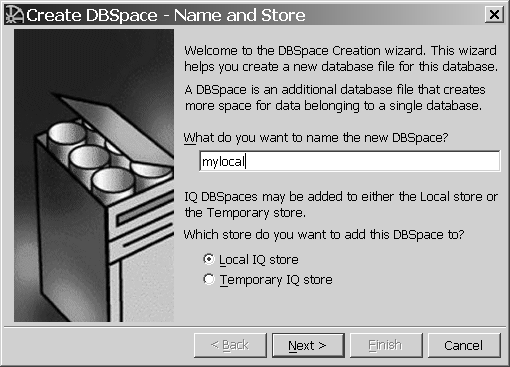
Click Next to accept the default, “Store IQ temporary data.”
Enter the amount of space to reserve, if you expect to resize the partition at a later time.
Type the path of the dbspace. Be sure to specify the file extension .iqtmp for IQ Temporary Store, or .iqloc for an IQ Local Store.
On the Path screen, type the dbspace path in the text box (Alt+D). If the device is not raw and the path is specified without an explicit directory, then IQ creates the dbspace in the same directory as the main database file. Specify the file extension .iqtmp for IQ Temporary Store. An IQ Local Store may have any file extension.
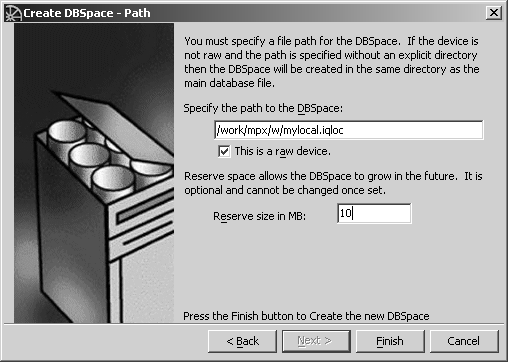
The raw device option is selected by default (Alt+a). Tab or click Alt+e and type the size in MB of reserve space to allow for future growth. Reserve space is optional and cannot be changed once set.
If your dbspace is a file, deselect the raw device option (Alt+a). Type the file size value (number of MB) in the text box (Alt+i), or accept the 10MB default and tab (or Alt+e) to the Reserve size box.
After you add or drop a dbspace, it's a good idea to issue a CHECKPOINT. In the event system recovery is needed, it begins after the most recent checkpoint.