

The tutorial shows you how to use the Composite Application Builder to create a composite application comprised of three new applications, and the Most Actives application you created in Chapter 6, “Creating a Multipage Mobile Charting Application.”
![]() Creating and approving
the MostActives application
Creating and approving
the MostActives application
From Mobile Web Studio, select Applications in the Build menu in the left pane, select New under Application Manager, and click the New button to launch Application Builder.
In Application Builder, click Add to launch the New Web Element window.
In Location, enter the following URL, and click Find:
http://finance.yahoo.com/actives?e=o
Click Next in the top right portion of the New Web Element window.
Perform a one-click capture by moving your mouse over the six-column Volume Leaders table under U.S. Most Actives table, and clicking the mouse once (a flag follows your cursor with abbreviated instructions).
![]() The Web site changes periodically. If you do not see
the six-column table with data, close the window and repeat the
previous steps until you do, otherwise the tutorial will not work.
The Web site changes periodically. If you do not see
the six-column table with data, close the window and repeat the
previous steps until you do, otherwise the tutorial will not work.
You see a preview page where you select how much content to display.
Click the Select button next to the six-column data grid, (you can use the scroll bar to scroll through the various options).
Figure 8-1: Selecting the most active stocks grid
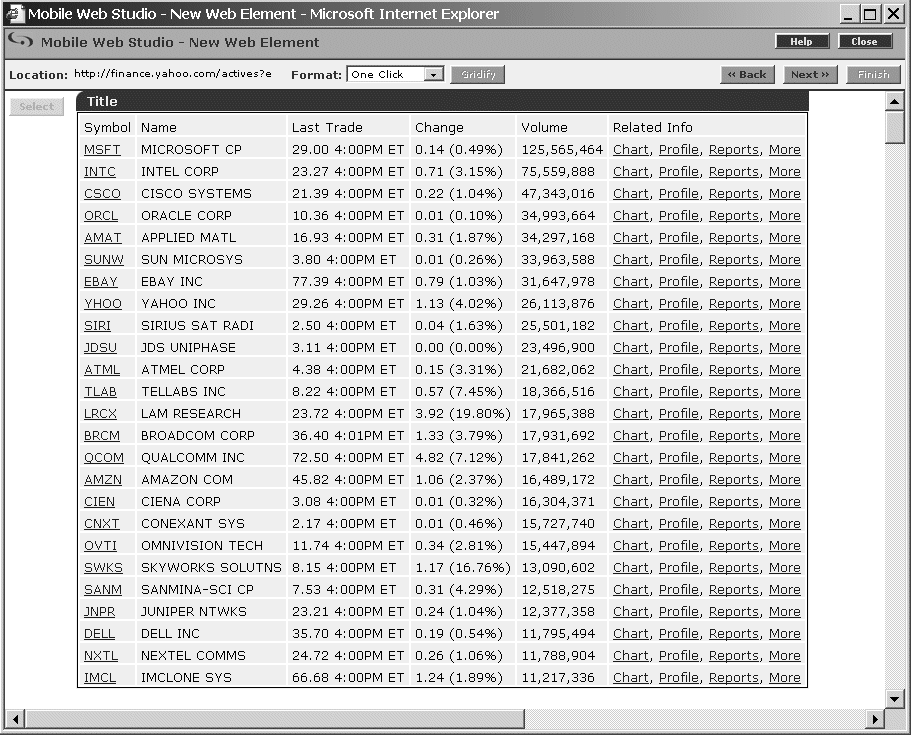
![]() If you do not see the six-column data grid, close the
window and repeat the process until you do, otherwise the tutorial
will not work.
If you do not see the six-column data grid, close the
window and repeat the process until you do, otherwise the tutorial
will not work.
Click Next. The Split window displays.
On the Split window, notice that Column 3 includes several values—volume, time, and time zone. Split Column 3 into separate columns to accommodate each value:
In the left-most drop-down list, select “Column No.”
In the text box, enter 3 to
indicate the third column.
In the second drop-down list, select “Space.”
Click Add. In Preview, the third column has split into three columns.
Click Next to continue.
On the Define window, select the “Records contain labels” check box. The “Labels are displayed in Record” option displays.
Accept the default value 1,
and click Next to continue. The Filter window displays.
Use the Filter window to identify the columns you want to include in the application.
In the left-most drop-down list, select the “Include field(s).”
In the second drop-down list, select “number” from the “number/label” list.
In the text box, enter 1,3,7 to
indicate columns 1, 3, and 7 (Symbol, Last, and Volume) should be
included.
Click Add. In Preview, the fields you selected are highlighted, and a new rule is added under Current Filter Rules.
Click Next. The parameter definition window displays with the parameter used to capture the table.
Check the Variable check box to the left of “e.” This exposes the parameters for the variable.
Default Value – enter o#Nasdaq,nq#NYSE,aq#AMEX (no
spaces) to create a drop-down list with three options.
Type – choose “Select” from the drop-down list. An Add button displays, which you can ignore.
Click Next. The Window Preview window displays the modified table and a drop-down list. The links and drop-down list are not active.
In Element Name, enter MostActives (no
space) as the name for this Web element, and click Next. The Continuous
Capture window displays.
On the Continuous Capture window, click Finish. The New Web Element window closes.
On the Application Builder window, the MostActives element appears under Element List. In the detail pane, the application displays. The links are not yet active, but the drop-down list includes the three options.
Click Save to create the application.
On the Finish window, make these entries (accept the defaults for all others):
Click Finish to save the application, and click OK in the Application Saved Successfully window.
Click Close in the upper-right corner to close the Application Builder window.
From the Mobile Web Studio main window, select New from the Application Builder Status menu. The MostActives application displays in the detail pane.
Right-click the MostActives (no space) application and select Approval Status | Approved.
Click OK.
Select Approved under Application Manager Status and verify the MostActives application displays.
![]() Creating and approving
the Markets application
Creating and approving
the Markets application
In this step, create a market overview application.
From Mobile Web Studio, select Applications in the Build menu in the left pane, select New under the Application Manager Status menu, and click the New button in the Application Manager toolbar. The Application Builder window displays.
In Application Builder, click Add to launch the New Web Element window.
In Location, enter the following URL, and click Find or press Enter:
http://money.cnn.com/markets/us_markets.html
Click Next in the top right portion of the New Web Element window.
Perform a one-click capture by moving your mouse over the U.S. Stock Markets table and clicking the mouse once (a flag follows your cursor with abbreviated instructions).
You see a preview page where you select how much content to display.
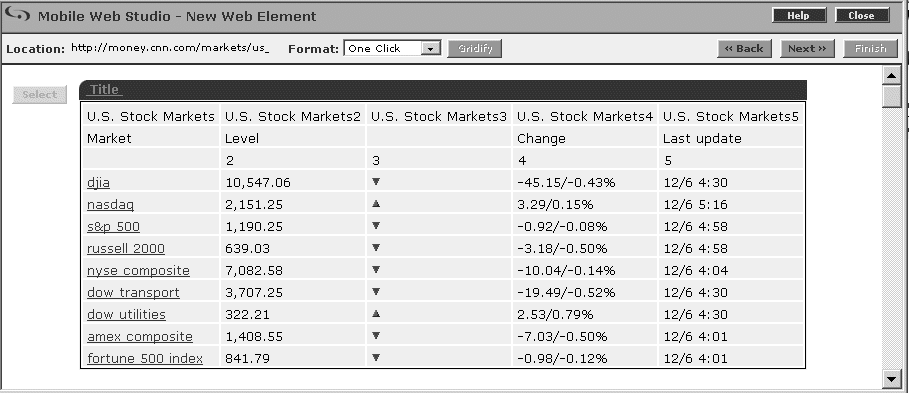
Click the Select button next to the data grid with the arrows in Column 3 (you can use the scroll bar to scroll through the various options), and click the Next button. The Split window displays.
Figure 8-2: Selecting the market grid
On the Split window, click Next to continue.
On the Define window, select the “Records contain labels” check box. The “Labels are displayed in Record” option displays.
Enter 2, and click Next
to continue. The Filter window displays. Record 2 is highlighted.
Use the Filter window to identify what to include in the application.
Identify the fields to include:
In the left-most drop-down list, select the “Include field(s).”
Select “number” from the “number/label” drop-down list.
In the text box, enter 1,2,4 to
indicate columns 1, 2, and 4 should be included.
Click Add. In Preview, the records you selected are highlighted in blue (Market, Level, and Change), and a new rule is added under Current Filter Rules.
Identify the records to exclude:
In the left-most drop-down list, select the “Exclude record(s).”
Select “number” from the “number/label” drop-down list.
In the text box, enter 1 to
indicate record 1 should be excluded.
Click Add. In Preview, the first record is no longer highlighted, and a new rule is added under Current Filter Rules.
Click Next. The Window Preview window displays the modified table.
In Element Name, enter Markets as
the name for this Web element, and click Next. The Continuous Capture
window displays.
Click Finish. The New Web Element window closes and Markets appears under
Element List.
Click Save to create the application.
On the Finish window, make this entry (otherwise accept the defaults):
Content tab In Name, enter Markets.
Window Preview At the bottom of the Finish window, you can see a preview of your application. The links do not work.
Click Finish to save the application, and click OK in the Application Saved Successfully window.
Click Close in the upper-right corner to close the Application Builder window.
From the Mobile Web Studio main window, select New from the Application Builder Status menu. The Markets application displays in the detail pane.
Right-click the Markets application and select Approval Status | Approved.
Click OK.
Select Approved under Application Manager Status and verify the Markets application displays.
![]() Creating and approving
the Energy application
Creating and approving
the Energy application
In this step, create an energy overview application
From Mobile Web Studio, select Applications in the Build menu in the left pane, select New under the Application Manager Status menu, and click the New button in the Application Manager toolbar. The Application Builder window displays.
In Application Builder, click Add to launch the New Web Element window.
In Location, enter the following URL, and click Find:
http://money.cnn.com/markets/commodities.html
When the window redisplays, click Next in the top right portion of the New Web Element window.
Perform a one-click capture by moving your mouse over the Energy table and clicking the mouse once (a flag follows your cursor with abbreviated instructions).
You see a preview page where you select how much content to display.
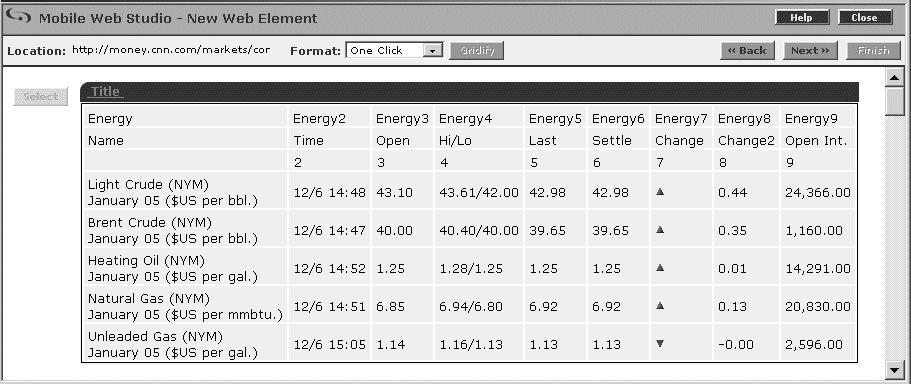
Click the Select button next to the data grid with data in ENERGY, ENERGY3, ENERGY5, ENERGY7, ENERGY9, and so on (you can use the horizontal scroll bar to view wide tables, and the vertical scroll bar to scroll through the various presentation options).
Figure 8-3: Selecting the energy grid
Click the Next button. The Split window displays.
On the Split window, split the first column, using the open parenthesis as the delimiter. Make sure the grid displays in Preview, and make these entries:
Under Add Split Rule, in the left-most drop-down list, select “Column No.”
In the text box, enter 1 to
indicate the first column (Energy).
In the second drop-down list, select “Other.”
In the text box, enter an open parentheses: (
Click Add. After a moment, the first column is split into two columns (one for the commodity and one for the date), and the new rule displays.
Click Next to continue.
On the Define window, select the “Records contain labels” check box. The “Labels are displayed in Record” option displays.
Enter 2 to use the labels
in Record 2, and click Next to continue. The Filter window displays.
Use the Filter window to identify the columns you want to include in the application.
Under Add Filter Rule, identify the fields to include:
In the left-most drop-down list, select the “Include field(s).”
In the second drop-down list, select “number” from the “number/label” list.
In the text box, enter 1,5,6,8 to
indicate columns 1, 5, 6, and 8 should be included.
Click Add. In Preview, the records you selected are highlighted in blue (Name, Open, Hi/Lo, and Settle), and a new rule is added under Current Filter Rules.
Identify the records to exclude:
In the left-most drop-down list, select the “Exclude record(s).”
In the second drop-down list, select “number” from the “number/where” list.
In the text box, enter 1,3 to
indicate records 1 and 3 should be excluded.
Click Add. In Preview, the records you selected are no longer highlighted, and a new rule is added under Current Filter Rules.
Click Next. The Window Preview window displays the modified table.
In Element Name, enter Energy Futures as
the name for this Web element, and click Next. The Continuous Capture
window displays.
Click Finish. The New Web Element window closes.
On the Application Builder window, the Energy Futures element appears under Element List.
Click Save to create the application.
On the Finish window, make this entry (accept the defaults for all others):
Content tab In Name, enter Energy.
Window Preview At the bottom of the Finish window, you can see a preview of your application.
Click Finish to save the application, and click OK in the Application Saved Successfully window.
Click Close in the upper-right corner to close the Application Builder window.
On the Mobile Web Studio main window, select New from the Application Builder Status menu. The Energy application displays in the detail pane.
Right-click the Energy application and select Approval Status | Approved.
Click OK.
Click Approved under Application Manager Status and verify the Energy application displays.
![]() Creating the composite application
Creating the composite application
In this step, place the MostActives (no space), Most Actives, Markets, and Energy applications into a single composite application.
While logged into Mobile Web Studio, click on Composite Apps in the Build menu. The Composite App Manager menu displays in the middle pane.
In the toolbar, click the blue, down-arrow to the right of the New button and select New Mobile Application. The Composite Application Builder displays.
Click the down-arrow to the right of the Tab Flow button, and select “2 Tab Layout” from the menu.
Double-click to highlight Tab 1, and enter Stocks to
rename the tab.
Double-click to highlight Tab 2, and enter Market to
rename the tab.
Click the Add button to open the Search window.
In the Search window, click the Search button. After a moment, all applications with the Approved status display.
While holding the Control key, select each of these applications:
Energy – created in “Creating and approving the Energy application”.
Markets – created in “Creating and approving the Markets application”.
Most Actives – created in “Creating the Most Actives stock application”.
MostActives (no space) – created in “Creating and approving the MostActives application”.
Once all of the applications are highlighted, click the Add button
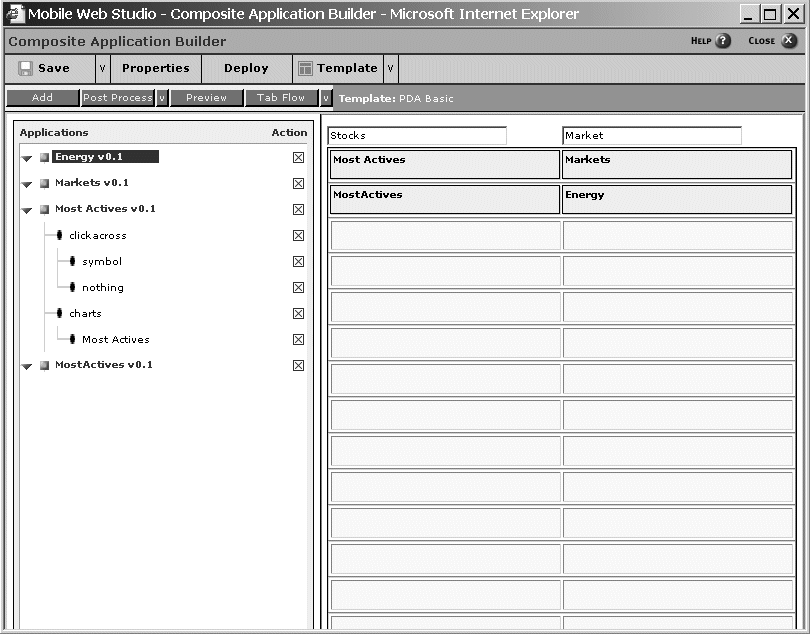
All of the applications are added to the Composite Application Builder window. Using the right side of the screen, drag and drop the applications into position:
Under Stocks – place MostActives (no space) and Most Actives.
Under Markets – place Markets and Energy.
Figure 8-4: Composite Application Builder
Click the Save button to create the composite application.
In the Composite Application Properties window:
Enter the name Finance.
Click Add All to assign all available navigation styles.
Click Add All to assign all roles.
Click OK to save the Composite Application, and click OK to confirm.
On the Composite Application Builder window, click the Deploy button. The Create Mobile Application window displays.
In Group, select employees (the
group you created in “Working with groups”) from the drop-down list, and
click OK to deploy the Composite Application to that group.
Click OK to confirm.
Click Close to close the Composite Application Builder window.
After synchronizing your mobile device you will see
the Composite Mobile Application, Markets, if you are a member of
the employees group.
Figure 8-5: Example composite application
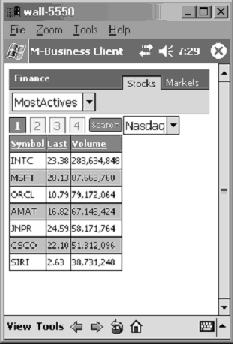
Select the application you want to use, such as MostActives, from the drop-down list. Select the appropriate tab, Stocks or Markets, to view specific information.
| Copyright © 2005. Sybase Inc. All rights reserved. |

|
|