
To illustrate the use of drill-down charts using server-side click-across, this section contains procedures to create a table of data with the stock market’s most active stocks and use drill-down charting to get the quote page with details of a selected stock. The information is presented in a bar chart.
To create a drill-down charting application for two chart applications, there must be a relationship between the category or series names of the first chart and the parameters used in defining the second chart’s data source.
![]() Creating the Stock Details application
Creating the Stock Details application
Log in to Mobile Web Studio.
Select Applications from the Build menu in the left pane, select New from the Application Manager Status menu, then click the New button to launch the Application Builder.
Click the Add button to select Web Element
When the New Web Element window appears, in location,
enter http://finance.yahoo.com/,
and click Find or press Enter.
When the Yahoo Finance Web site displays, type SY in the Enter Symbol field below the Yahoo Finance title bar, and click GO.
Verify that One Click is selected as the Format, and click Next.
Place the cursor over the Last Trade cell and click the mouse. The window refreshes displaying various presentation possibilities.
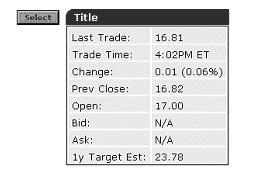
Click Select to the left of the top grid capture, then click Next.

On the Split window, click Next to bypass the options.
On the Define window, click Next to bypass the options.
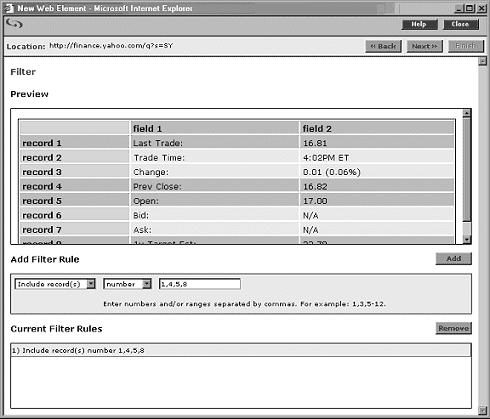
On the Filter window, in the Add Filter Rule section, add a rule to include some of the rows. To include only rows 1, 4, 5, and 8:
In the left-most drop-down list, select “Include record(s).”
Make sure the second drop-down list is set to “number.”
In the text box, enter 1,4,5,8 to
indicate you only want to include these records.
Click Add. In Preview, the records Last Trade, Prev Close, Open, and 1 Yr. Target Est. are highlighted in blue, and a new rule is added under Current Filter Rules.
The result looks similar to this image.

Click Next. The parameter definition window displays.
On the parameter definition window, select the Variable option for the “s” parameter and complete these options for that parameter (accept the defaults for all others):
Display Name – enter symbol.
Default Value – enter SY.
Type – select None.
Click Next.
On the Window Preview, enter Stock
Details for the element name and click Next.
On the Continuous Capture window, click Finish because you do not want to perform a continuous capture.
In the Application Builder, click Save to create the application.
On the Finish window, make this change (accept the default for all others):
Name – enter Stock
Details.
In Context – select this option.
Roles tab Click Add All to add all of the available roles to the assigned roles list.
Click Finish, and click OK to confirm.
Click Close to close the Application Builder.
In the Mobile Web Studio main window, select New from the Application Manager Status menu, then right-click the Stock Details application in the details pane and select Create Chart. The Create Chart window displays.
Under Choose a Selection, click Select next to the table and click Next.
Complete the following options in the Select Chart Type window:
Chart Title – enter Stock
Details.
Chart Height – change this value to 300, since PDA screens are only 320 pixels high.
Chart Width – change this value to 200, since PDA screens are only 240 pixels wide.
Font Name – accept the default of SansSerif.
Chart Legend – select None from the drop-down list.
Chart Output – accept the default of JPEG.
![]() If you are using Pocket Internet Explorer, you can use
Flash. Otherwise, you must use JPEG.
If you are using Pocket Internet Explorer, you can use
Flash. Otherwise, you must use JPEG.
Chart Type – select Bar Chart.
Click Next to continue.
On the Chart Parameters window, set these options:
X-Axis Label – enter Time to
establish a label for the row.
Y-Axis Label – enter Value to
establish a label for the column.
Category Labels – select “Column 1” from the drop-down list.
Show Values – select this option.
Series 1 Data – select “Column 2” from the drop-down list.
Series 1 Name – accept the default, since the legend is set to None.
Series 1 Color – select “Blue” from the drop-down list.
Click Next to continue.
In the Preview window, you see a stock details bar chart in blue, with labels for Value and Time.
Click Finish to save the application, and click OK to confirm.
Click Close in the upper-right corner to close Application Builder.
In Mobile Web Studio, click New under Application Manager Status. The Stock Details application displays in the detail pane.
Approve the application:
Right-click the Stock Details application in the detail pane, and select Approval Status | Approved.
Click OK to confirm.
Select Approved under Application Manager Status and verify the Stock Details application displays.
![]() Creating the Most Actives
stock application
Creating the Most Actives
stock application
In Mobile Web Studio, select Applications from the Build menu in the left pane, select New from the Application Manager Status menu, then click the New button to launch the Application Builder.
Click the Add button to select Web Element.
When the New Web Element window appears, enter http://finance.yahoo.com/ in
the Location field and click Find or press Enter.
When the Yahoo Finance Web site displays, click the Most Actives link, located in the middle column below Top Stories and above Market Overview.
Verify that One Click is selected as the Format, and click Next.
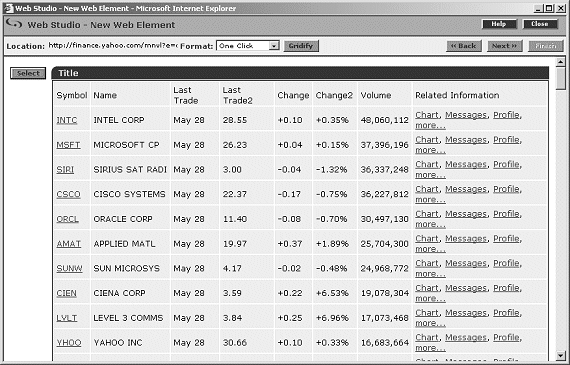
Perform a one-click capture on the Most Actives stock table by clicking on Symbol (the cursor flag provides instructions). The window displays various presentation styles.
Click Select to the left of the first grid, which should look like the capture option shown below, and then click Next.

On the Split window, notice that Column 3 includes several values—trade and time. Split Column 3 into separate columns to accommodate each value:
In the left drop-down list, select “Column No.”.
Enter 3 in
the text box.
In the second drop-down list, select “Space”.
Click Add. The Preview section shows the changes, and a new rule is added.
Click Next.
On the Define window, click Next to bypass the option.
On the Filter window, in the Add Filter Rule section, set the following:
“Include
record(s)” and “number”, enter 2-6 in
the text field, and click Add;
“Include field(s)” and “number”,
enter 1,3 in the text field,
and click Add.
Click Next.
On the parameter definition window, click Next to bypass the options.
In Window Preview window, enter Most
Actives for the Element Name, and click Next.
On the Continuous Capture window, click Finish.
On the Application Builder, click Save to create the application.
In the Finish window, make this change (otherwise accept the defaults):
Name – enter Most
Actives.
In Context – select this option.
Click Finish, then click OK to confirm.
Click Close to close the Application Builder.
On the Mobile Web Studio main window, select New from the Application Manager Status menu.
Right-click the Most Actives application in the details pane and select Create Chart.
On the Create Chart window, click Select next to the table and click Next.
Complete the following options in the Select Chart Type window:
Chart Title – enter Most
Actives.
Chart Height – change this value to 300, since PDA screens are only 320 pixels high.
Chart Width – change this value to 200, since PDA screens are only 240 pixels wide.
Font Name – accept the default of SansSerif.
Chart Legend – select None from the drop-down list.
Chart Output – accept the default of JPEG.
Chart Type – select Bar Chart.
Create An Image Map – select this option. Several additional options display when this option is selected.
Category Event Name – enter symbol,
which is the name of the parameter in the Stock Details application.
Accept the default options that are selected below the Category Event Name.
Series Event Name – enter nothing.
While this is a required value, we are not using it, hence the value “nothing”.
Accept the default options that are selected below the Series Event Name.
Client Side – make sure this option is not selected (unchecked).
Click Find Application.
When the Search window displays, click Search, select the Stock Details application in the Results pane, then click Add. The Name, Resource ID, and Window ID of the associated application display.
Click Next to continue.
In the Chart Parameters window, complete these options:
X-Axis Label – enter Stock to
establish a label for the row.
Y-Axis Label – enter Volume to
establish a label for the column.
Category Labels – select Column 1 from the drop-down list.
Show Values – select this option.
Series 1 Data – select “Column 2” from the drop-down list.
Series 1 Name – accept the default, since the legend is set to None.
Series 1 Color – select “Blue” from the drop-down list.
Click Next to continue. The Most Actives chart displays in the Preview window.
In the Preview window, click Finish.
In the Mobile Web Studio main window, right-click the Most Actives application in the detail view and select Approval Status | Approved.
When you see the confirmation that the application was saved successfully, click OK.
![]() Previewing the drill-down chart application
Previewing the drill-down chart application
Select Approved from the Application Manager Status menu.
Select the Most Actives application in the detail pane and click Preview.
Click one of the bars in the bar chart. You see the Stock Details charting application with a bar chart for the selected company.
![]() The Most Actives application is used in “Composite application tutorial”.
The Most Actives application is used in “Composite application tutorial”.
| Copyright © 2005. Sybase Inc. All rights reserved. |

|
|