![]()
![]()
![]()
Click the Database Profile button in the PowerBar
or
Select Tools>Database Profile from the menu bar.
PocketBuilder displays the Database Profiles dialog box, which includes a tree view of the installed database interfaces and defined database profiles for each interface. You can click the + signs or double-click the icons next to items in the tree view to expand or contract tree view nodes.
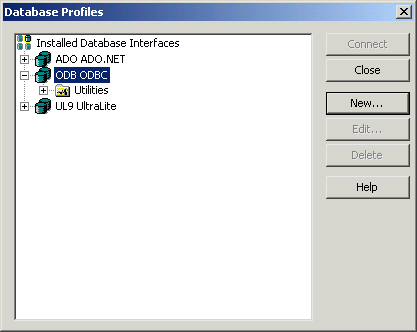
Select the ODB ODBC node by clicking on it.
Click the New button.
The Database Profile Setup dialog box displays.
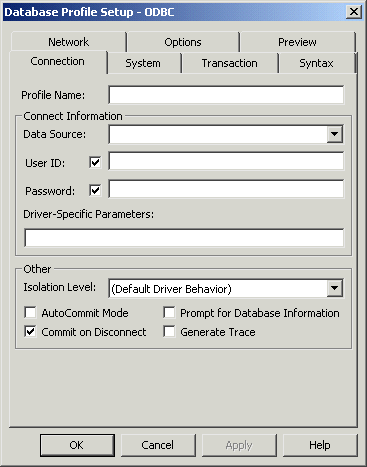
Type or select the required profile information.
Profile setup |
Value |
|---|---|
Profile Name |
ASA Demo |
Data Source |
ASA 9.0 Sample |
User ID |
dba |
Password |
sql |
Here is what the profile setup should look like when you are done:

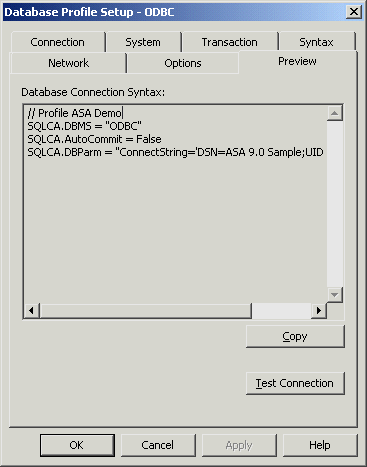
Select the Preview tab.
The PowerScript connection syntax for the new profile is shown on the Preview tab. If you change the profile connection options, the syntax changes accordingly.
Click the Test Connection button.
A message box tells you that the connection is successful.
![]() If the message box tells you the connection is not
successful
Close the message box and verify that the information on the
Connection page of the Database Profile Setup dialog box is correct.
Then check the configuration of the data source in the ODBC Administrator.
You can run the ODBC Administrator by expanding the Utilities folder
under the ODB ODBC node of the Database Profile painter
and double-clicking the ODBC Administrator item.
If the message box tells you the connection is not
successful
Close the message box and verify that the information on the
Connection page of the Database Profile Setup dialog box is correct.
Then check the configuration of the data source in the ODBC Administrator.
You can run the ODBC Administrator by expanding the Utilities folder
under the ODB ODBC node of the Database Profile painter
and double-clicking the ODBC Administrator item.
Click OK to close the message box.
Click OK to close the Database Profile Setup dialog box.
Click Close to close the Database Profiles dialog box.
| Copyright © 2004. Sybase Inc. All rights reserved. |
|
|
