![]()
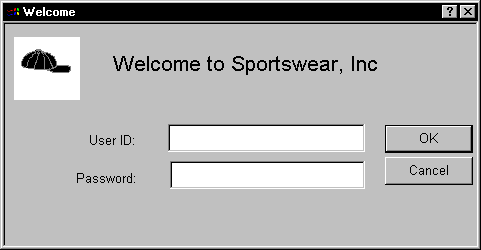
Now you use the Script view to add context-sensitive Help messages to the SingleLineEdit controls that you placed on the login window, and you preview the window.
Using the Script view The Script view has three drop-down list boxes. The first drop-down list box displays the list of available controls for the current object plus two special entries, Functions and Declare. The contents of the second drop-down list box depend on the selection in the first drop-down list box. The third drop-down list box contains all ancestor objects of the current object, if any.
Selection in first drop-down list box |
Contents of second drop-down list box |
Contents of third drop-down list box |
|---|---|---|
An object or control name |
List of events for the selected object or control. |
All of the ancestor objects of the current object, if any |
Functions |
List of editable functions. Displays (New Function) if no editable functions exist. |
All ancestor objects with functions having the same signature as selected function |
Declare |
List of declaration types: global, shared, and instance variables, and global and local external functions. |
Empty |
If the Script view is not currently displayed in your Window painter, you can open it by double-clicking an object in the Layout view.
Double-click the top SingleLineEdit control in the Layout view.
The object name, sle_userid, appears in the first drop-down list box in the Script view.
Select the Help event in the second drop-down list box in the Script view.
The Help event has the prototype: help (integer
xpos, integer ypos) returns long [pbm_help]
Type the following line of PowerScript code in the script area:
ShowPopupHelp("pbtutor.hlp", this, 100)
You can find the pbtutor.hlp file in the Tutorial directory. The second argument refers to the current SingleLineEdit control, and the last argument refers to a context ID in the pbtutor.hlp file.

As you type text in the Script view, notice that PowerBuilder changes the text colors to show what kind of syntax element you have entered (such as keywords, variables, and comments).
Select sle_password from the first drop-down list box in the Script view.
Select the Help event in the second drop-down list box.
PowerBuilder compiles the code you typed for the Help event of the sle_userid SingleLineEdit text box. You now add a Help event for the sle_password SingleLineEdit text box.
Type the following lines in the script area:
ShowPopupHelp("pbtutor.hlp", this, 200)
Select File>Run/Preview from the menu bar
or
Click the Run/Preview Object in the PowerBar.
The Run dialog box displays. Be sure the Objects of Type list box displays Windows and the w_welcome object is selected.
![]() Previewing the window
You can preview the window without running scripts by selecting Design>Preview
on the menu bar or the Preview button in PainterBar1 (which uses
the same icon as the Run/Preview Object button in the PowerBar).
However, you must run scripts to view the results of the Help event
scripts you just entered.
Previewing the window
You can preview the window without running scripts by selecting Design>Preview
on the menu bar or the Preview button in PainterBar1 (which uses
the same icon as the Run/Preview Object button in the PowerBar).
However, you must run scripts to view the results of the Help event
scripts you just entered.
Click OK.
A message box prompts you to save your changes.
Click Yes.
The login window appears as it would at runtime. If you do not like the window layout, you can change the size, location, and fonts of the window controls when you go back to the Window painter workspace.

Click the question-mark button in the login window title bar.
Click inside the sle_userid SingleLineEdit text box.
A message displays: Type your user ID here.
This text is associated with context ID 100 in
the pbtutor.hlp file. You entered the context ID as an argument
of the ShowPopupHelp call for the sle_userid Help event.
Click anywhere in the window to close the message.
Click inside the sle_password SingleLineEdit text box.
Press F1.
A message displays: Type your password here.
This text is associated with context ID 200 in
the pbtutor.hlp file.
Click anywhere in the window to close the message.
Click the close button in the login window title bar.
You return to the Window painter workspace.
Later you add code to the Clicked event for the Cancel button that closes the application.
Close the Window painter by clicking the close button in PainterBar 1.
The close button is labeled with an x.