![]()
Now you create a new DataWindow object and display it in the DataWindow painter. Like other painters, the DataWindow painter has an assortment of views that you can open simultaneously.
![]() About the Design view of the DataWindow painter
The Design view in the DataWindow painter is similar to the
Layout view in other painters. You can open only one Design view
at a time.
About the Design view of the DataWindow painter
The Design view in the DataWindow painter is similar to the
Layout view in other painters. You can open only one Design view
at a time.
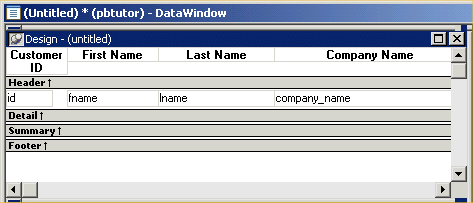
The Design view is divided into four areas called bands: header, detail, summary, and footer. You can modify the contents of these bands. For example, you can change their sizes, add objects (controls, text, lines, boxes, or ovals), and change colors and fonts.
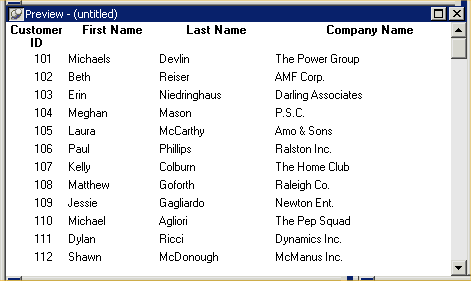
In the Preview view of the DataWindow painter, you can see how the object looks in an application at runtime, complete with table data.
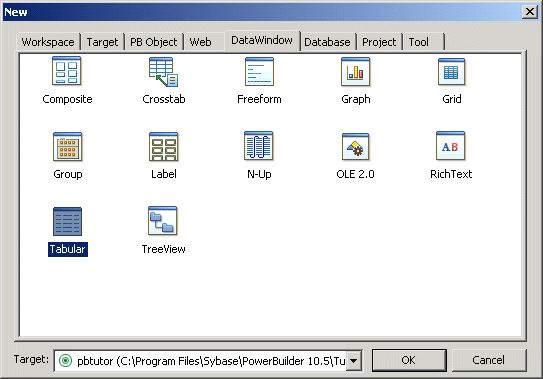
Click the New button in the PowerBar.

The New dialog box displays.
Click the DataWindow tab.
Select Tabular from the list of presentation styles.

Click OK.
The Choose Data Source for Tabular DataWindow page of the DataWindow wizard displays.
Select Quick Select as the data source and select the Retrieve On Preview check box if it is not already selected.
Click Next.
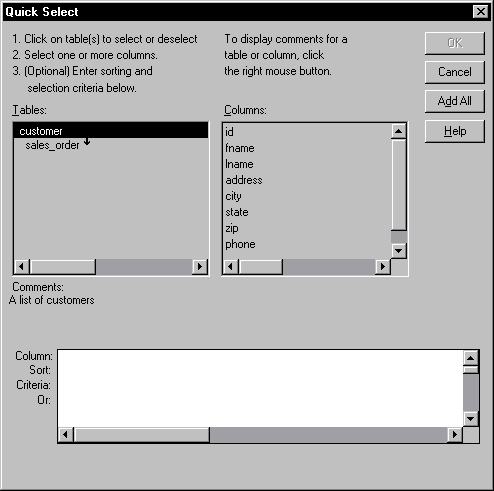
PowerBuilder connects to the EAS Demo DB Database, and the Quick Select dialog box displays.
Click the customer table in the Tables list box.
This opens the table and lists its columns as shown in the illustration below. For this DataWindow, you will select four columns.

Click id, fname, and lname in the Columns list box in the order listed.
Scroll down the list and click company_name.
PowerBuilder displays the selected columns in a grid at the bottom of the Quick Select dialog box.
![]() Selection order determines display order
The order in which you select the columns determines their
left-to-right display order in the DataWindow object. If you clicked a
column by mistake, you can click it again to clear the selection.
Selection order determines display order
The order in which you select the columns determines their
left-to-right display order in the DataWindow object. If you clicked a
column by mistake, you can click it again to clear the selection.
You can use the grid area at the bottom of the dialog box to specify sort criteria (for the SQL ORDER BY clause) and selection criteria (for the SQL WHERE clause). Now you specify sort criteria only. You sort the id column in ascending order.
In the grid area of the Quick Select dialog box, click in the cell next to Sort and below Id.
A drop-down list box displays.
Select Ascending from the drop-down list box.
This specifies that the id column is to be sorted in ascending order.

Click OK.
The DataWindow wizard asks you to select the colors and borders for the new DataWindow object. By default, there are no borders for text or for columns.
Click Next.
You accept the border and color defaults. The DataWindow wizard summarizes your selections.
Click Finish.
PowerBuilder creates the new DataWindow object and opens the DataWindow painter.
In the Design view, PowerBuilder displays a Heading band with default headings and a Detail band with the columns you selected:

The Preview view displays the DataWindow as it appears during execution. PowerBuilder displays data for all customers. The data is sorted in ascending order by customer ID, just as you specified.
