![]()
![]()
This tutorial guides you through building a drill-down application that captures a set of Web pages for two customer sites in the CustomerView application, and generalizing the URL for any customer site in the application. The resulting application can be downloaded to a mobile device.
![]() CustomerView provides examples for the tutorials, but
is not a fully functioning application. Some records are not fully
populated. Use the examples provided in the tutorials.
CustomerView provides examples for the tutorials, but
is not a fully functioning application. Some records are not fully
populated. Use the examples provided in the tutorials.
This tutorial assumes you know how to:
Log in to Mobile Web Studio
Create and approve an application in Mobile Web Studio
![]() Building a drill-down application with continuous
capture
Building a drill-down application with continuous
capture
Log in to Mobile Web Studio.
Select Applications in the left pane, select New under Application Manager Status, and click the New button to launch Application Builder.
Click Add to create a Web Element. You see the New Web Element window.
Access the CustomerView application:
In Location, enter the URL for the CustomerView application in this format:
http://hostname.domain:port/custview/Search.jsp
where hostname is the machine on which Unwired Accelerator is installed, domain is the domain on which Unwired Accelerator is installed, and port is the HTTP port on the machine used for Unwired Accelerator; for example:
http://lab2k.sybase.com:4040/custview/
Search.jsp
For the tutorial, use the host name for the machine where your Mobile Web Studio is installed.
Click Find. The Login window displays.
Click Next.
Enter your initials for User ID and password, and click Login. These values are ignored for the CustomerView sample application.
In CustomerView, select a customer site:
Select the General Search tab, and look for the Search By Company Name section of the page.
Enter sybase into
the Company Name field. The search is case sensitive.
![]() For the CustomerView application, valid entries are
For the CustomerView application, valid entries are sybase, ianywhere,
and ebank.
Click Find. The application displays a page showing customer sites.
Click Next.
Place the cursor over any site entry in the table, and click the mouse. The screen refreshes showing various presentation styles.
Figure 4-1: Presentation possibilities
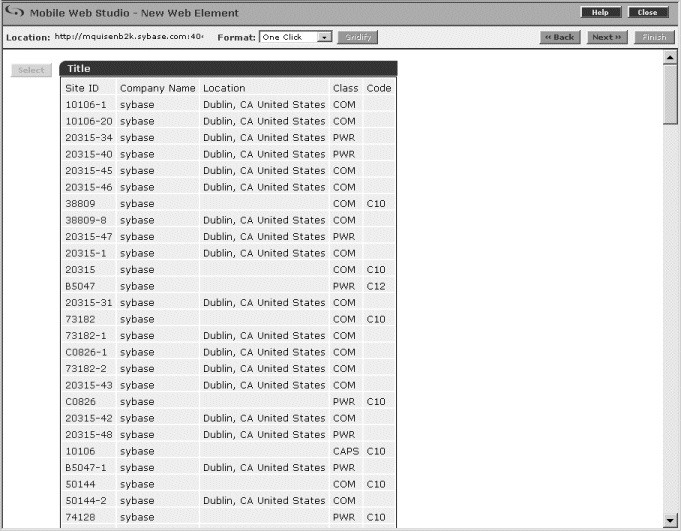
Click the Select button at the left of the five-column grid, and click Next. The Split window displays.
Click Next to bypass the Split window. The Define window displays.
Use the Define window to identify record 1 as the header row. In the Define Record Layout section:
Click “Records contain labels.” The “Labels are displayed in Record” option displays.
Accept the default 1,
and click Next. The Filter window displays.
On the Filter window, define a filter rule that only includes fields 1–3:
Under Add Filter Rule, select “Include fields” from the drop-down list.
Select “number” from the number/label drop-down list.
Enter 1-3 in the
value field to indicate that you only want to use fields 1, 2, and
3.
Click Add. Fields 1, 2, and 3 are highlighted in the Preview section, and the new rule appears under the Current Filter Rules section.
Click Next. The parameter definition window displays.
Click Next to bypass the parameter definition window. The Window Preview window displays.
In Element Name, enter customerSites as
the Web element name.
Click Next. The Continuous Capture window displays. This window provides you with a choice—to finish the creation of this particular element, or to proceed with defining one or more continuous capture pages for the element.
Click Continue, and OK in the pop-up window. The Defining Continuous Capture window displays, including the capture that you defined as the initial page.
Define a continuous capture page:
With Format set to One Click, click the link for Site ID 10106-1, then click Next. The profile for the selected link displays. This page enables you to select a desired feature on the captured page.
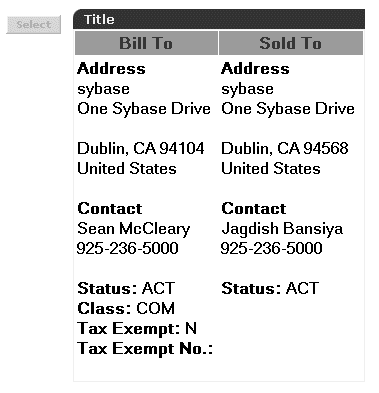
When the page reloads, move your mouse over the “Bill To or Sold To” area and click the mouse (a flag follows the cursor with abbreviated instructions). The screen refreshes showing various presentation styles.
Choose Select to the left of the second style, which looks similar to the original, and then click Next.
The Continuous Capture window displays, this time showing the Continuous Capture definition. The window shows the capture level (in this case, 1), and the URL and corresponding CCL used to extract the requested feature.
Sample level 1 URL:
http://lab2k\.sybase\.com:4040/custview/
ReportBuilder\.jsp\?&customerNo=10106&siteId=1
&reportName=None
CCL found under the Capture Description column:
Cells( <?xml version="1.0"?><params><target
type=""/></params>, Feature (C1AAANCAABDA002,
Load("_0_", void)));
Click Continue to define another continuous capture window.
Define another continuous capture window using the same steps, starting with Step 12. This time, capture the details for Site ID 20315-34.
Your window is similar to Figure 4-2. This shows the two capture levels defined so far, and shows that both URLs map to the same CCL.
Figure 4-2: Continuous capture – URL-CCL mapping
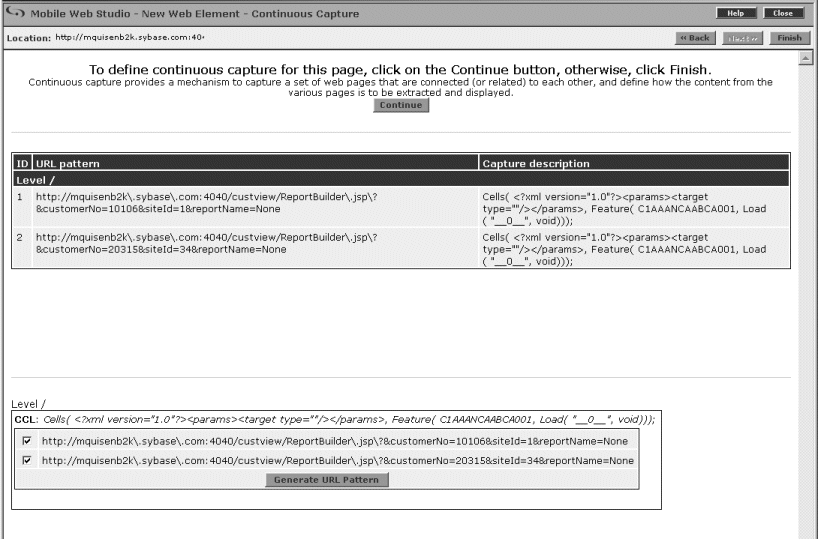
Click Generate URL Pattern at the bottom of the window. The two URLs are replaced with a single generalized URL, as are the two CCLs.
Sample URL (generalized from levels 1 and 2):
http://lab2k\.sybase\.com:4040/custview/
ReportBuilder\.jsp\?&customerNo=[^&#]*8siteID=
[^&#]*&reportName=None
CCL found under the Capture Description column (same):
Cells( <?xml version="1.0"?><params><target
type=""/></params>, Feature (C1AAANCAABDA002,
Load("_0_", void)));
The URL has been turned into a “regular expression” that matches on all customers and site IDs.
Click Finish to return to the Application Builder window. In the left pane, the new “customerSites” application displays under Element List. In the detail pane, the three columns, Site ID, Company Name, and Location, are displayed.
Click Save.
On the Finish window, make these changes to configure the application (otherwise accept the defaults):
Content tab Enter customerSites (no
space).
Presentation tab Select the No Popup option.
Window Preview You can preview the format, but the links are not yet enabled.
Click Finish.
Click OK to confirm.
In Application Builder, click Preview at the top of the page and test the application by clicking on any of the site ID links. You should see details of the Bill To and Ship To page for the target site. Close the Preview window when you are finished.
Click Close to close Application Builder.
In Mobile Web Studio, approve the customerSites application:
Right-click the customerSites application in the detail pane, and select Approval Status | Approved.
Click OK to confirm.
Select Approved from the Application Manager Status menu. You see the customerSites application in the detail pane.
| Copyright © 2005. Sybase Inc. All rights reserved. |
|
|
