
This tutorial introduces you to creating and approving an application that accesses currency exchange rates on a currency exchange Web site, and demonstrates how to use grid rules to optimize the data for display on a mobile device.
![]() Some tutorials use public Web sites, which are subject
to change. You may notice some variation in your results.
Some tutorials use public Web sites, which are subject
to change. You may notice some variation in your results.
Also, keep in mind that some stock applications, such as Content Explorer, cannot be mobilized for the PDA, since they require Java or Java plug-in support.
![]() Creating and approving an application
Creating and approving an application
Log in to the Mobile Web Studio.
Click Applications in the Build menu, and select New under Application Manager Status in the middle pane.
Click the New button in the Application Manager toolbar. The Application Builder window displays.
In Application Builder, click Add to launch the New Web Element window.
In Location, enter the following URL:
http://www.xe.com/ict/
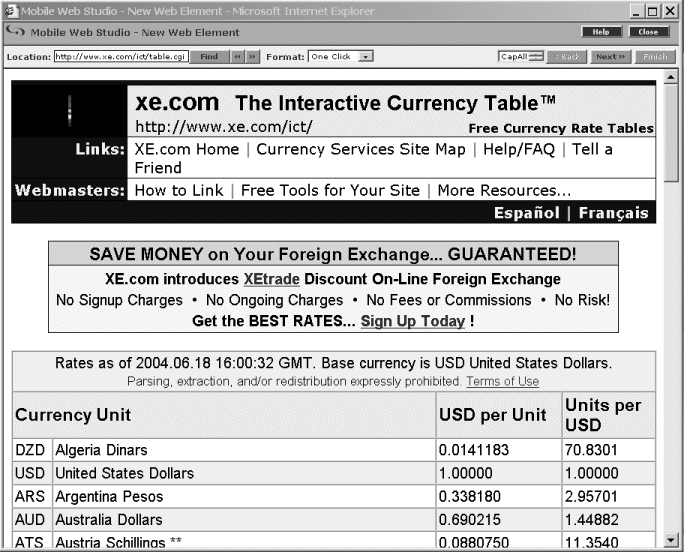
Click Find or press Enter to display the Interactive Currency Table Web site.
Click the Click Here to Generate Currency Table button located at the bottom of the window. You do not have to change anything, since this tutorial uses the default settings on the Web site.
Figure 2-1: Capturing a Web site

Click Next in the top right portion of the New Web Element window. The page reloads.
When the Web page reloads, move your mouse over the table of currencies and click Algeria Dinars. A flag follows your cursor with abbreviated instructions.
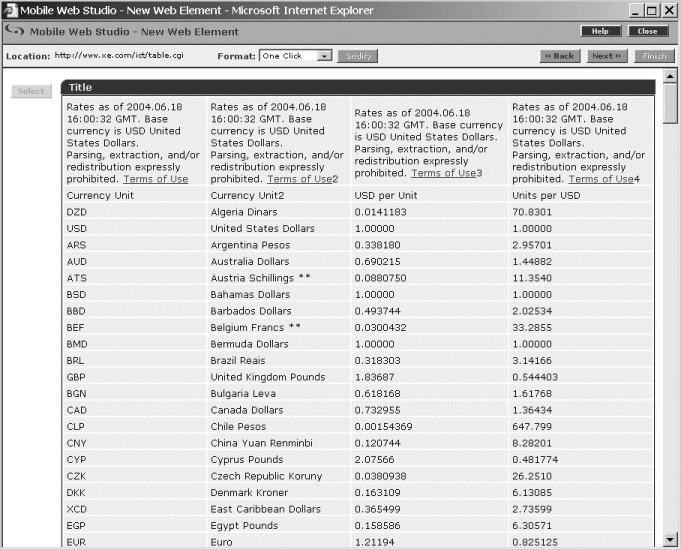
The table of currencies redisplays in several presentation formats, including a grid format as shown in Figure 2-2. You can use the scroll bar to scroll through the various options.

Click Select to the left of the grid, then click Next in the top right section of the window. The Split window displays.
Click Next to bypass the Split window as this tutorial does not demonstrate the feature. The Define window displays. The Define window enables you to define the grid layout.
Use the Define window to identify record 2 as the header row. In the Define Record Layout section:
Click “Records contain labels.” The “Labels are displayed in Record” option displays.
Enter 2 into
the text box.
Click Next to continue. The Filter window displays. The Filter window enables you to identify which rows, columns, and fields to use in the application, and which to exclude.
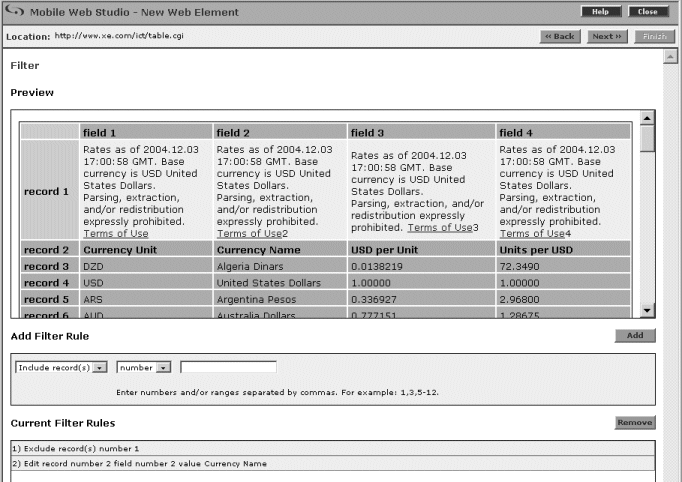
Use the Filter window to make a few modifications to the table. The following modifications remove the first row from the table and rename the headers that appear above the table columns.
To remove the first row from the table:
Look for the Add Filter Rule section of the window, and in the left-most drop-down list, select the “Exclude record(s).”
In the second drop-down list, select “number” from the “number/where” list.
In the text box, enter 1.
Click Add. In Preview, all records are highlighted except record 1, and a new rule is added under Current Filter Rules.
![]() If you make a mistake, click the rule under Current
Filter Rules to highlight the rule, click Remove to delete it, and
re-enter the rule correctly.
If you make a mistake, click the rule under Current
Filter Rules to highlight the rule, click Remove to delete it, and
re-enter the rule correctly.
To rename the title of the second column to Currency Name:
In the left-most drop-down list, select “Edit record.”
Make sure the second drop-down list is set to “number.”
In the first text box, enter 2.
For Field, select “number” from the “number/label” drop-down list.
In the second text box, enter 2.
In the fourth drop-down list, select “value” from the “value/image” drop-down list.
In the third text box, enter Currency
Name.
Click Add. In Preview, the field 2 title has changed from Currency Unit2 to Currency Name, and a new rule is added under Current Filter Rules.
When you finish adding the two filter rules, your table should look similar to one in Figure 2-3.
Figure 2-3: Adding filter rules

Click Next. The parameter definition window displays with a list of parameters used to capture the table.
Check the Variable check box to the left of “currency.” This exposes the parameters for the variable.
Make sure the Default Value is set to “USD”, without quotes, and click Next. The Window Preview window displays the modified table.
In Element Name, enter Currency Table as
the name for this Web element, and click Next. The Continuous Capture
window displays.
Click Finish to bypass the Continuous Capture window as this tutorial does not demonstrate this feature. The New Web Element window closes.
On the Application Builder window, notice that the Currency Table element appears under Element List.
Click Save to create the application.
On the Finish window, make this entry (otherwise accept the defaults):
Content tab In Name, enter CurrencyTable (no
space).
Window Preview At the bottom of the Finish window, you can see a preview of your application.
Click Finish to save the application, and click OK in the Application Saved Successfully window.
Click Close in the upper-right corner to close the Application Builder window.
In Mobile Web Studio, click New under Application Manager Status in the middle pane. The CurrencyTable application displays in the detail pane.
When applications are initially saved, their status is set to “New.” To make the CurrencyTable application available for use in a mobile device or in a Composite Application, you must first change the status of the application to Approved.
To approve the application:
Right-click the CurrencyTable application in the detail pane, and select Approval Status | Approved.
Click OK to confirm.
Select Approved under Application Manager Status and verify the CurrencyTable application displays.
You have successfully created an application using a Web site as a source, and customized the appearance by including only certain data and modifying column names.
| Copyright © 2005. Sybase Inc. All rights reserved. |

|
|