
In the SELECT statement associated with a DataWindow object, you can add selection, sorting, and grouping criteria that are included in the SQL statement and processed by the DBMS as part of the retrieval.
![]() Dynamically selecting, sorting, and grouping data
Selection, sorting, and grouping criteria that you define
in the Select painter are added to the SQL statement and processed
by the DBMS as part of the retrieval. You can also define selection,
sorting, and grouping criteria that are created and processed dynamically
by PocketBuilder after data has been retrieved from the DBMS.
Dynamically selecting, sorting, and grouping data
Selection, sorting, and grouping criteria that you define
in the Select painter are added to the SQL statement and processed
by the DBMS as part of the retrieval. You can also define selection,
sorting, and grouping criteria that are created and processed dynamically
by PocketBuilder after data has been retrieved from the DBMS.
For more information, see Chapter 22, “Filtering, Sorting, and Grouping Rows.”
If you have defined retrieval arguments, you reference them in the WHERE or HAVING clause. In SQL statements, variables (called host variables) are always prefaced with a colon to distinguish them from column names.
For example, if the DataWindow object is retrieving all rows from the Department table where the dept_id matches a value provided by the user during execution, your WHERE clause will look something like this:
WHERE dept_id = :Entered_id
where Entered_id was defined previously as an argument in the Specify Retrieval Arguments dialog box.
![]() Referencing arrays
Use the IN operator and reference the retrieval
argument in the WHERE or HAVING clause.
Referencing arrays
Use the IN operator and reference the retrieval
argument in the WHERE or HAVING clause.
For example, if you reference an array defined as deptarray, the expression in the WHERE view might look like this:
"employee.dept_id" IN (:deptarray)
You need to supply the parentheses yourself.
You can limit the rows that are retrieved into the DataWindow object by specifying selection criteria that correspond to the WHERE clause in the SELECT statement.
For example, if you are retrieving information about employees, you can limit the employees to those in Sales and Marketing, or to those in Sales and Marketing who make more than $50,000.
![]() To define WHERE criteria:
To define WHERE criteria:
Click the Where tab to make the Where view available (or select View>Where if the Where view is not currently displayed).
Each row in the Where view is a place for entering an expression that limits the retrieval of rows.
Click in the first row under Column to display columns in a drop-down list, or select Columns from the pop-up menu.
Select the column you want to use in the left-hand side of the expression.
The equality (=) operator displays in the Operator column.
![]() Using a function or retrieval argument in the expression
To use a function, select Functions from the pop-up menu and
click a listed function. These are the functions provided by the
DBMS.
Using a function or retrieval argument in the expression
To use a function, select Functions from the pop-up menu and
click a listed function. These are the functions provided by the
DBMS.
To use a retrieval argument, select Arguments from the pop-up menu. You must have defined a retrieval argument already.
(Optional) Change the default equality operator.
Enter the operator you want, or click to display a list of operators and select an operator.
Under Value, specify the right-hand side of the expression. You can:
Type a value.
Paste a column, function, or retrieval argument (if there is one) by selecting Columns, Functions, or Arguments from the pop-up menu.
Paste a value from the database by selecting Value from the pop-up menu, then selecting a value from the list of values retrieved from the database. (It may take some time to display values if the column has many values in the database.)
Define a nested SELECT statement by selecting Select from the pop-up menu. In the Nested Select dialog box, you can define a nested SELECT statement. Click Return when you have finished.
Continue to define additional WHERE expressions as needed.
For each additional expression, select a logical operator (AND or OR) to connect the multiple boolean expressions into one expression that PocketBuilder evaluates as true or false to limit the rows that are retrieved.
Define sorting (Sort view), grouping (Group view), and limiting (Having view) criteria as appropriate.
Click the Return button to return to the DataWindow painter.
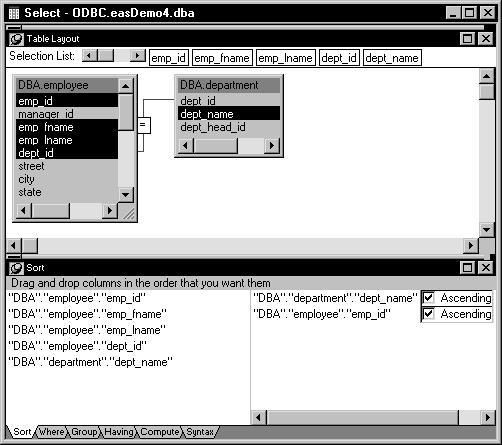
You can sort the rows that are retrieved into the DataWindow object by specifying columns that correspond to the ORDER BY clause in the SELECT statement.
For example, if you are retrieving information about employees, you can sort on department. Then within each department, you can sort on employee ID.
Figure 17-19: Defining multiple sort criteria for a DataWindow object

![]() To define ORDER BY criteria:
To define ORDER BY criteria:
Click the Sort tab to make the Sort view available (or select View>Sort if the Sort view is not currently displayed).
The columns you selected display in the order of selection. You might need to scroll to see your selections.
Drag the first column you want to sort on to the right side of the Sort view.
This specifies the column for the first level of sorting. By default, the column is sorted in ascending order. To specify descending order, clear the Ascending check box.
Continue to specify additional columns for sorting in ascending or descending order as needed.
You can change the sorting order by dragging the selected column names up or down.
Define limiting (Where view), grouping (Group view), and limiting by group (Having view) criteria as appropriate.
Click the SQL Select button to return to the DataWindow painter.
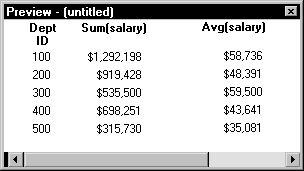
You can group the retrieved rows by specifying groups that correspond to the GROUP BY clause in the SELECT statement. This grouping happens before the data is retrieved into the DataWindow object. Each group is retrieved as one row into the DataWindow object.
For example, if in the SELECT statement you group data from the Employee table by department ID, you will get one row back from the database for every department represented in the Employee table. You can also specify computed columns, such as total and average salary, for the grouped data. This is the corresponding SELECT statement:
SELECT dept_id, sum(salary), avg(salary)
FROM employee
GROUP BY dept_id
If you specify this with the Employee table in the ASA Sample database, you get five rows back, one for each department.
Figure 17-20: Computed columns grouped by department ID

For more about GROUP BY, see your DBMS documentation.
![]() To define GROUP BY criteria:
To define GROUP BY criteria:
Click the Group tab to make the Group view available (or select View>Group if the Group view is not currently displayed).
The columns in the tables you selected display in the left side of the Group view. You might need to scroll to see your selections.
Drag the first column you want to group on to the right side of the Group view.
This specifies the column for grouping. Columns are grouped in the order they are displayed in the right side of the Group view.
Continue to specify additional columns for grouping within the first grouping column as needed.
To change the grouping order, drag the column names in the right side to the positions you want.
Define sorting (Sort view), limiting (Where view), and limiting by group (Having view) criteria as appropriate.
Click the Return button to return to the DataWindow painter.
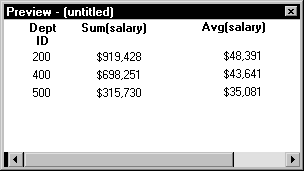
If you have defined groups, you can define HAVING criteria to restrict the retrieved groups. For example, if you group employees by department, you can restrict the retrieved groups to departments whose employees have an average salary of less than $50,000. This corresponds to:
SELECT dept_id, sum(salary), avg(salary)
FROM employee
GROUP BY dept_id
HAVING avg(salary) < 50000
If you specify this with the Employee table in the ASA Sample database, you will get three rows back, because there are three departments that have average salaries less than $50,000.
Figure 17-21: Grouped data restricted by HAVING criteria

![]() To define HAVING criteria:
To define HAVING criteria:
Click the Having tab to make the Having view available (or select View>Having if the Having view is not currently displayed).
Each row in the Having view is a place for entering an expression that limits which groups are retrieved. For information on how to define criteria in the Having view, see the procedure in “Defining WHERE criteria”.
| Copyright © 2004. Sybase Inc. All rights reserved. |

|
|