![]()
![]()
![]() Portal alerts require you to use Portal Interface with
Internet Explorer 5.5 or 6.0. Netscape support is not currently
available.
Portal alerts require you to use Portal Interface with
Internet Explorer 5.5 or 6.0. Netscape support is not currently
available.
Alerts allow you to easily capture, process, and save the application content to some type of adapter at a scheduled event. You can set up alerts on applications that display the “!” in the application title bar. For example, you can set up an alert to send an automatic e-mail to you when new information is added to the application.
Alerts have two attributes – rules and schedule. Rules are set up on applications to determine what content from the application triggers an alert. The schedule determines the interval at which the alert checks the application content.
![]() Setting rules for the alert
Setting rules for the alert
Click the Alerts icon (!) in the application title bar. The Alert window launches.
![]() The alerts icon (!) only displays in the title bar of
applications if the alerts functionality has been set up in Web
Studio. Contact your portal administrator for information.
The alerts icon (!) only displays in the title bar of
applications if the alerts functionality has been set up in Web
Studio. Contact your portal administrator for information.
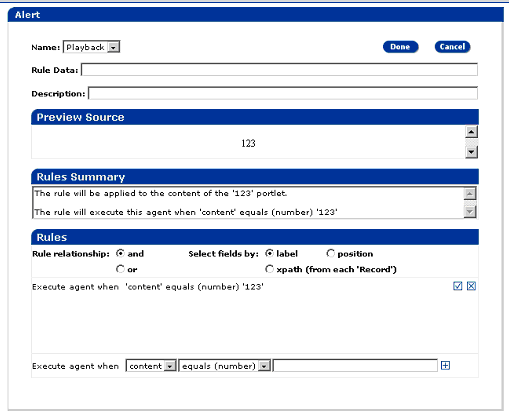
In the Alert window, enter:
Name – from the drop-down list, select Playback to display the application as it previews. Select XML to display the application as XML.
Rule Data – the text that should appear as the subject for the e-mail message.
Description – this is optional. Enter a description of the rule.
Preview Source – displays the source data automatically. This is read-only.
Rules Summary – shows the rule in text format. This is read-only.
Rules – select:
Rule Relationship – select either AND or OR. Use these operators to specify what terms must appear in the selected application’s content.
Select Fields By – select:
Label – uses column labels in the data. When table fields reorder, the rule still picks up the correct field.
Position – indexes on position in the data
XPath – allows for all matches to be done via XPath expressions. XPath is a set of syntax rules for defining parts of an XML document.
Execute Agent When – from the drop-down lists, select the criteria for executing the agent. The rules operators are:
Equals – enter a numeric value. This converts the application data into floating point numbers for the equals comparison.
Is Greater Than – enter a numeric value. This converts the application data into floating point numbers for the greater-than comparison. If the data is not numeric, the expression returns false. The application data must be greater than the value supplied in the Rules text field.
Is Less Than – enter a numeric value. This converts the application data into floating point numbers for the less-than comparison. If the data is not numeric, the expression returns false. The application data must be less than the value supplied in the Rules text field.
Equals – takes the application data as text and compares the data to the text supplied in the Rules text field. If they are equal, the expression returns true.
Contains – takes the application data as text and returns true if the text data contains the string supplied in the Rules text field
Starts With – takes the application data as text and returns true if the text data starts with the string supplied in the Rules text field.
Ends With – takes the application data as text and returns true if the text data ends with the string supplied in the Rules text field.
Matches RegExp – takes the application data as text and returns true if the text data matches the regular expression supplied in the Rules text field.
Contains Data – checks the application data to see if the application contains any data (has a size > 0). The Rules text field is disabled for this option.
Contains No Data – this is the opposite of “contains data.” This checks the application data to see if the application contains no data (has a size = 0). The Rules text field is disabled for this option.
Is Found – this option is mostly designed to be used with XPath. This expression returns true if the XPath expression resolves to a XML node or attribute.
Is Not Found – this is the opposite of “is found.” This option is mostly designed to be used with XPath. This expression returns true if the XPath expression does not resolve to a XML node or attribute.
For example, if you select “content” from
the first drop-down list and “contains” from the
second drop-down list, then enter Hello in
the input field, this means, the rule matches content that contains
the string “Hello.”
Click the plus sign (+) to add the rule. To add multiple rules, enter each rule in the Execute Agent When input field, click on the plus sign (+), then click Done to save all of them.
Click Done to save the alert rules.
Click Cancel to return to the originating window without saving the rules.
After saving the alert rules, you must set the schedule for it. See “Setting the schedule for the alert” below.
![]() Setting the schedule for
the alert
Setting the schedule for
the alert
Click MyInfo at the top of the window, then click Alert.
In the Alert window, select Trigger Based On Schedule, then:
Time – select the start time for the alert.
Recurrence – select how often the alert should occur.
Range – select the start date and end date, or select No End Date if you want to schedule the alert indefinitely.
Send Alerts To – select either:
E-mail – enter the e-mail address to send the alert to.
SMS – from the drop-down list, select the wireless carrier.
Click Start, then Done.
Click Stop to stop an alert.
| Copyright © 2004. Sybase Inc. All rights reserved. |
|
|
