
This section explains how to create a DSN for the Authorization Console.
![]() Because the Authorization Console only runs on Windows,
you need to perform this procedure only on the Windows machine where
the Authorization Console is installed.
Because the Authorization Console only runs on Windows,
you need to perform this procedure only on the Windows machine where
the Authorization Console is installed.
![]() Creating the Authorization Console DSN
Creating the Authorization Console DSN
Go to x:\Sybase\ImpactServer-5_4\asa\ (where “x” is the drive or directory where the e-Biz Impact server is installed) and double-click dbsrv8.exe to start Adaptive Server Anywhere.
The Server Start-up Options dialog box appears.

Complete these options:
Database – enter the path to the database (for example, x:\Sybase\ImpactServer-5_4\bin\impact.db, where “x” is the drive where the e-Biz Impact security database is located) or Browse to locate the authorization database.
Server Name – enter dbsrv8.
Leave the remaining options as they are and click OK. An Adaptive Server Anywhere status window appears and states that you have successfully connected to the database. When the last line displays, “Now accepting requests,” the window automatically minimizes.
On Windows, select Start | Settings | Control Panel.
Select Administrative Tools | Data Sources (ODBC). The ODBC Data Source Administrator window appears.
Select the System DSN tab and click Add.
From the driver list, select “Imc54
Adaptive Server Anywhere 8” and click
Finish.
![]() Typically, you install the e-Biz Impact server on a
UNIX machine and install the e-Biz Impact client on a Windows machine.
If you have the server and client installed on Windows, two entries
display in the driver list (“Imc54..” for the
client and “Ims54..” for the server). Select
the client entry for this procedure.
Typically, you install the e-Biz Impact server on a
UNIX machine and install the e-Biz Impact client on a Windows machine.
If you have the server and client installed on Windows, two entries
display in the driver list (“Imc54..” for the
client and “Ims54..” for the server). Select
the client entry for this procedure.
When the ODBC Configuration for Adaptive Server Anywhere 8 window appears, complete these options on the ODBC tab:
Data Source Name – tells the ODBC driver manager or Embedded SQL™ library where to look in the file or registry to find ODBC data source information.
Enter any unique descriptive name for the authorization DSN
(spaces are allowed); for example, Auth_DSN.
Keep the name short; you may need to enter it in connection strings.
Description – enter an optional longer description of the data source to help you or end users to identify this data source from among their list of available data sources.
Select the Login tab, then select Supply User ID and Password, but leave the actual user ID and password fields blank.
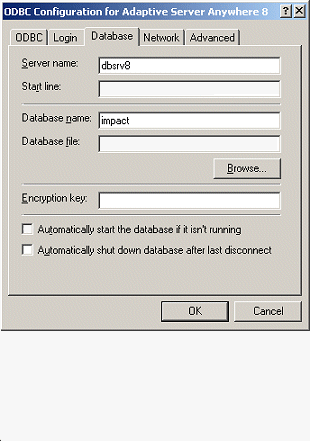
Select the Database tab and complete these options:
Server Name – the name of the
local Adaptive Server Anywhere (dbsrv8)
or the network database server where the security information is
stored.
Start Line – leave this field empty.
Database Name – enter the name of the Adaptive
Server Anywhere database to which you want to connect—impact.
WARNING! Do not enter impact.db for the database name.
Database file – leave this field blank.
Encryption Key – leave this field blank.
Automatically start the database if it isn’t running – leave this option unselected.
Automatically shut down database after last disconnect – leave this option unselected.
When you finish, the Database tab entries should look similar to the screen shown in Figure 2-2
Figure 2-2: Authorization Console ODBC DSN Database tab entries

Only the Server Name and Database Name should be filled in.
Select the Network tab and verify that the only options selected are Shared Memory and None (for encryption of network packages). The TCP/IP option should not be selected.
Accept the default values for the time-outs and buffer size.
![]() Testing the Authorization Console DSN
Testing the Authorization Console DSN
Select the ODBC tab and click Test Connection. You should see this message:
Connection Failed: Integrated logins are not permitted.
Even though the message indicates that the connection failed, the message actually means that the DSN configuration is successful.
![]() If you receive the following message, verify your parameters, particularly,
host, port, and server name:
If you receive the following message, verify your parameters, particularly,
host, port, and server name:
Connection Failed: Database server not found.
Click OK to save your entries and close the ODBC Configuration window.
Click OK to save the DSN and exit the ODBC Data Source Administrator.
To shut down the authorization database, right-click the dbsrv8 icon that appears on the far right of the task bar and select Exit.
![]() Proceed to Chapter 3, “Setting Up Role-Based Authorization,” to finish configuring e-Biz Impact
security.
Proceed to Chapter 3, “Setting Up Role-Based Authorization,” to finish configuring e-Biz Impact
security.
| Copyright © 2005. Sybase Inc. All rights reserved. |

|
|