![]()
![]()
![]()
![]()
In this lesson, you create a simple business process service called MySalesBPService. The service has one operation—ManageInventory.
The ManageInventory operation takes an input parameter called inputSalesItem, and returns an output parameter called outputResponse. The inputSalesItem variable contains information about a sale—item identifier, quantity sold, price, and so on. The outputResponse variable contains status information about the execution of the service—success or failure, and if there is a failure.
Select Start|Programs|Sybase|Sybase WorkSpace|Sybase WorkSpace 1.5.
Select Window|Open Perspective|Other, select Service Development, and click OK.
The Service Development perspective opens the WorkSpace Navigator, the Service Explorer, and the Enterprise Explorer views.
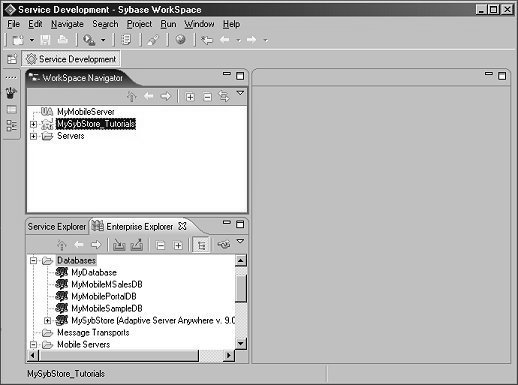
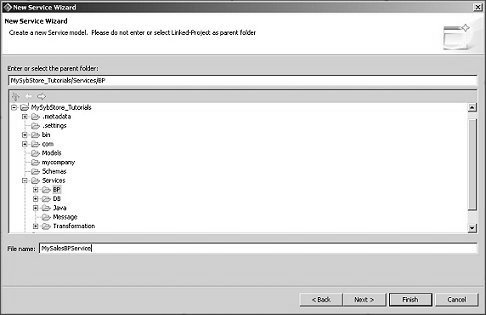
In the WorkSpace Navigator, right-click the MySybStore_Tutorials/Services/BP folder and select New|Service from the context menu.
In the Creat a Service dialog box, select Business Process Service and click Next.
Verify that MySybStore_Tutorials/Services/BP is
selected as the parent folder, then enter MySalesBPService for
the File Name and click Finish.
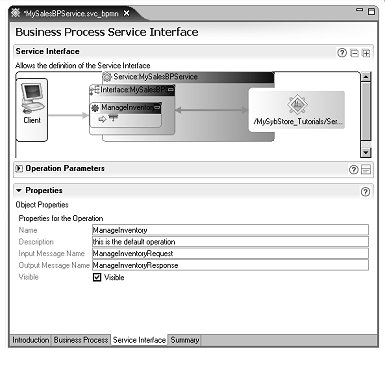
The new service is created and opens in the Business Process Service Editor.
In the editor, select the Service Interface tab.

In the Service Interface diagram, expand the Properties pane (at the bottom of the editor) and select the operation1 box in the editor diagram.
Enter ManageInventory in
the Name field. The Input Message Name
and Output Message Name fields update automatically to reflect the
change.
Expand the Operation Parameters section and click Add to add a new input parameter.
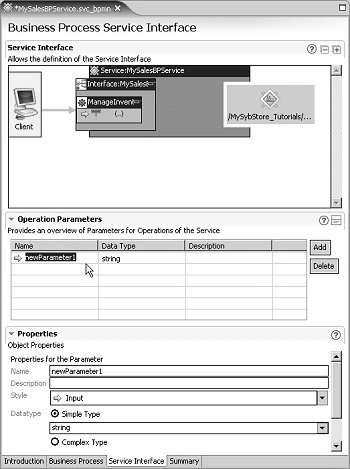
Select the new input parameter in the Operation
Parameters pane. In the Properties pane,
enter inputSalesItem in the Name column,
and select Complex Type as the Datatype.
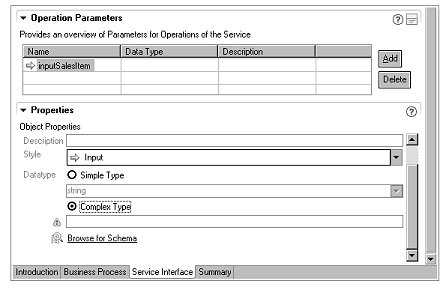
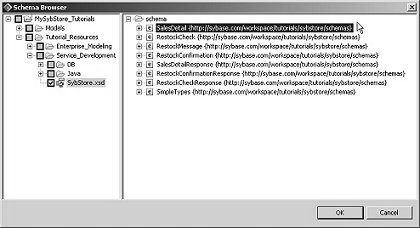
Click Browse for Schema at the bottom of the Properties pane. When the Schema Browser opens, expand MySybStore_Tutorials/Tutorial_Resources/Service_Development in the tree view, then select the SybStore.xsd check box.
In the right pane, select the SalesDetail schema at the top of the list and click OK.
Click Add again in the Operations Parameter pane to add an output parameter.

In the Properties pane, enter outputResponse for
the Name, select Output from
the Style drop-down list, and select Complex
Type for the Datatype.
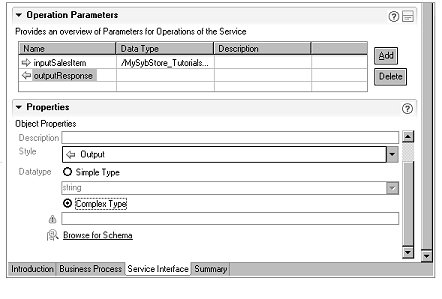
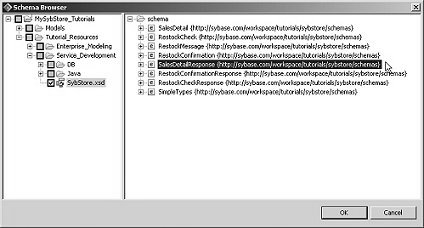
Click Browse for Schema in the Datatype section. When the Schema Browser opens, select MySybStore_Tutorials/Tutorial_Resources/Service_Development in the tree view, then select the SybStore.xsd check box.
In the right pane, select the SalesDetailResponse schema and click OK.
![]() If you select the wrong schema, click Browse
for Schema in the Properties pane
to redisplay the schema browser.
If you select the wrong schema, click Browse
for Schema in the Properties pane
to redisplay the schema browser.
Select File|Save from the WorkSpace main menu.
Select the Business Process tab in the editor to see the Business Process Diagram.
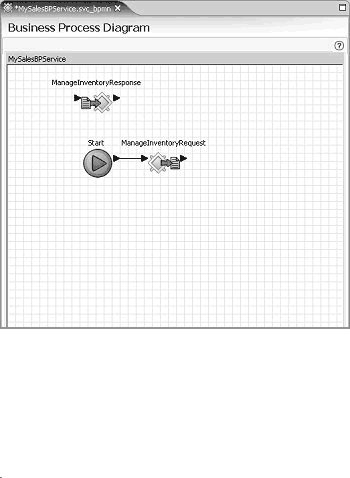
You see two operations—ManageInventoryResponse and ManageInventoryRequest.
![]() To change how icon labels display, select Window|Preferences on the
WorkSpace main menu. When the Preferences dialog
box opens, select Sybase, Inc.|Graphic Editors in
the tree view on the left, then make your selections in the Graphic
Editors Icons section.
To change how icon labels display, select Window|Preferences on the
WorkSpace main menu. When the Preferences dialog
box opens, select Sybase, Inc.|Graphic Editors in
the tree view on the left, then make your selections in the Graphic
Editors Icons section.
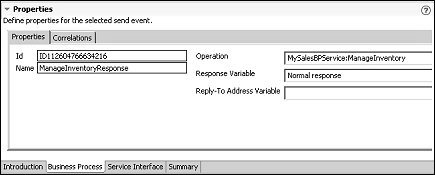
Expand the Properties pane below the Business Process Variables pane, then select ManageInventoryResponse in the diagram.
![]() If you cannot see the entire Properties pane, close
the Business Process Variables pane and maximize the editor window.
If you cannot see the entire Properties pane, close
the Business Process Variables pane and maximize the editor window.
The ManageInventoryResponse activity is associated with the service operation MySalesBPService:ManageInventory.
So far, the semantics of the business process service is that an invocation of the ManageInventory operation sends the inputSalesItem input parameter to the operation and returns the outputResponse output parameter. For the MySalesBPService:ManageInventory operation to perform a useful function, add activities between the ManageInventoryRequest and ManageInventoryResponse.
The simplest activity is to assign a value to the outputResponse variable before it is returned by the operation. To do this, use an Assign activity.
Right-click the background of the diagram and select Show Tool Palette from the context menu.

On the Tool Palette, select the Assign activity from the Activities category and drag it onto the Business Process Diagram canvas.
![]() If the Tool Palette disappears from the display, click
the Tool Palette icon in the Fast View to redisplay it. You can
also right-click the title of the Tool Palette to select various
display options. See the online help topic Sybase WorkSpace
Development|Getting Started|Basics|Tool
Palettes for more information.
If the Tool Palette disappears from the display, click
the Tool Palette icon in the Fast View to redisplay it. You can
also right-click the title of the Tool Palette to select various
display options. See the online help topic Sybase WorkSpace
Development|Getting Started|Basics|Tool
Palettes for more information.
Rearrange the diagram objects to line up horizontally starting with the Start icon, followed by the ManageInventoryRequest icon to the right, followed by the Assign icon, then ending with the ManageInventoryResponse icon on the far left.
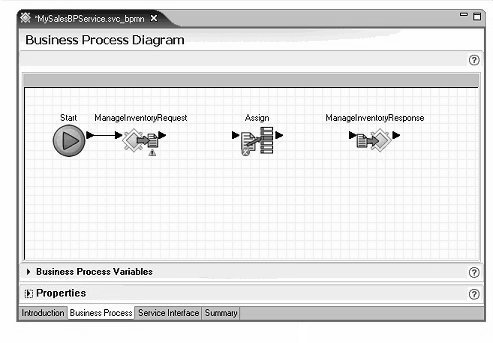
Connect the Assign activity into the business process flow.
Click the arrow on the right side of the ManageInventoryRequest and drag to and click the arrow on the left side of the Assign activity to connect those objects.
Click the arrow on the right side of the Assign activity and drag to and click the arrow on the left side of the ManageInventoryResponse target icon to connect those objects.
Your diagram should resemble the following graphic. Notice the red “X” on the Assign activity’s icon. Once you set this activity’s parameters, the “X” disappears.
Select the Assign activity in the diagram and open the Properties pane at the bottom of the editor window.
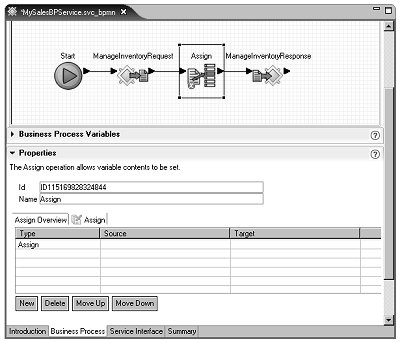
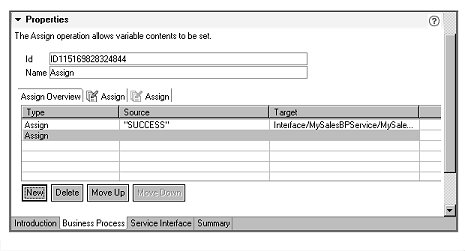
An Assign activity copies a source value to a target variable.
In the first row of the table (with Assign in
the Type column), click the cell of
the Target column, then click the button
with the three dots (ellipsis).
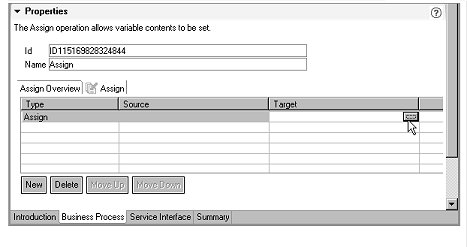
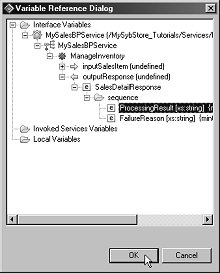
When the Variable Reference Dialog opens, select Interface Variables/MySalesBPService/MySalesBPService/ManageInventory/outputResponse/SalesDetailResponse/sequence/ProcessingResult and click OK.
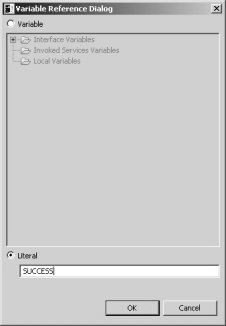
Again in the first row, click the cell in the Source column and click the ellipsis button.
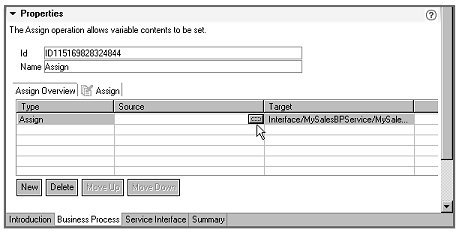
When the Variable Reference Dialog opens,
select the Literal option (below the Variable pane),
type SUCCESS in the Literal field,
and click OK to set the value.
Select the Business Process Variables pane (above the Properties pane), and expand the Interface Variables/MySalesBPService/MySalesBPService/ManageInventory/outputResponse/SalesDetailResponse/sequence folder.
The outputResponse variable has two sequences:
ProcessingResult
FailureReason
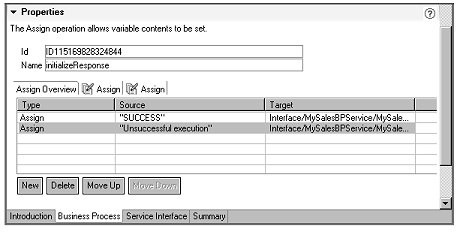
Set a value for FailureReason. First, add a new Assign directive to the Assign activity.
Close the Business Process Variables pane, open the Properties pane, then click New below the table.
Set the FailureReason part of outputResponse to a literal value.
In the second row (with Assign in
the Type column), click the cell of
the Target column, then click the ellipsis button.
When the Variable Reference Dialog opens, select Interface Variables/MySalesBPService/MySalesBPService/ManageInventory/outputResponse/SalesDetailResponse/sequence/FailureReason and click OK.
Again in the second row, click the cell in the Source column, then click the ellipsis button.
When the Variable Reference Dialog opens,
select the Literal option (below the Variable pane),
type Unsuccessful execution in
the Literal field, and click OK.
Finally, enter initializeResponse in
the Name field.
Select File|Save to save the business process.
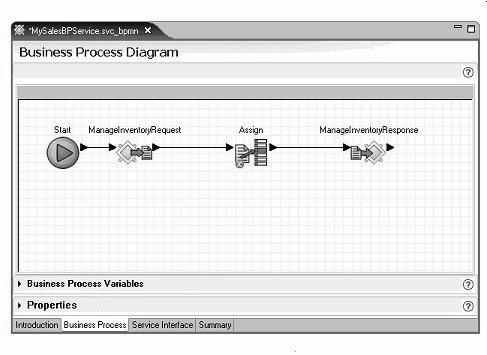
The red “X” no longer displays on the Assign activity’s icon in the editor canvas diagram.
You have finished creating the business process service, MySalesBPService, that has one operation named ManageInventory.
The ManageInventory operation takes one input parameter called inputSalesItem, and returns an output parameter called outputResponse. The outputResponse parameter has a complex type with two parts of type string—ProcessingResult and FailureReason.
The ManageInventory operation receives the input parameter, sets the values of the outputResponse variable parts to literals, and returns the outputResponse parameter. SalesBPService is a complete service that you can deploy and test.
