![]()
![]()
![]()
![]()
In the first lesson, you created a business process service with a simple operation called ManageInventory. In this lesson, you augment the logic of the ManageInventory operation to invoke a pre-built Java service named SalesValidate.
If the business process you created in the previous lesson is not open, in the WorkSpace Navigator, expand MySybStore_Tutorials/Services/BP and double-click MySalesBPService.svc_bpmn to open the file in the Business Process Service Editor.
Add the service invocation inside a complex activity. One of the purposes of a complex activity is to hide details that you do not want to see at the top level of the business process logic.
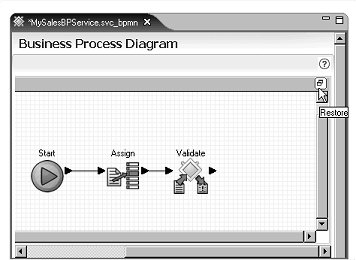
Select the Business Process tab at the bottom of the editor.

When the Business Process Diagram displays, right-click anywhere in the editor canvas and select Show Tool Palette from the context menu.
On the Tool Palette, select the Activities category, then select the Complex activity and drag it onto the editor canvas.
Click the maximize icon on the Complex activity’s title bar.
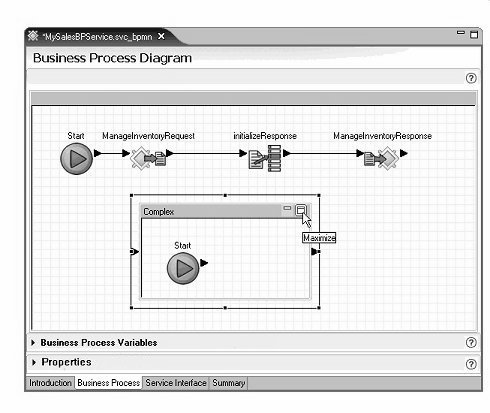
You can also minimize the Business Process Variables and Properties panes to view more of the diagram.
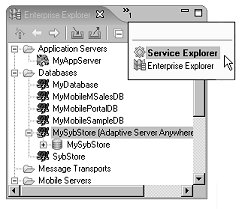
Select the Service Explorer. This view may be hidden behind the Enterprise Explorer. If you cannot locate it, click >>1 to the right of the Enterprise Explorer tab, then select Service Explorer from the list.
Expand Private/MySalesValidate/salesItem.
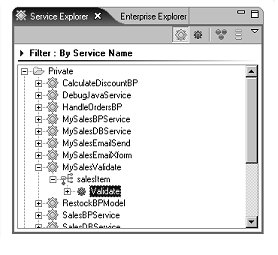
With the Complex activity maximized, drag the Validate service from the Service Explorer onto the Business Process Diagram canvas.

Right-click on the canvas and select Show Tool Palette from the context menu.
Select the Activities category on the Tool Palette and drag the Assign activity onto the canvas.
Rearrange the diagram objects horizontally, placing the Assign icon between the Start icon and the Validate icon.
Connect the business process logic in the diagram
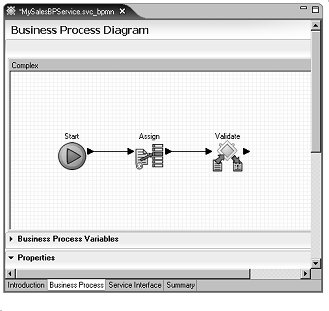
Click the right arrow on the Start icon and drag to and click the left arrow on the Assign icon to connect those objects.
Click the right arrow on the Assign icon and drag to and click the left arrow on the Validate icon to connect those objects.
Select the Assign activity in the diagram.
Expand the Properties pane and click New three times below the Assign Overview table to create three more directives for the Assign activity.
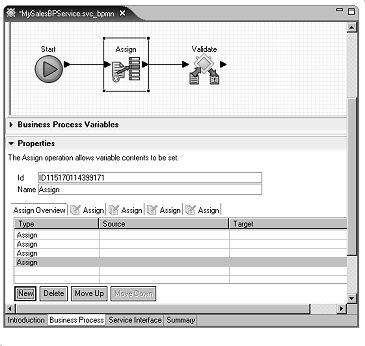
Set the target variable for the first Assign:
In the row of the first Assign in
the Assign Overview table, click the cell
in the Target column, then click the ellipsis button.
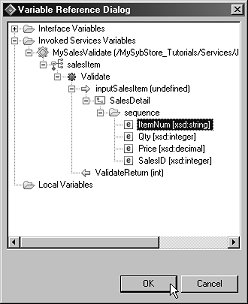
When the Variable Reference Dialog window opens, select Invoked Services Variables/MySalesValidate/SalesItem/Validate/inputSalesItem/SalesDetail/sequence/ItemNum variable and click OK.
Repeat the preceding step for each of the other
three Assign rows in the Properties table
to set the remaining targets using the Qty, Price,
and Sales ID as variables. The other three Target columns
should reflect these settings:
Invoked Services Variables/MySalesValidate/SalesItem/Validate/inputSalesItem/SalesDetail/Sequence/Qty
Invoked Services Variables/MySalesValidate/SalesItem/Validate/inputSalesItem/SalesDetail/Sequence/Price
Invoked Services Variables/MySalesValidate/SalesItem/Validate/inputSalesItem/SalesDetail/Sequence/SalesID
Set the source variable for the first Assign:
In the row of the first Assign in
the Assign Overview table, click the cell
in the Source column, then click the ellipsis button.
When the Variable Reference Dialog window opens, select Interface Variables/MySalesBPService/MySalesBPService/ManageInventory/inputSalesItem/SalesDetail/sequence/ItemNum and click OK.
Repeat steps a and b for the other three Assign Sources. The other three Source columns should reflect these settings:
Interface Variables/MySalesBPService/MySalesBPService/ManageInventory/inputSalesItem/SalesDetail/sequence/Qty
Interface Variables/MySalesBPService/MySalesBPService/ManageInventory/inputSalesItem/SalesDetail/sequence/Price
Interface Variables/MySalesBPService/MySalesBPService/ManageInventory/inputSalesItem/SalesDetail/sequence/SalesID
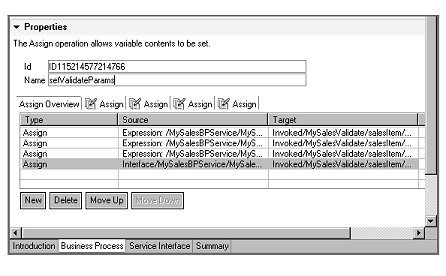
In the Properties pane,
change the name of the Assign activity
by entering setValidateParams in
the Name field.
When you finish, the Business Process Variables section of the editor should look like this:
Restore the Complex activity (click the small double window icon in the upper-right corner of the Complex activity diagram) to return to the top-level of the business process diagram, then minimize the Complex activity small window to make the icon the same as the other objects within the top-level diagram.
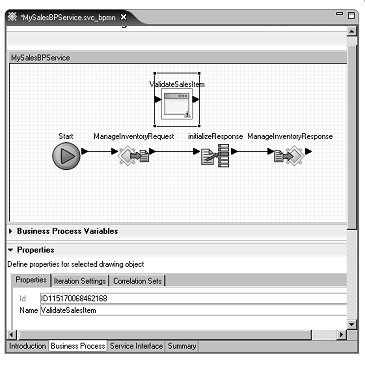
Select the Complex activity
icon in the Business Process Diagram, expand the Properties pane below
the diagram, and rename the Complex activity by entering ValidateSalesItem in
the Name field.
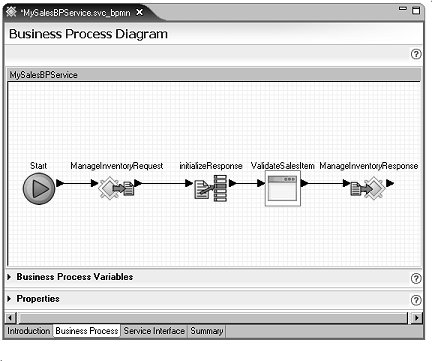
Add the ValidateSalesItem activity between the initializeResponse and ManageInventoryResponse activities in the business process flow:
Right-click the connector line between initializeResponse and the ManageInventoryResponse in the diagram and select Delete from the context menu.
Drag the ValidateSalesItem icon in between the initializeResponse icon and the ManageInventoryResponse icon. Rearrange the icons to fit the diagram as necessary.
Click the right arrow of the initializeResponse icon and drag and click the left arrow of the ValidateSalesItem icon to connect those activities.
Click the right arrow of the ValidateSalesItem icon and click the left arrow of the ManageInventoryResponse icon to connect those activities.
Your business process flow looks like the following graphic with Start connected to ManageInventoryRequest, connected to initializeResponse, connected to ValidateSalesItem, connected to ManageInventoryResponse.
Select File|Save from the WorkSpace main menu bar.
You have finished adding a service invocation to your business process logic.
The ManageInventory operation now takes one input parameter inputSalesItem, validates the sales item data with a Java service, and returns an output parameter outputResponse.
