![]()
![]()
![]()
![]()
In this lesson, you define the transformation mapping from the source content model to the destination content model, as identified by the XML schemas you chose in the preceding lesson.
You must complete “Lesson 1: Creating a new transformation service” before you begin this lesson.
Verify that the Map tab is selected in the editor. The unmapped source and target models display.
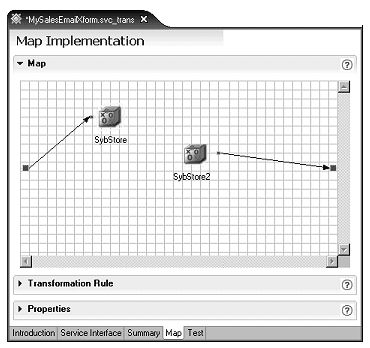
Double-click the SybStore icon and the SybStore2 icon to display the schemas in a tree view.
Click the maximize button to expand the editor view.
Expand the sequences items in both tree views to see all elements in both the source and target schemas.

Create the binding between elements in the source schema to elements in target schema:
Drag and drop RestockQty from the Sybstore tree view onto the SybStore2 tree value StringValue.
Drag and drop ItemNum from the Sybstore tree view onto the SybStore2 tree value StringValue.
You see this message:
The existing rule on the target node StringValue will be modified as a result of this action. Do you wish to continue?
Click OK.

This establishes the base binding between the source and target elements.
Click the solid arrow (the bottom line) that connects the source and target schemas. This activates the Expression editor in the Transformation Rule pane below the diagram.
![]() There is also a dashed arrow connecting the schemas;
ensure you select the solid line.
There is also a dashed arrow connecting the schemas;
ensure you select the solid line.
Click the arrow next to the Transformation Rule pane title, below the diagram, to expand that section and work in the Expression editor. If you do not see the Transformation Rule title, click the arrow beside the Map pane to minimize it.

Define additional mapping rules using the Expression editor and the Tool Palette.
Select Window|Show View|Tool Palette on the WorkSpace main menu.
One concat functions already exists in the Expression editor diagram. Add two more.
Click in the Expression editor pane, select the Xpath String Functions category in the Tool Palette, select the concat function, and drag and drop it onto the Expression editor canvas in the Transformation Rule pane.

![]() If the Tool Palette disappears from view, click the
Tool Palette icon in the Fast View to redisplay it.
If the Tool Palette disappears from view, click the
Tool Palette icon in the Fast View to redisplay it.
Drag and drop another concat function onto the editor canvas.

Select the Constants category on the Tool Palette, select string constant, and drag and drop it onto the Expression editor canvas.
Drag and drop another string constant onto the Expression editor canvas.
To set values for the constant strings:
Select one of the new string constant icons in the Expression editor.
In the Properties for the Operation to
the right of the Expression editor,
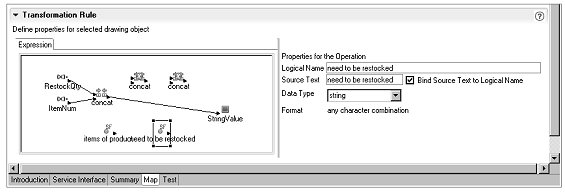
change the Logical Name to items
of product.
Select the Bind Source Text to Logical Name option to the right of the Source Text field to populate that field with the logical name.
Select the other new string constant icon in the editor.
Change the Logical Name to need
to be restocked.
Select the Bind Source Text to Logical Name option.
Finish creating the bindings in the Expression editor using the string constants and schema elements.
In the Expression editor, right-click the line connecting RestockQty to concat and select Delete from the context menu.
Right-click the line connecting ItemNum to concat and select Delete from the context menu.
Right-click the line connecting concat to StringValue and select Delete from the context menu.
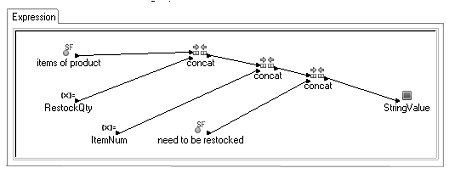
In the Expression editor, define the transformation mapping from the source schema to the target schema. The small arrows on each object represent input and output links. To connect schemas, click the source arrow on the first object’s right side, then drag to and click the target arrow on the other object’s left side.
As you work, arrange the icons in the editor to make linking them easier.
Connect the output link of element RestockQty to the upper input link f the first concat operation.
Connect the output link of constant items
of product to the lower input link of the first concat operation.
Connect the output link of the first concat operation to the upper input link of the second concat operation.
Connect the output link of the element ItemNum to the lower input link of the second concat operation.
Connect the output link of the second concat operation to the upper input link of the last concat operation.
Connect the output link of constant needs
to be restocked to the lower input link of the
last concat operation.
Connect the output link of the last concat operation to the input link of StringValue.
Your expression should have the same connections as the following graphic.
![]() If you link incorrectly, right-click the incorrect line
and select Delete from the context
menu, then add the link again.
If you link incorrectly, right-click the incorrect line
and select Delete from the context
menu, then add the link again.
The final step is to assign literal values to the remaining target elements so that none of the target elements are unmapped. All fields have a minimum setting of “1” and cannot be “null.”
Expand the Map pane (above the Transformation Rule pane) if necessary, then right-click on the canvas and select Add Literal from the context menu.
Right-click on the Map canvas again and select Add Literal again.
Two literal icons appear in the canvas—literal_1 and literal_2.
Select each literal icon and move it slightly below and to the left of the SybStore2 tree view box in the diagram.
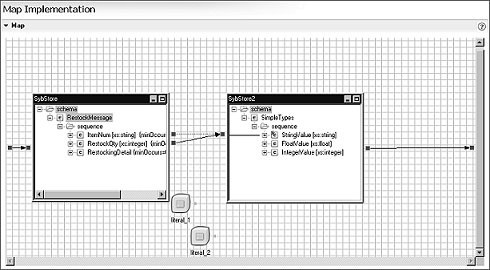
Click the small connection square for the literal_1 icon and drag to the SybStore2 box and click the sequence FloatValue to make the connection.
Click the small connection square for the literal_2 icon and drag to the SybStore2 box and click the sequence IntegerValue to make that connection.

Select literal_1 and,
expand the Properties pane, change
the Name to Float
Value and change Literal Value to 0.0.
Select literal_2 and,
expand the Properties pane, and change
the Name to Integer
Value and change its Literal Value to 0.

Select File|Save from the main menu bar.
Leave the new transformation service open in the editor for the next lesson.
You have finished defining the schema mapping for a transformation service. In the next lesson, you test the transformation service using input values from a sample file.
