![]()
![]()
![]()
![]()
In this lesson, you will learn how to enter SQL statements in the script, add or remove comments, execute the script, and view the results. Then you will use the Visual SQL wizard to modify the script, then execute it again with the modifications.
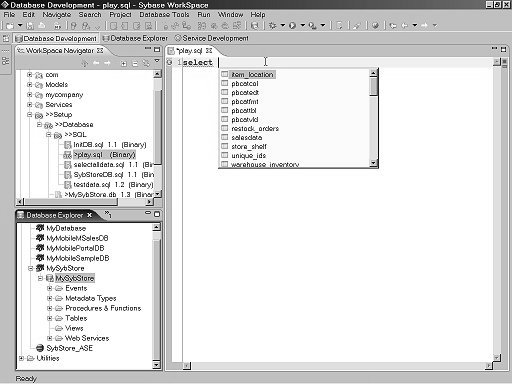
In the SQL Editor where
the play.sql file is open, type select (the
word “select,” followed by a space). Several things
occur:
An “X” in a red circle appears at the beginning of the line, which indicates that the SQL is not valid.
When you pause after typing a space in the editor, a window opens to the right of the cursor that presents a list of available syntax options while you are editing SQL statements. This is the Content Assist feature.
![]() To select an item from Content Assist, either double-click
your choice or click your selection and press Enter. See the online
help topic Sybase WorkSpace Development|Database Development|
Develop|Editing Procedural
Objects|Using Content Assist for
more information.
To select an item from Content Assist, either double-click
your choice or click your selection and press Enter. See the online
help topic Sybase WorkSpace Development|Database Development|
Develop|Editing Procedural
Objects|Using Content Assist for
more information.
Continue typing until the line reads:
select * from store_shelf
which means “select everything from the store_shelf table in the Sybase WorkSpace tutorial sample database.”
As you type:
The “X” at the beginning of the line disappears once the SQL is valid.
The syntax options shown by Content Assist change as you move to different parts of the SQL statement.
Now you can execute the script; however, you must first start and connect to the tutorial database.
If the tutorial database is already running, go to step 4.
If the tutorial database is not running, in the WorkSpace Navigator, expand the folder MySybStore_Tutorials/Setup/Database. Right-click startMySybStore.bat and select Open With|System Editor to start the tutorial database.
You should see the Adaptive Server Anywhere icon in your Windows system tray.

If a connection to the SybStore tutorial database is already established, skip to step 5. When there is a successful connection, you see a database icon below the SybStore connection profile.
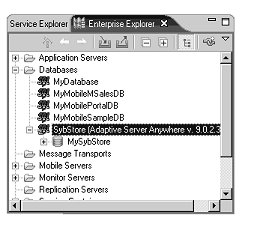
If you are not connected, in the Enterprise Explorer, right-click the MySybStore connection profile, which you created in the tutorial setup, and select Connect to connect Sybase WorkSpace to the tutorial database.
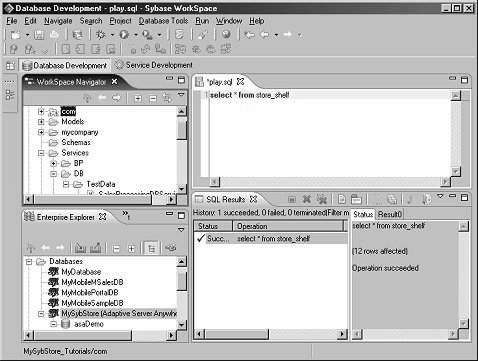
Execute the SQL statement by right-clicking in the editor and selecting Execute All.
![]() When a SQL file is open, right-click in the editor and
choose Execute All to run all SQL statements
in a file. Choose Execute Selected Text to
run only the selected text in a SQL file. You can also run all statements
in a file after the file has been saved by right-clicking the file name
in the WorkSpace Navigator and selecting Execute
SQL File.
When a SQL file is open, right-click in the editor and
choose Execute All to run all SQL statements
in a file. Choose Execute Selected Text to
run only the selected text in a SQL file. You can also run all statements
in a file after the file has been saved by right-clicking the file name
in the WorkSpace Navigator and selecting Execute
SQL File.
You see the SQL Results view with the outcome of the script execution.
Now you will use the Visual SQL wizard to add a SQL statement.
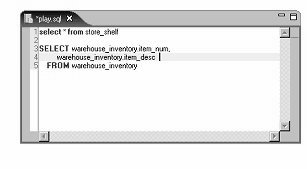
In the editor, place the cursor at the end of the first line in the play.sql file, then press Enter twice. The cursor should be on line 3 of the file, which is where you want to add the new SQL statement.
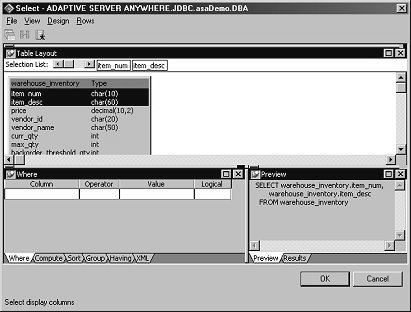
Right-click in the editor and select Visual SQL|Select from the context menu. The Visual SQL wizard opens.
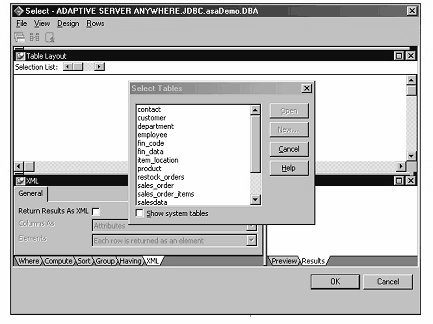
In the Select Tables window, select warehouse_inventory and click Open. You see three main views in the wizard:
Table Layout – select columns.
Where – create a more complex SQL statement by adding and nesting clauses. The tabs at the bottom of the view represent different clauses of a SQL statement appear at the bottom of the lower view.
Results, Preview – view the results or a preview of the SQL statement you are creating.
Highlight item_num and item_desc in the Table Layout view. These columns are added to Selection List bar in the Table Layout view and display the Preview view.
To close the Visual SQL wizard and add the new statement to the SQL file, click OK.
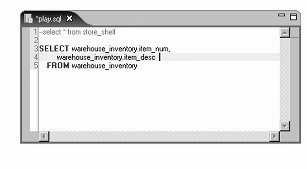
Comment out the first line in the SQL file. Place the cursor anywhere on line 1, right-click, and select Toggle Comment from the context menu.
![]() You can also uncomment the line or comment and uncomment multiple
lines.
You can also uncomment the line or comment and uncomment multiple
lines.
To uncomment one line, right-click anywhere on line 1 and select Toggle Comment from the context menu, or place the cursor at the beginning of the line and press Ctrl / (Control + Backslash).
To comment or uncomment multiple lines, select the lines, right-click on your selection, then select Toggle Comment from the context menu.
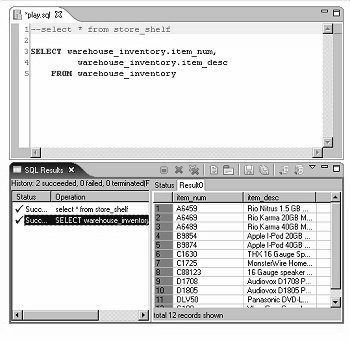
Right-click in the editor and select Execute All from the context menu. Look at the SQL Results view to see the outcome of executing the modified script.
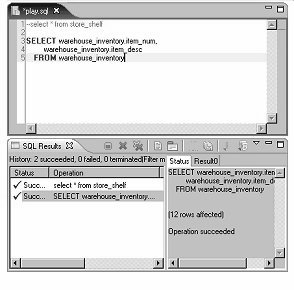
Select the Result tab in the SQL Results view to see items selected from the table based on the executed statement.
To save the SQL file, select File|Save from the Sybase WorkSpace main menu.
Close the editor and Results views by clicking the “X” next to the view’s title. You now know how to create a SQL file, perform basic edits on that file, execute the file, and view the results.
