
Chapter 2 Getting Started with PowerDesigner
Creating a model in Visual Studio
You can create any of the model types supported by PowerDesigner from within Visual Studio. The following procedure focuses on how to create an object-oriented model (OOM).
 To create a object-oriented model:
- Select a project in the Solution Explorer.
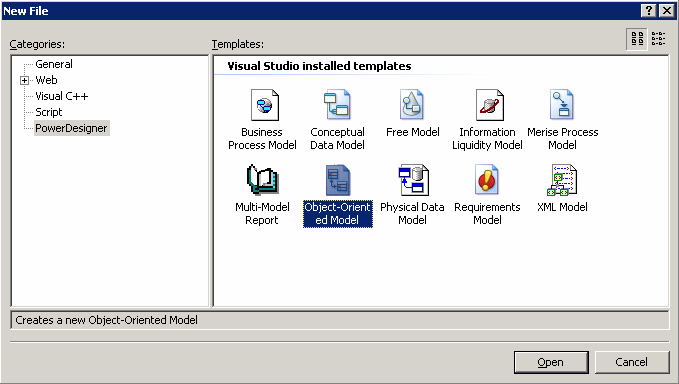
- Select File→New→File to open the New File window:

- Select PowerDesigner in the Categories pane, and the type of model that you want to create in the Templates pane.
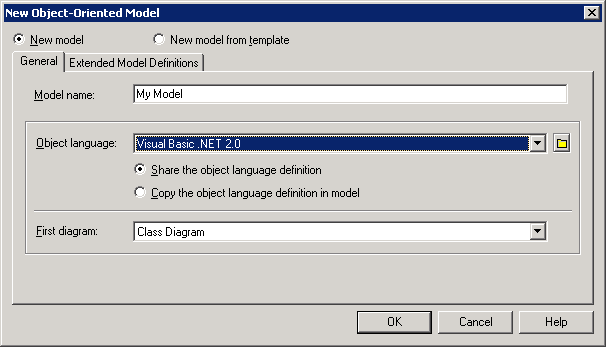
- Click OK to open the New Model window:

- Select one of the following radio buttons:
- New model – Creates a new, standard, model.
- New model from template – Creates a model from a model template, which can contain pre-configured options, preferences, extensions, and objects. For more information, see "Model templates" in the Models chapter.
- Enter a model name. The code of the model, which is used for script or code generation, is derived from this name according to the model naming conventions.
- Select an Object language from the list.
Object languages are defined in dedicated XML files (with a .XOL extension), which are provided as part of your PowerDesigner installation in the "\Resource Files\Object Languages" directory, and contain all the syntax and specifications for each target language.
- Select one of the following radio buttons:
- Share the object language definition – use the original object language file in the "Resource Files\Object Languages" directory. Any changes made to the object language are shared by all linked OOM.
- Copy the object language definition in model –copy the object language file to the model. The copied object language is saved with the OOM and cannot be used without it. It is not affected by modifications made to the original language in the Object Languages directory.
For more information on object language properties and customizing an object language, see "Resource File Reference" and "Working with the Resource Editor" in the Resource Files and the Public Metamodel chapter of the Customizing and Extending PowerDesigner
manual.
- Select the type of the first diagram in the First Diagram list. The first type of diagram selected remains in memory, and is the default for the next time when you create a new OOM.
You can create as many diagrams as you need in the same OOM. They are sorted alphabetically in the Model Explorer, except the diagram specified here, which is always the first in the list.
- [optional] If you want to attach one or more extended model definitions to complement the selected object language, click the Extended Model Definitions tab, and select the extended model definitions of your choice.
For more information on attaching extended model definition to a model, see "Extended Model Definitions" in the Resource Files and the Public Metamodel chapter of the Customizing and Extending PowerDesigner
manual.
- Click OK to create the OOM.
|
Copyright (C) 2008. Sybase Inc. All rights reserved.
|

|


![]() To create a object-oriented model:
To create a object-oriented model:

