
Chapter 15 The Mapping Editor
The Mapping Editor provides a global view of all the mappings defined throughout a given model. It allows you to quickly identify mapped and unmapped objects.
It is available using the Tools→Mapping Editor command from the models that support the mapping feature.
The Mapping Editor dialog box is divided in three parts:
You create a mapping using any of the following ways:
For more information about mapping creation, see section Working with Mappings.
The model from which you open the Mapping Editor is displayed in the Target pane. This model owns the mapping.
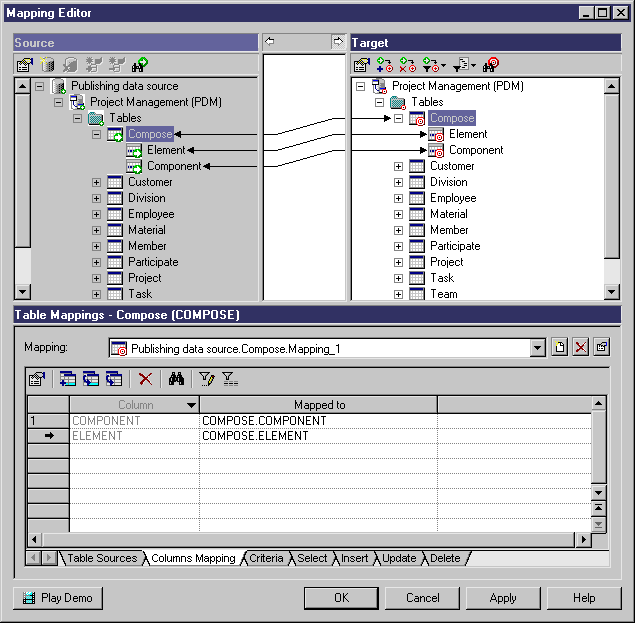
When a mapping is defined, it is materialized by a non-editable link with an arrow joining mapped object icons, giving you a global graphical view. This link is only informative and the arrow specifies the direction of the data transfer.
When you click a link in the section between the Source and the Target pane, you display in the Mappings pane the mapping coming from the source and target objects of the link.
When an arrow is displayed on both extremities of the link, it means the data can be extracted from the source to target and vice versa.
A small symbol is placed on the bottom right-hand corner of the source and target mapped objects icon and also on their respective parent hierarchy icon to ease readability:
| Pane | Mapped object icon | Parent hierarchy icon |
|---|---|---|
| Source (green) |

|

|
| Target (red) |

|

|
When you define a mapping for a parent (for example a table) a mapping is automatically defined for its child objects (columns in this case) when their name matches the name of the source child objects:

You primarily define mappings from a source model to a target model. This means you are defining how to populate the objects of the current model with those of the data source model. It is called direct mapping.
In this case, the Edit Current Model Mappings arrow located beside the Target pane is pressed to let you edit the mappings of the current model using the Mappings pane beneath:

However, you can wish to define reverse mapping. This means you are defining how to populate back the objects of the data source models with those of the current model.
To do so, you have to click the Edit Data Source Mappings arrow located beside the Source pane. The Target pane and the Source pane are switched temporarily:

When you create a mapping, PowerDesigner defines a default reverse mapping (bi-directional link) when the access type of the data source is Read/Write or Write-only.
For more information about data source access type, see the "Creating a data source in the Mapping Editor" section.
You can modify the default reverse mapping by switching Source and Target panes and edit the Insert, Update and Delete sub-tabs in the Mappings pane. These tabs summarize the reverse mapping for a given mapping. Mappings are always owned by the model on the right-hand side.
Depending on whether you are editing the source model mappings or the target model mappings, the following types of links display. A plain link indicates the existence of a mapping for which you are in edition mode and a dotted link indicates that a mapping exists but you are not in edition mode for that mapping.
| Edit...mappings | Type of link | Description |
|---|---|---|
| Current model | 
|
Direct mapping with potential reverse mapping (bi-directional link). |

|
Direct mapping only. | |

|
Reverse mapping with no direct mapping defined. | |
| Data source models | 
|
Reverse mapping with potential direct mapping (bi-directional link). |

|
Reverse mapping only. | |

|
Direct mapping with no reverse mapping defined. |
Defining reverse mapping can be required when a data for example has several sources and you want to define how the data in the current model objects is inserted, updated or deleted in the data source model objects.
| Copyright (C) 2006. Sybase Inc. All rights reserved. |

| |