![]()
![]()
![]()
![]()
One of the essential features of the Data Calculator is its capability to display the result of transformation rules immediately. This powerful simulation capability allows you to verify the incoming data, the transformation rules, and their effect on the data output. By changing the Current Input Record you can even enter your own test data for verifying your transformation rule.
The Data Calculator window consists of two tabbed section: Tabular and Graph. When the Data Calculator window opens, it displays the tabular view of the current simulation.
There are four major areas in the Tabular tab:
Current Input Record
Transformation Rules
Current Output Record
Input/Output Port Content
This area displays the content of the current record. You can freely change the values of each attribute and verify the result in the Transformation Rules and Current Output Record area. Manual modifications made in this area only affect the data of the Input/Output Port buffer. This offers a convenient way to create test cases for transformation rules.
![]() To simulate a single attribute
To simulate a single attribute
Change the value of any attribute in the Current Input Record.
Press Enter.
The result of transformation based on the new field value is displayed in the area to the right.
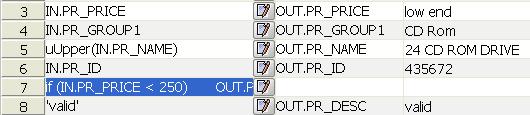
In the Transformation Rule column, you can add, modify, or delete transformation rules. You can also edit single-line functions by changing the current attribute input field. Adding the function uUpper to the attribute IN.PR_NAME would look like the following example:
You can use the Procedure Editor (see “Using the JavaScript Procedure Editor and Debugger”) to create more complex procedural transformations.
The attributes displayed after opening the Data Calculator window in the Tabular view are related to attribute structure of the IN-port and the OUT-Port.
You can also add additional transformation rules. This is extremely helpful if the number of OUT attributes does not match the number of IN attributes, or if additional attributes have been added to the project at a later stage of development.
![]() The view in the Graph Tab mirrors the actual Port Structures. You
cannot add or delete attributes there.
The view in the Graph Tab mirrors the actual Port Structures. You
cannot add or delete attributes there.
![]() To manually add transformation rules
To manually add transformation rules
Right-click anywhere in the Transformation Rule and Current Output Port column.
Select the Insert command to add a line.
Click the added line.
Right-click and select OUT or TMP.
Select one of the attributes from the menu.
The added attribute can now be used for further assignments or calculations.
To delete transformation rules, right-click the desired line in the Transformation Rule or Current Output Port column and select Remove.
To change the order of the transformation rules, right-click the desired line in the Transformation Rule or Current Output Port column and select UP or DOWN.
The transformation rules are processed is sequential order. The processing starts with the first transformation rule of the list. Consider the following example:
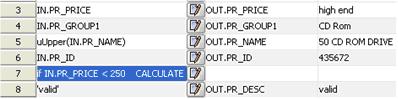
In Line 3 you find a direct mapping between IN.PRICE and OUT.PRICE. Later in line 7, there is a procedure that re-calculates the price and is thus overwriting the assignment of the previous transformation rule.
Shows the current set of records available at the input port.
Shows the current set of records available at the output port.
The Graph tab shows the current mapping between the IN- and OUT-port attributes.
You can freely change the mapping by re-connecting the lines to the connection points.
![]() After you apply a transformation rule to an IN.attribute,
the mapping line between the IN.attribute and the OUT.attribute
will no longer be displayed.
After you apply a transformation rule to an IN.attribute,
the mapping line between the IN.attribute and the OUT.attribute
will no longer be displayed.
