When you deploy a PowerBuilder application as a .NET Web Forms application, PowerBuilder creates a virtual file system that Web Forms users can access from client-side Web browsers. The virtual file system is maintained on the server. Application users can read from and write to files in the virtual file system as long as user permissions for file operations are not restricted.
![]() File operations with external functions
You cannot use external functions to do file operations in
Web Forms targets.
File operations with external functions
You cannot use external functions to do file operations in
Web Forms targets.
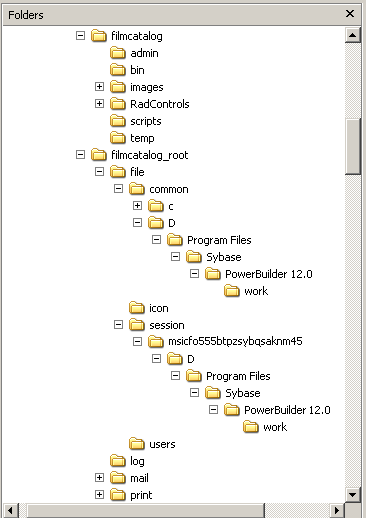
The virtual file system for a PowerBuilder .NET Web Forms application is contained in the applicationName_root\File\Common directory under the virtual root of the IIS server, where applicationName is the name of the current Web Forms application.
Subdirectories of the Common directory store read-only files that are shared by all users of a Web Forms application. PowerBuilder creates these subdirectories at deployment time. A top-level subdirectory is created for each development computer drive containing a file deployed with the PowerBuilder application. The entire path to each application file is mirrored in the virtual file system to reflect the path to the application files on the desktop file system. The name of each top-level subdirectory in the virtual file system consists only of a drive letter that mirrors the desktop drive from where an application file was copied.
Figure 5-3 shows the Common directory and its subdirectories for the FilmCatalog Web Forms application. It also shows a SessionID subdirectory with a single subdirectory where a PDF file was written in Share mode. At runtime, the Web Forms application creates a SessionID folder in the File\Session directory for each user for storing files uploaded or created by that user. The exact name of the SessionID directory is generated by the ASP.NET runtime engine.
Figure 5-3: Virtual file system under the IIS root directory

There are two file process modes: Share mode and Copy mode. The PBWebFileProcessMode global property defines the mode for the current Web Forms application. It is set to Share mode by default.
Share mode: Files are copied from the Common directory to the File\Session\SessionID or the File\User\UserName directory only as needed.
Copy mode: In Copy mode, the first time a file operation is called, all folders and files under the Common directory are copied to the SessionID or UserName directory. In Copy mode, all file operations are handled in subdirectories of the SessionID or UserName directory.
The File Manager presents a merged view of the files under the Common and SessionID or UserName directories. If a read-only file in the Common directory has the same name as a read-write file in the SessionID or UserName directory, only the SessionID or UserName file is displayed.
Although users can delete and move folders or files that they create under the SessionID or UserName directory, files and folders that are copied from the Common directory cannot be deleted because the File Manager presents a merged view of these virtual file paths, and removing a file or folder from the SessionID or UserName directory does not cause its removal from the Common directory.
The common dialog boxes for all file operations are supported regardless of file process mode. You can display these dialog boxes with the GetOpenFileName, GetSaveFileName, and GetFolder functions.
When you set the PBFileManager property to true, the File Manager icon normally displays in every window of your Web Forms application. Users can open the File Manager at any time by clicking the File Manager icon. You can also code an application event to open the File Manager by calling the OpenFileManager function.
Although you can choose to render the File Manager icon at design time, you can change your selection after deployment by modifying the application’s PBFileManager global property. If you do not want the File Manager icon to display on a specific window in your application, you can set the HasFileManager property for that window to false.
For information on the HasFileManager property, see HasFileManager. For information on the OpenFileManager function, see OpenFileManager.
The File Manager icon displays in the upper right corner of Web Forms, just to the right of the Mail Profile Manager icon when that icon is also rendered. The File Manager opens in the current browser window when a user clicks the File Manager icon.
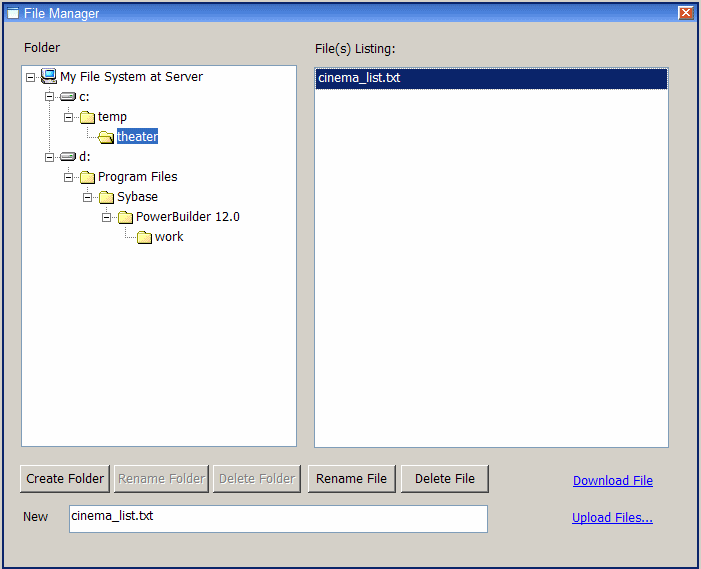
Figure 5-4 shows the File Manager for a Web Forms application.
Figure 5-4: File Manager displaying an uploaded text file

The File Manager allows users to create directories, rename and delete selected files or directories, and upload and download selected files. It allows users to view all files in the virtual file system for the Web Forms application unless those files are located in a directory or subdirectory listed in the PBDenyDownloadFolders global property.
![]() To create a folder using the File Manager
To create a folder using the File Manager
Select the directory in the left pane under which you want to create a folder.
Type the name you want for the new folder in the New text box.
Click Create Folder.
The new directory is created in the SessionID (or UserName) path under the directory you selected in Step 1. No other application user can use the Web Forms File Manager to see the new directory. When an application user leaves the current session, the SessionID directory and any files uploaded to it are removed. (If an application user is logged in with a permanent user account, the UserName directory and its contents are not removed.)
![]() Renaming and deleting a directory
You can rename a directory by selecting it in the left pane,
entering a new name in the New text box, and clicking Rename Folder.
You delete a directory by selecting it in the left pane and clicking
Delete Folder.
Renaming and deleting a directory
You can rename a directory by selecting it in the left pane,
entering a new name in the New text box, and clicking Rename Folder.
You delete a directory by selecting it in the left pane and clicking
Delete Folder.
You cannot rename or delete a directory if it was not created in the current Web Forms session. The Rename Folder and Delete Folder buttons are disabled when a directory under the Common path of the virtual file directory is selected in the left pane of the File Manager.
Users can close the File Manager and return to the current Web Forms window by clicking the close (x) button at the upper right corner of the manager frame.
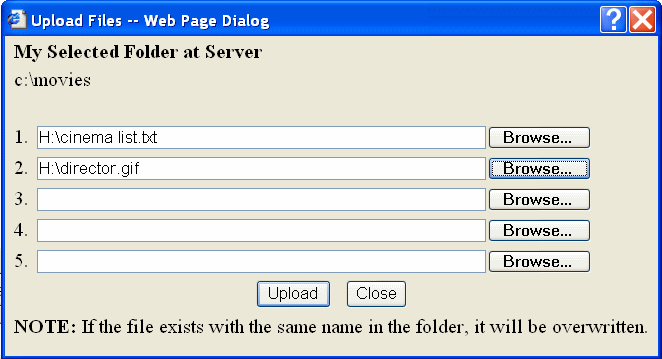
The files that a user uploads through the Web Forms File Manager are saved under the SessionID (or UserName) path. The uploaded files are copied from the client-side computer. They are deleted from the server-side SessionID path (but not from the UserName path) at the end of the Web Forms session.
Figure 5-5 shows the PowerBuilder Upload File dialog box for a Web Forms application.

![]() To upload a file using the File Manager:
To upload a file using the File Manager:
In the left pane of the File Manager, select the directory where you want to copy a file.
The Upload File link displays to the right of the New text box.
Click the Upload File link.
The PowerBuilder Upload File dialog box displays.
Type the file name or browse to the file or files you want to upload.
Click Upload.
A message displays in the dialog box to indicate whether the upload is successful.
Click Close & Refresh to close the dialog box and refresh the file listings in the right pane of the File Manager.
Users can download any file listed in the right pane of the File Manager. The files are downloaded to the client-side computer from either the SessionID (UserName) or Common path on the server. (The actual server path is never displayed in the virtual file directory.)
![]() To download a file using the File Manager
To download a file using the File Manager
From the right pane of the File Manager, select the file you want to download.
The Download File link displays near the bottom right corner of the File Manager, just above the Upload File link.
Click Download File.
The File Download dialog box lists the file name and file type and the name of the server from which the file can be downloaded. It prompts you to save the file or cancel the download. (On some operating systems, the File Download dialog box can also include Open and More Info buttons.)
Click Save.
The Save As dialog box displays.
Browse to the path on the local computer where you want to save the file, and click Save.
The Download Complete dialog box displays. Its appearance depends on the client operating system. It typically prompts you to open the downloaded file, open the folder where you saved the file, or close the dialog box.
Click Close to close the Download Complete dialog box and return to the File Manager.