

This tutorial discusses how to establish application and field synonyms for an airline arrival application.
![]() Creating synonyms for an application
Creating synonyms for an application
In Mobile Web Studio, click Applications in the Build menu, and click the New button. The Application Builder window displays.
In Application Builder, click Add to launch the New Web Element window.
In Location, enter the following URL:
www.flysfo.com/airlines/arrivdepart/index.asp
Click Find or press Enter to display the Web site.
Select American Airlines and Arrival from the drop-down lists, and click “retrieve info.”
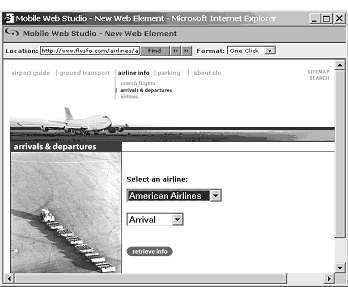
After the screen refreshes, click Next in the top right portion of the New Web Element window.
When the Web page reloads, move your mouse over the table of arrivals and departures, and select a row. You see a preview page where you select the format to display.
Click Select to the left of the table, then click Gridify. (You can use the scroll bar to scroll through the various format options). The Split window displays.
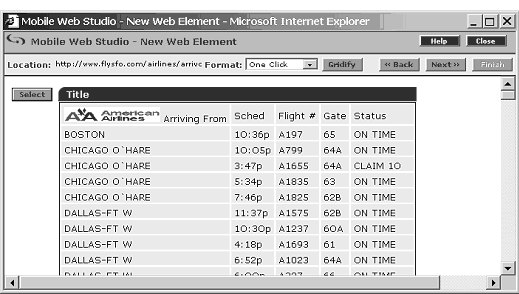
Click Next to bypass the Split window. The Define window displays.
On the Define window, identify the first row as the header row:
Under Define Record Layout, select the Records Contain Labels check box. The Labels are Displayed in Record option displays
Accept 1 in
the text box, and click Next to continue. The Filter window displays.
Click Next to bypass the Filter window. The parameter definition window displays.
On the parameter definition window, check the Variable box to the left of “airline.” Then make this modification (accept the defaults for all other entries):
In Type, select “Select” from the drop-down list. The Add button displays.
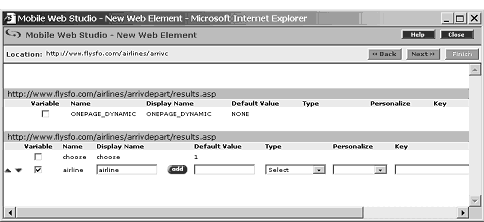
Click Add. The Edit Default Value window displays.
Enter these values:
Display Name = United
Value = UA
Click the plus sign to continue.
Display Name = American
Value = AA
Click the plus sign to continue.
Display Name = British
Value = BA
Click the plus sign to continue.
Display Name = Singapore
Value = SQ
Click the plus sign to continue.
Display Name = Cathay Pacific
Value = CX
Click the plus sign to continue.
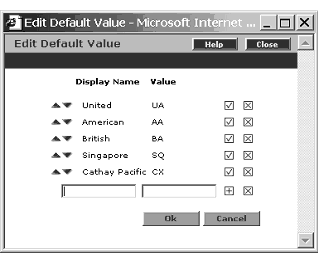
Click OK.
Click Next. The Window Preview displays the modified table.
In Element Name, enter Arrivals as
the name for this Web element, and click Next. The Continuous Capture
window displays.
Click Finish to bypass the Continuous Capture window. The New Web Element window closes.
On the Application Builder window, notice that the Arrivals element appears under Element List.
Click Save.
On the Finish window, make these entries (otherwise accept the defaults):
Content tab In Name, enter Arrivals.
Answers Anywhere tab Add the Application and Field synonyms:
For Application Synonyms:
Enter sfo arrivals,
and click Add.
Enter Incoming,
and click Add.
Enter airline,
and click Add.
For Field Synonyms, select the Assigned Fields from the list of Available Fields:
Select Gate, and click Add.
Select Status, and click Add.
Select Arriving from, and click Add.
Select Flight #, and click Add.
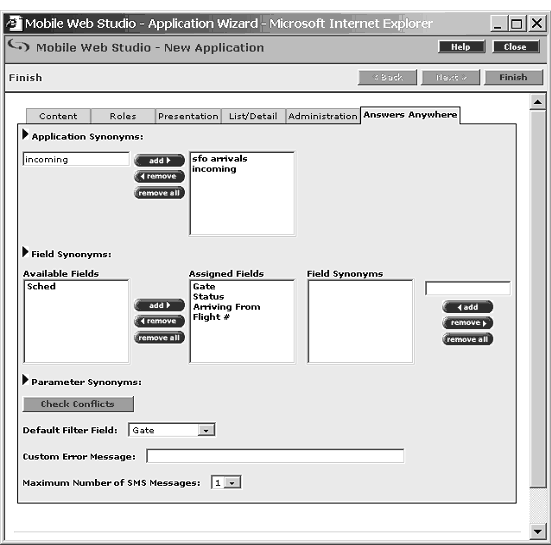
For the list of selected Assigned Fields, set up the synonyms:
Select Arriving From from the Assigned
Fields list, enter From in
the blank field, and click the Add button beneath the text box. The
new synonym displays in the Field Synonym list.
Select Flight # from the Assigned Fields
list, enter Flight in the blank
field, and click the Add button beneath the text box. The new synonym
displays in the Field Synonym list.
For Parameter Synonyms:
Navigate to the parameter list.
Select the Airline parameter.
Add for as
the synonym.
Click the Add button.
In Default Filter Field, select “Gate” from the drop-down list.
Select Check Conflicts to make sure the synonyms are unique for all Unwired Accelerator applications. The Check Conflicts window displays. If no conflicts are reported, close the window and proceed.
If conflicts are reported, change the synonyms that are in conflict to unique values. If synonym or field names are the same between two or more applications, Unwired Accelerator selects the one that was created first.
Click Finish to save the application, and click OK in the Application Saved Successfully window.
Click Close in the upper-right corner to close the Application Builder window.
Click New under Application Manager Status. The Arrivals application displays in the detail pane.
Approve the Arrivals application by right-clicking the Arrivals application in the detail pane, and selecting Approval Status | Approved.
Click OK.
Click Approved under Application Manager Status. The Arrivals application displays.
You have successfully created an application using a Web site as a source, and added search synonyms.
| Copyright © 2005. Sybase Inc. All rights reserved. |

|
|