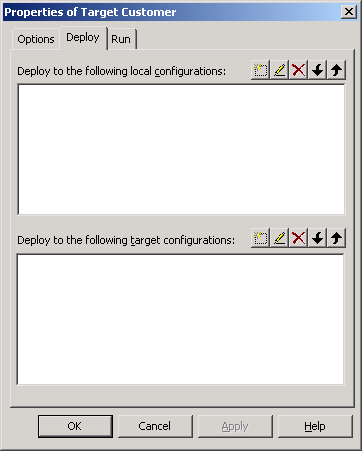
After you create a target, you can add deployment configurations and change settings for the target from the property pages for the target. For information about deploying a Web target, see Chapter 12, “Building and Deploying Web Targets.”
Before you add a deployment configuration, you should decide whether you want to create a test (local) configuration, a shared or production (target) configuration, or both. You can deploy using both types of configuration at the same time.
Local configurations are stored in your registry, whereas target configurations are stored in the PBT file. PBT files with target configurations can be shared in a source control system, but users will have to make certain that any configuration paths, database profiles, and target mappings have identical names on all machines that use the source-controlled target configurations.
You can add multiple deployment configurations to the list of local or target configuration profiles. You can change the order of the configurations in the list by using the wavy arrow keys above the configuration list boxes. A check box next to each deployment configuration in the list lets you select which of the configurations you want to use the next time you deploy your Web target. When you add a configuration, it is selected for deployment by default.
![]() To add deployment configurations:
To add deployment configurations:
Right-click the Web target on the Workspace tab of the System Tree and select Properties from the pop-up menu.
Click the Deploy tab.
The Deploy page is one of three pages in the Properties dialog box for a Web Site target and a JSP target.

Click the Create New Configuration button for either a local deployment configuration or a target deployment configuration.
The New Deployment Configuration wizard starts.
Follow the instructions in the New Deployment Configuration wizard.
In the wizard, you provide the following information:
A name for the deployment configuration
The Web server to deploy to (Active Server Page or Basic)
The access to the ASP site or Web server (static file system or FTP)
FTP server name, deployment directory, and login ID and password
HTTP server name and port
Whether you are using the default object model or no object model
How to handle failures (deploy all or nothing or only successful files)
A folder name for a local copy of the deployed files
After you click Finish on the last wizard page, the new deployment configuration displays in one of the list boxes on the Deploy page of the Target Properties dialog box. You can use the toolbar above the list box to edit, delete, or change the order of the configurations in the list.
Click the Run tab and select a start page for your Web target.
For ASP targets, you must give the complete URL, including the server name, if you want to start your Web application from the design-time environment. For JSP targets, you do not need the complete URL.
![]() Choosing a URL (only for ASP targets)
If you use the Choose URL dialog box (URL picker) that you
access from the ellipsis button next to the Start Page field, only
the file name portion of the URL that you select is added to the
field. You must then type in the protocol, domain, and prefix portion
of the URL (before the file name in the Start Page field) to be
able to start the application from your design-time environment.
Choosing a URL (only for ASP targets)
If you use the Choose URL dialog box (URL picker) that you
access from the ellipsis button next to the Start Page field, only
the file name portion of the URL that you select is added to the
field. You must then type in the protocol, domain, and prefix portion
of the URL (before the file name in the Start Page field) to be
able to start the application from your design-time environment.
Select a deployment configuration that you want to use for running.
The deployment configurations you created for the current Web target are available for selection from the Deploy Configuration For Running drop-down list.