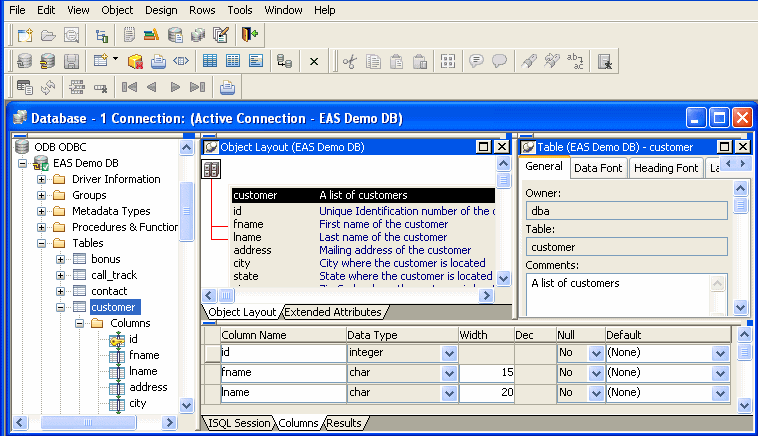
To open the Database painter, click the Database button in the PowerBar.
Like the other InfoMaker painters, the Database painter contains a menu bar, customizable PainterBars, and several views. All database-related tasks that you can do in InfoMaker can be done in the Database painter.

Table 3-1 lists the views available in the Database painter.
View |
Description |
|---|---|
Activity Log |
Displays the SQL syntax generated by the actions you execute. |
Columns |
Used to create and/or modify a table’s columns (formerly done in the Table painter). |
Extended Attributes |
Lists the display formats, edit styles, and validation rules defined for the selected database connection. |
Interactive SQL |
Used to build, execute or explain SQL. (In InfoMaker 6 and earlier, some of this functionality was in the Database Administration painter.) |
Object Details |
Displays an object’s properties. For some objects, properties are read-only; for others, properties can be modified. This view is analogous to the Properties view in other painters. |
Object Layout |
Displays a graphical representation of tables. |
Objects |
Lists the database interfaces and profiles. For an active database connection, might also list all or some of the following objects associated with that database: groups, metadata types, procedures and functions, tables, columns, primary and foreign keys, indexes, users, views, driver information, and utilities (the database components listed depend on the database and your user privileges). |
Results |
Displays data in a grid, table, or freeform format. |
You can select certain database objects from the Objects view and drag them to the Object Details, Object Layout, Columns, and/or ISQL views. Just position the pointer on the database object’s icon and drag it to the appropriate view.
Object |
Can be dragged to |
|---|---|
Driver, group, metadata type, procedure or function, table, column, user, primary or foreign key, index |
Object Details view |
Table or view |
Object Layout view |
Table or column |
Columns view |
Procedure or view |
ISQL view |
Table 3-3 describes how to do some basic tasks in the Database painter. Most of these tasks begin in the Objects view. Many can be accomplished by dragging and dropping objects into different views. If you prefer, you can use buttons or menu selections from the main bar or from pop-up menus.
To |
Do this |
|---|---|
Modify a database profile |
Highlight a database profile and select Properties from the Object or pop-up menu or use the Properties button. Alternatively, use the Import and Export Profiles menu selections to copy profiles. For more information, see the section on importing and exporting database profiles in Connecting to Your Database. |
Connect to a database |
Highlight a database profile and then select Connect from the File or pop-up menu or use the Connect button. With File>Recent Connections, you can review and return to earlier connections. You can also make database connections using the Database Profile button. |
Create new profiles, tables, views, columns, keys, indexes, or groups |
Highlight the database object and select New from the Object or pop-up menu or use the Create button. |
Modify database objects |
Drag the object to the Object Details view. |
Graphically display tables |
Drag the table icon from the list in the Objects view to the Object Layout view, or highlight the table and select Add To Layout from the Object or pop-up menu. |
Manipulate data |
Highlight the table and select Grid, Tabular, or Freeform from the Object>Data menu or the pop-up menu Edit Data item, or use the appropriate Data Manipulation button. |
Build, execute or explain SQL |
Use the ISQL view to build SQL statements. Use the Paste SQL button to paste SELECT, INSERT, UPDATE, and DELETE statements or type them directly into the view’s workspace. To execute or explain SQL, select Execute SQL and Explain SQL from the Design or pop-up menu. |
Define or modify extended attributes |
Select from the Object>Insert menu the type of extended attribute you want to define or modify, or highlight the extended attribute from the list in the Extended Attributes view and select New or Properties from the pop-up menu. |
Specify extended attributes for a column |
Drag the column to the Object Details view and select the Extended Attributes tab. |
Access database utilities |
Double-click a utility in the Objects view to launch it. |
Log your work |
Select Design>Start Log from the menu bar. To see the SQL syntax generated, display the Activity Log view. |