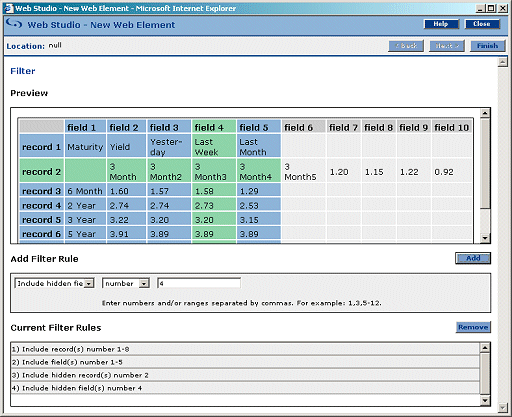

Once you select any type of “Include” action, you must explicitly select the rows you want included in the portlet. You can also hide a entire record, an entire field, one cell, or a range of cells in a grid. Although the hidden record or field does not display to the end user, you can use the record’s or field’s values in calculations or event definitions.
![]() Including a record or field
Including a record or field
Log in to Web Studio, select Build Portlets from the left pane, then click New to open the Portlet Builder.
When the Portlet Builder displays, click the down-arrow to the right of the Add button and select Web Element.
When the Web Studio – New Web Element window
appears, select the enter http://bonds.yahoo.com in
the Location field and click Find.
In the New Web Element window, verify that One Click is selected as the Format, and click Next.
Perform a One Click capture on the U.S. Treasury Bonds table on the left; that is, when the yellow selection box displays, click anywhere in the Bonds table.
In the window where you choose which capture option to use, click Select to the left of the top grid capture, then click Next.
On the Add Split Rules window, click Next to bypass the options.
On the Define window, click Next to bypass the options.
On the Filter window, specify which records (rows) you want to include in the portlet:
Select Include Records from the first drop-down list in the Add Filter Rule section.
In the second drop-down, select Number.
In the third field, enter 1-8 to
indicate that you want to include records 1 through 8 in this portlet,
then click Add.
On the Filter window, specify which fields (columns) you want to include in the portlet:
Select Include Fields from the first drop-down list in the Add Filter Rule section.
In the second drop-down, select Number.
In the third field, enter 1-5 to
indicate that you want to include fields 1 through 5 in this portlet,
then click Add.
Next, hide one of the included records. The record will not display, but you could use the values in a calculation, or copy the values to another field.
On the Filter window, select Include Hidden Records from the first drop-down list in the Add Filter Rule section.
In the second drop-down, select Number.
In the third field, enter the number of the record you
want hidden; for this example, enter 2,
then click Add. Record 2 is highlighted in the Preview to indicate
this record will be hidden.
And finally, hide an entire column.
In the first drop-down, select Include Hidden Fields.
In the second drop-down, select Number.
In the third field, enter the number of the field you
want hidden; for this example, enter 4,
then click Add. Field 4 is highlighted in the Preview to indicate
that this field will be hidden.
Notice that all of the new rules display in the Current Filter Rules, and that the included and hidden records and fields are highlighted in a different color.

Click Next.
Enter Bonds for
the element name and click Next.
Click Finish.
In the Portlet Builder, click Save to save the portlet with the same name and information.
Click Preview. You see a grid that incorporates the records and field selection you made.
| Copyright © 2004. Sybase Inc. All rights reserved. |

|
|