![]()
![]()
![]()
![]()
You can define user, system, or file data sources. If you want to use the data source on a Pocket PC, define a file data source. Windows CE supports only file data sources.
When you create a local SQL Anywhere database in the Database painter, PocketBuilder automatically creates a data source definition and database profile for you. Therefore, you do not need to define a user data source for use on the desktop, but you do need to define a file data source if you want to deploy the database to a remote device.
You can use the ODBC Data Source Administrator utility to create a file data source, but in general it is easier to use a text editor. The file should be saved with ANSI encoding.
The following example shows the format of the file. The database name and engine name are usually the same as the name of the database file without the .db extension. In the example, the database file is MyRemoteDB.db, and on the device it will be installed in the same directory as the application, \Program Files\AcmeTools:
[ODBC]
uid=dba
pwd=sql
enginename=MyRemoteDB
databasename=MyRemoteDB
databasefile=\Program Files\AcmeTools\MyRemoteDB.db
start=\Program Files\Sybase\ASA\dbsrv9.exe
Use the following procedure to define a system or user data source for use on a desktop or server:
![]() To define a data source for the SQL Anywhere driver:
To define a data source for the SQL Anywhere driver:
Launch the ODBC Data Source Administrator utility. From the User or System DSN tab page, click the Add button.
The Create New Data Source dialog box displays.
Select a driver for the version of SQL Anywhere or Adaptive Server Anywhere that your database uses and click Finish.
The ODBC configuration dialog box displays for the database version you selected.
Figure 14-2: The ODBC Configuration dialog box
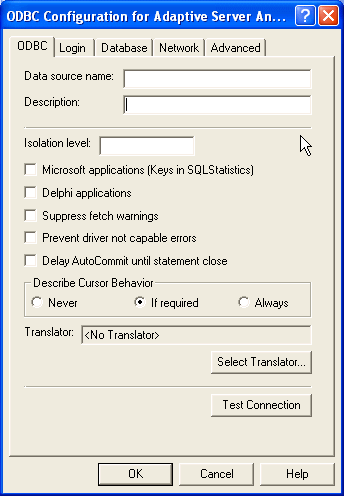
You must supply the following values:
Data source name on the ODBC page
User ID and password on the Login page
Database file on the Database page
Use the Help button to get information about boxes in the dialog box.
![]() Using the Browse button
When you use the Browse button to supply the Database File
name (for example, the SQL Anywhere sample database demo.db),
this name also creates entries in both the Data Source Name and
Database Name boxes. This might change values you previously supplied
in these boxes.
Using the Browse button
When you use the Browse button to supply the Database File
name (for example, the SQL Anywhere sample database demo.db),
this name also creates entries in both the Data Source Name and
Database Name boxes. This might change values you previously supplied
in these boxes.
If you want to specify a different name for the data source or database, you can edit one or both of these boxes after using the Browse button.
Click OK to save the data source definition.
When the SQL Anywhere ODBC driver cannot find a running database server using the PATH variable and Database Name setting, it uses the commands specified in the Start Line field to start the database server.
If you are creating a DSN for use on a Pocket PC device, specify the name of the network database server and its location on the device, for example: \Program Files\SQLAnyPath\dbsrv\XX.exe, where SQLAnyPath is typically SQLAny10 for SQL Anywhere 10 and Sybase\ASA for Adaptive Server Anywhere 9, and XX is the version of the database system.
If you are creating a DSN for use in the development environment only, you can specify the name and location of the personal database server. The default location is C:\Program Files\Sybase\SQL Anywhere XX\win32\dbengXX.exe.
You can add a -q or -qw switch to the start line to prevent the SQL Anywhere log screen from displaying when you connect to the database. The start line in a file DSN for use on a Pocket PC device would look like this:
start=\Program Files\SQLAny10\dbsrv10.exe -qw
The start line for Adaptive Server Anywhere 9 might look like this:
start=\Program Files\Sybase\ASA\dbsrv9.exe -q
Because the connection might take a few moments, you might want to call the SetPointer function to display the Windows CE version of the hourglass icon when using the -q or -qw switch. On Windows CE, you need to explicitly call the SetPointer function to reset the default pointer when the script completes.
For more information on completing the ODBC Configuration For SQL Anywhere dialog box, see the SQL Anywhere Server Database Administration book in the SQL Anywhere documentation set.
