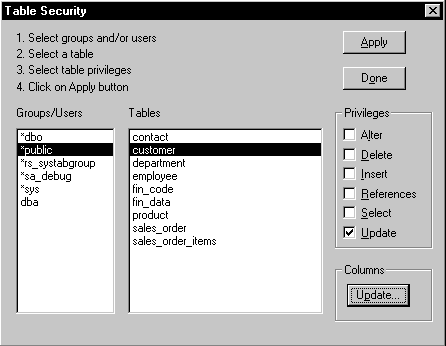
The Database painter's Design>Table Security menu allows you to control access to the current database. You use the Table Security dialog box to assign table access privileges to different users and groups.
UltraLite databases do not use owners and groups. All users have full permission to update tables, and you cannot use the procedures described in this section to grant or revoke access to tables.
![]() User maintenance in UltraLite databases
Although you
cannot set table-level security for UltraLite databases, PocketBuilder
allows you to add or edit multiple users in these databases. UltraLite
permits a maximum of four user IDs per database. For UltraLite database
profiles, you can use the pop-up menu for the Users item in the Objects
view of the Database painter to add or edit users, and to delete
users.
User maintenance in UltraLite databases
Although you
cannot set table-level security for UltraLite databases, PocketBuilder
allows you to add or edit multiple users in these databases. UltraLite
permits a maximum of four user IDs per database. For UltraLite database
profiles, you can use the pop-up menu for the Users item in the Objects
view of the Database painter to add or edit users, and to delete
users.
When you select Add or Edit User from the User item pop-up menu for an UltraLite database, or when you select Delete User, you should already know which user IDs exist in the database. If you select either of these menu items, the Properties view displays. The Properties view has three text boxes (User, New Password, and Confirm New Password) when you select Add or Edit User, and a single text box (UltraLite User to Delete) when you select Delete User.
After you save changes in the Database painter involving user maintenance for an UltraLite database, the Output view displays a message with the type of change you made.
Figure 16-13 shows the Table Security dialog box that allows you to assign privileges to selected users or groups for specific tables in a database.
Figure 16-13: Assigning privileges in the Table Security dialog box

![]() To control access to the current database:
To control access to the current database:
Select Design>Table Security from the Database painter menu
Select a user or group, or multiple users and groups, from the Groups/Users list box.
Select a table from the Tables list box.
Select the privileges you want to give the selected users or groups for the table you selected in the previous step, and click Apply.
Update privileges can be restricted to specific columns of the selected table by clicking the Update button, selecting only those columns for which you want to grant the privilege, and clicking OK.
Repeat steps 2 – 5 until you have granted all the privileges that you want to assign, then click Done.