Once you have defined the map and added it to the list of maps in ECMAP, you can continue with the map development procedure outlined in “Task overview,” in Chapter 1, “ECMAP Overview” in the ECMAP User Guide. The major steps in the procedure are outlined in this section, along with more detailed additional steps that are specific to EDI-to-EDI mapping:
Set up a company ID. You can add multiple Company IDs if you have different outbound company profiles.
Set up a trading partner for the inbound EDI transaction.
Add a trading agreement for the trading partner you set up and add the EDI-to-EDI map to the inbound trading partner you have set up.
Set up a trading partner for the outbound EDI transaction. If the outbound transaction is for the same trading partner as the inbound transaction, skip this step.
Add a trading agreement for each trading partner you set up, and add the EDI-to-EDI map to the outbound trading partner you have set up.
![]() You must have a trading agreement for each outbound
transaction before you can set options, such as requesting an acknowledgement,
on outbound transactions.
You must have a trading agreement for each outbound
transaction before you can set options, such as requesting an acknowledgement,
on outbound transactions.
In the Trade Agreement - Properties window | Map Type drop-down list, select EDI. This distinguishes outbound EDI-to-EDI transaction from a non-EDI-to-EDI outbound transaction.
You need not enter the map name since it is not a part of the trade agreement lookup when defining an outbound EDI-to-EDI transaction.
Create the inbound and outbound transactions to specify to ECMAP the segment and elements that make up the data you are exchanging with the trading partner.
In the Segments tab, select File | Make Transaction to create the inbound transaction.
A dialog box displays asking if you would like to create another transaction. Select Yes to create the outbound transaction.
In the Create Transaction window, you can toggle between the inbound and outbound transactions. Select View | Transactions. The list of defined transactions displays in a menu for you to select.
Select an outbound transaction from the list. The transaction displays.
You can modify the segments for a transaction if needed.
In the Segments tab, select File | Make Transaction to create the outbound transaction. You can create additional outbound transactions if you have defined them.
![]() If you selected an outbound EDIFACT transaction in step
6c, a dialog box displays with the prompt “Is this EDIFACT
Syntax 4?” when you select File | Make Transaction.
If you selected an outbound EDIFACT transaction in step
6c, a dialog box displays with the prompt “Is this EDIFACT
Syntax 4?” when you select File | Make Transaction.
Select Yes if it is a Syntax 4 EDIFACT transaction. The UNB and UNG segments are created based on Syntax 4.
Select No if it is not a Syntax 4 EDIFACT transaction. The UNB and UNG segments are created based on Syntax 3.
When you have completed creating the outbound transaction, select No when you are prompted to create another transaction.
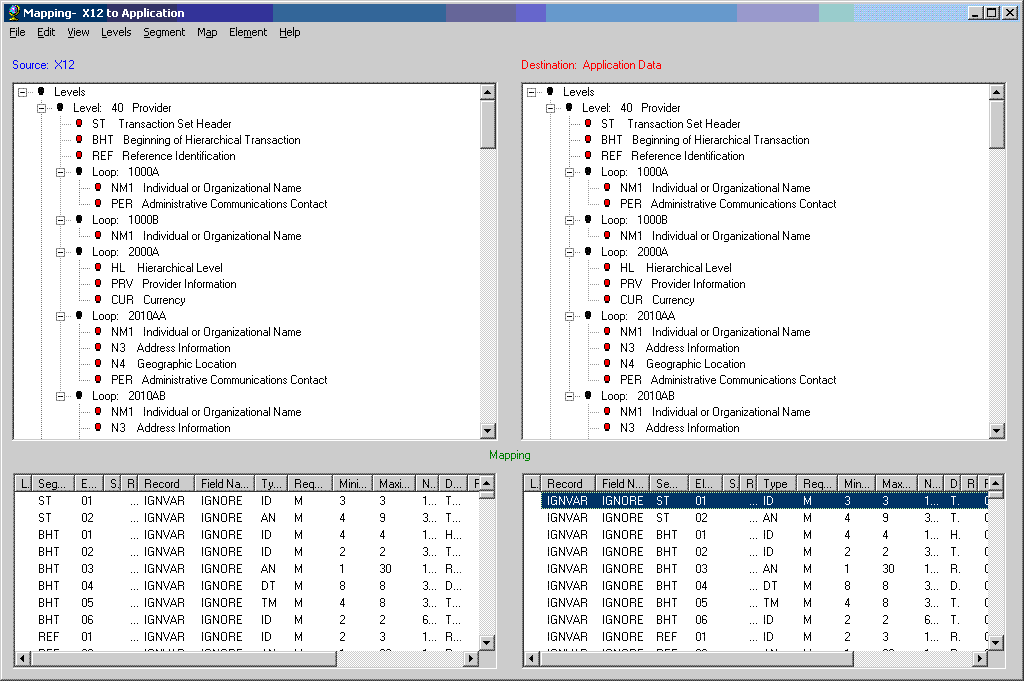
Build the map in the Mapping window that displays after you have created the inbound and outbound transactions.
Figure 2-1: EDI-to-EDI Mapping window

Figure 2-1 shows the EDI-to-EDI Mapping window. In the upper section of the Mapping window, you can view the source EDI file containing the inbound transaction on the left side pane and the destination EDI file containing the outbound transaction on the right side pane. You can map directly from the source EDI file to the destination EDI file.
For EDI-to-EDI maps, two mappings occur. These are for inbound and outbound element mappings. The Mapping window has been updated to display two panes at the bottom for inbound and outbound element mapping. The left pane is for inbound element mapping and the right pane is for outbound element mapping.
Double-click a segment in any of the transaction panes to view the elements belonging to that segment. Click a segment or element to view its properties in the bottom pane. If the segment or element is mapped, it displays the link, as a check mark, to the linked item on the opposite pane.
You can perform drag-and-drop mappings between inbound and outbound transactions. As with other types of maps, you can also perform drag-and-drop mapping with memory variables, records, and fields. You can add rules and cross-reference tables to elements in inbound and outbound transactions. You can use the Make Field option with both the inbound and outbound transactions.
![]() To map an inbound element to multiple outbound transactions,
make copies of the inbound element and map a copy to each outbound
element you want to map to that particular inbound element.
To map an inbound element to multiple outbound transactions,
make copies of the inbound element and map a copy to each outbound
element you want to map to that particular inbound element.
You can also map the inbound element to a record/field or memory variable and map that record/field or memory variable to multiple outbound elements. This allows you to perform rules and execute commands on records/fields or memory variables, allowing you to manipulate data or perform other business operations.
You must associate levels with the transaction. Levels have several properties:
Levels can be the same across all mapped transactions.You can use the same level number in the source and destination panes.
For outbound EDI, you must map the envelope level segments such as ISA, GS, ST, SE, GE, and IEA to their own levels.
The options in the main menu across the top of the Mapping window change to reflect the current active pane—source or destination.
Build the map logic with rule definitions using rule commands, including the new rule commands for EDI-to-EDI mapping. These are described in EDI-to-EDI rule commands and system variables.
Create the map flow.
Generate the map.
Run the map.