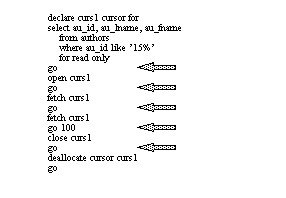
Here is a piece of cursor code you can use to display the locks that are set up at each point in the life of a cursor. The following example uses an allpages-locked table. Execute the code in Figure 28-4, and pause at the arrows to execute sp_lock and examine the locks that are in place.
Figure 28-4: Read-only cursors and locking experiment input

Table 28-3 shows the results.
Event |
Data page |
|---|---|
After declare |
No cursor-related locks. |
After open |
Shared intent lock on authors. |
After first fetch |
Shared intent lock on authors and shared page lock on a page in authors. |
After 100 fetches |
Shared intent lock on authors and shared page lock on a different page in authors. |
After close |
No cursor-related locks. |
If you issue another fetch command after the last row of the result set has been fetched, the locks on the last page are released, so there will be no cursor-related locks.
With a data-only-locked table:
If the cursor query runs at isolation level 1, and read committed with lock is set to 0, you do not see any page or row locks. The values are copied from the page or row, and the lock is immediately released.
If read committed with lock is set to 1 or if the query runs at isolation level 2 or 3, you see either shared page or shared row locks at the point that Table 28-3 indicates shared page locks. If the table uses datarows locking, the sp_lock report includes the row ID of the fetched row.