The Select Directory Service dialog box allows you to open a session with a directory service. You can open a session with:
Any directory service that has a driver listed in the libtcl.cfg file
The sql.ini file
![]() To open a session in Windows NT
To open a session in Windows NT
Double-click on the local name of the directory service you want to connect to, as listed in the DS Name box, or
Click on the local name of the directory service you want to connect to, as listed in the DS Name box, and click the OK button.
![]() dsedit uses the SYBASE environment
variable to locate the libtcl.cfg file. If
the SYBASE environment variable is not set correctly, dsedit cannot
locate the libtcl.cfg file.
dsedit uses the SYBASE environment
variable to locate the libtcl.cfg file. If
the SYBASE environment variable is not set correctly, dsedit cannot
locate the libtcl.cfg file.
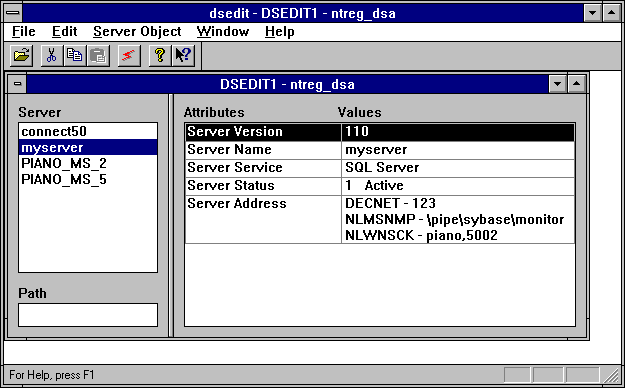
Figure 4-1: Using dsedit to edit an interfaces file

The session number and local name of the directory service appear in the header bar. In Figure 4-1, the session number and local directory service name are “DSEDIT1 - ntreg_dsa.”
![]() To open additional sessions
To open additional sessions
dsedit allows you to have multiple sessions open at one time.
Choose Open Directory Service from the File menu.
The Select Directory Service box appears.
Double-click the local name of the directory service to which you want to be connected (or click on the directory service name and click OK).
Opening multiple sessions allows you to copy entries between directory services. See “Copying server entries” for more information.
![]() To switch between sessions
To switch between sessions
If you have multiple sessions open at one time, you need to activate a session before you can work in it.
Activate a session by either:
Clicking in the session window
Choosing the session from the Windows menu
The dsedit title bar shows which session is active.
![]() To open the default interfaces file for editing
To open the default interfaces file for editing
Select Sybase Interfaces File.
Click OK.
![]() To open a file other than the default interfaces
file
To open a file other than the default interfaces
file
Select Sybase Interfaces File.
Edit the displayed file name.
Click OK.
The Directory Service Session window appears.
You can open multiple interfaces file sessions with different files.
The Directory Service Session screen displays the full path name of the interfaces file and lists the server entries contained within it.
Add new server entry – displays the Server Entry Editor window, where you specify the name and network addresses for a new server entry.
Modify server entry – lets you view and modify the network addresses for a selected server entry. To view or modify a server entry, select the server in the list, then click Modify server entry to display the server’s attributes in the Server Entry Editor window.
Copy server entry – lets you copy one or more entries to another interfaces file.
Close Session – closes the session window and writes changes to the interfaces file.
For procedures on using these buttons, see “Modifying server entries in Windows NT”.
Clicking the Add new server entry or Modify server entry button in the Session screen displays the Server Entry Editor window.
You use the Server Entry Editor window to view or edit server entries in an interfaces file:
Server name – if you are adding a server entry, type the name of the new server. If you are editing a server entry, you can edit the name field to rename the server. The new name cannot already exist in the interfaces file.
Available network transports – a list of the network addresses where the server accepts client connections.
To create a new address, click Add network transport. See “Modifying server entries in Windows NT”.
To edit an existing address, click Modify network transport. See “Modifying server entries in Windows NT”.
To remove a selected network address, click Delete network transport.
To rearrange the order of addresses in the list, click Move network transport up or Move network transport down.
OK – commits your changes and closes the window. Changes to the interfaces file are not applied until you close the session using the Close Session button in the Directory Service Session screen.
Cancel – closes the window and discards any edits.