![]()
![]()
![]()
![]()
This lesson teaches you how to use message context to send out-of-band data as part of an invocation. For example, you can use message context to dynamically set properties, such as correlation set IDs, when a message service operation is invoked.
You set the subject of an e-mail message sent using the Email service. This lesson assumes that you are somewhat familiar with service deployment and testing from other tutorials in this guide.
Select Window|Open Perspective|Other, select Service Development, and click OK.
Add message context to the business process service that requires using some predefined schemas, which are packaged as a project template.
Select File|New|Project from the WorkSpace main menu bar.
When the New Project wizard opens, select Sybase|New Project From Template in the Wizards list, then click Next.
When the Select a Project Template window opens, select WorkSpace Project with Schemas and click Finish.
In the WorkSpace Navigator, expand the new project folder WorkSpaceProjectWithSchemas/Schemas.
Right-click emailHeader.xsd and select Copy from the context menu.
Right-click the MySybStore_Tutorials/Schemas folder and select Paste.
If MySalesBPService is not open in the editor, expand MySybStore_Tutorials/Services/BP/ in the WorkSpace Navigator, double-click MySalesBPService.svc_bpmn to open it in the Business Process Service Editor, and select the Business Process tab.
Right-click in the Business Process Diagram canvas and select Show Tool Palette from the context menu.
![]() If the Tool Palette disappears from view, click the
Tool Palette icon in the Fast View to redisplay it.
If the Tool Palette disappears from view, click the
Tool Palette icon in the Fast View to redisplay it.
Select the Activities category, then drag and drop an Assign activity onto the diagram to the right of ManageInventoryResponse.
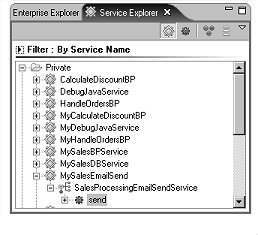
In the Service Explorer view, expand Private/MySalesEmailSend/SalesProcessingEmailSendService, select the send service and drag and drop it onto the business process canvas to the right of the Assign activity you just added.
Connect the Assign and send activities into the business process flow. Rearrange the objects on the canvas as necessary to connect the activities.
Click the arrow on the right side of the ManageInventoryResponse and drag to and click the arrow on the left side of the Assign activity to connect those icons.
Click the arrow on the right side of the Assign activity and drag to and click the arrow on the left side of the send target icon to connect those icons.
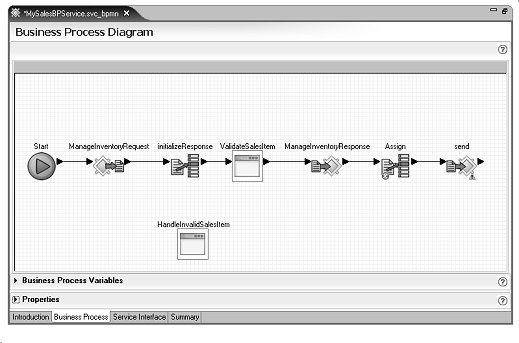
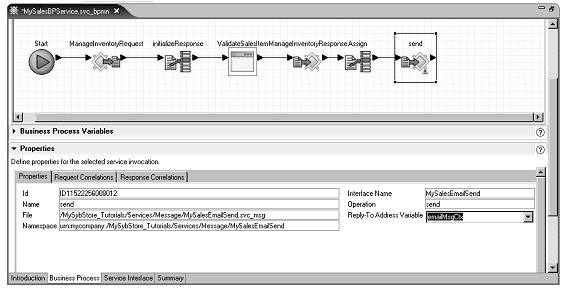
The canvas should look like this:
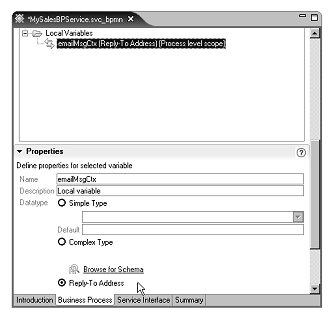
Expand the Business Process Variables pane in the editor (below the canvas).
To create a new local variable, right-click the Local Variables folder and select New Variable from the context menu.
In the Business Process Variables pane, expand the Local Variables folder and select newVariable1.
Expand the Properties pane,
enter emailMsgCtx in the Name field
and select Reply-To Address for
the Datatype.
Right-click the Local Variables folder and select New Variable from the context menu to create another new local variable.
In the Business Process Variables pane, expand the Local Variables folder and select newVariable1.
In the Properties pane, complete these properties:
Name – enter emailMsgVar.
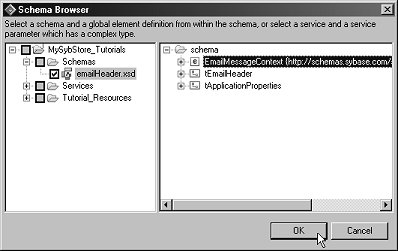
Datatype – select Complex Type and click Browse for Schema. When the Schema Browser opens, expand MySybStore_Tutorials/Schemas, and select the emailHeader.xsd check box.
In the Schema Browser right pane, select EmailMessageContext below the schema folder and click OK.
Expand the Properties pane, then select the new Assign icon on the editor canvas.
Expand the Business Process Variables pane, then expand Interface Variables/MySalesBPService/MySalesBPService/ManageInventory/inputSalesItem/SalesDetail/sequence.
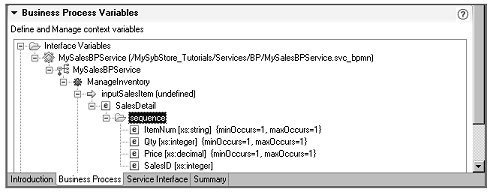
Drag and drop ItemNum from the Business Process Variables pane into the Source column of the Assign in the Properties pane Assign Overview table.
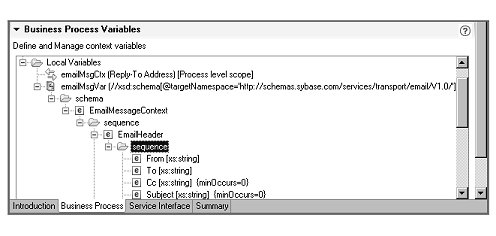
In the Business Process Variables pane, expand Local Variables/emailMsgVar/schema/EmailMessageContext/sequence/EmailHeader/sequence.
Drag and drop Subject onto the Target column of the Assign variable in the Properties pane.
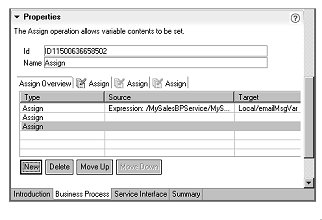
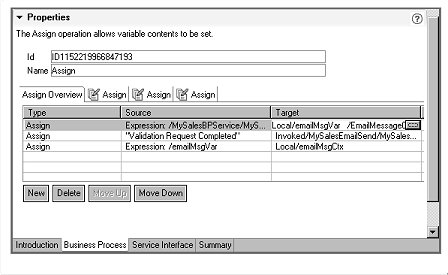
In the Properties pane, click New twice to add two additional Assign variables in the Assign Overview table.
Select the Source column of the second Assign variable and click the ellipsis button.
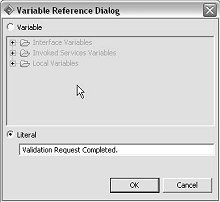
In the Variable Reference Dialog,
select the Literal option, enter Validation
Request Completed, and click OK.
In the Business Process Variables pane, expand Invoked Service Variables/MySalesEmailSend/SalesProcessingEmailSendService/send.
Drag and drop data (string) from the Business Process Variables pane to the Target column of the second Assign variable in the Properties pane.
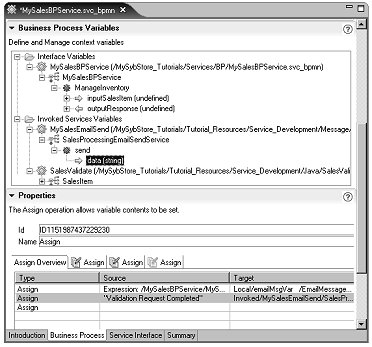
For the third Assign variable, in the Business Process Variables pane, expand Local Variables and drag and drop emailMsgVar to the Source column in the Properties pane.
For the Target column of the third Assign variable, in the Business Process Variables pane, expand Local Variables and drag and drop emailMsgCtx to the Target column in the Properties pane.
The finished Assign Overview table should look like this:
In the Business Process Diagram canvas, select the send operation operation.
In the Properties pane Reply-To AddressVariable field (to the right of the File field), select emailMsgCtx from the drop-down list.
WARNING! Do not type the variable name in the Reply-To Address Variable field; you must select the name from the field’s drop-down list. If this field does not display in its entirety on your screen, temporarily change your screen resolution to 1280 x 1024.
Select File|Save from the WorkSpace main menu bar, then select File|Close.
