![]()
![]()
![]()
![]()
Select Window|Open Perspective|Other, select Service Development, and click OK
Select File|New|Service from the WorkSpace main menu bar.
When the Create a service wizard opens, select Business Process Service and click Next.
Select the MySybStore_Tutorials/Services/BP as
the parent folder, enter MyCalculateDiscountBP as
the name of the service, and click Finish.
When the new service opens in the Business Process Service Editor, select the Service Interface tab.
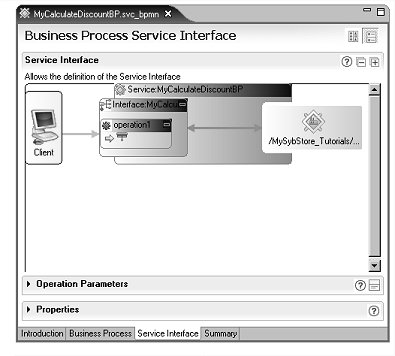
Expand the Properties pane,
select the operation1 box in the Service Interface diagram,
and change the operation Name to receiveCustomerData.
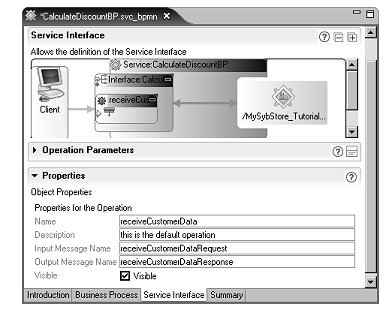
Open the Operation Parameters pane, reselect the receiveCustomerData operation in the diagram if necessary, and click Add three times in the Operation Parameters pane to add three parameters with these values:
Parameter 1:
Name – customerid
Style – Input
Datatype – Simple Type string
Parameter 2:
Name – item
Style – Input
Datatype – Simple Type string
Parameter 3:
Name – qty
Style – Input
Datatype – Simple Type integer
![]() To change parameter name and type, use the Properties pane.
To change parameter name and type, use the Properties pane.

Select the Business Process tab.

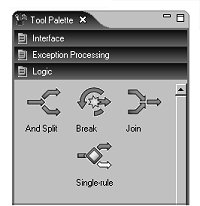
Add some logic to calculate the discount. Right-click in the editor canvas and select Show Tool Palette from the context menu.
![]() If the Tool Palette disappears, click the Tool Palette
icon in the Fast View to redisplay it.
If the Tool Palette disappears, click the Tool Palette
icon in the Fast View to redisplay it.
Select the Logic category and drag and drop the Single-rule logic onto the canvas.
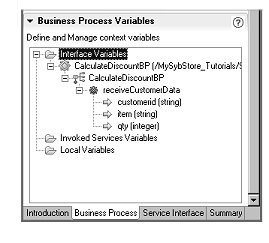
Select the Single-rule object in the diagram and expand the Business Process Variables pane in the editor. Expand the Interface Variables folder, then expand the tree view below that until you see the qty parameter.
With the Single-rule object selected in the diagram, expand the Properties pane and drag the qty variable to the Expression editor in the Properties pane and drop it on the Select Variable icon.
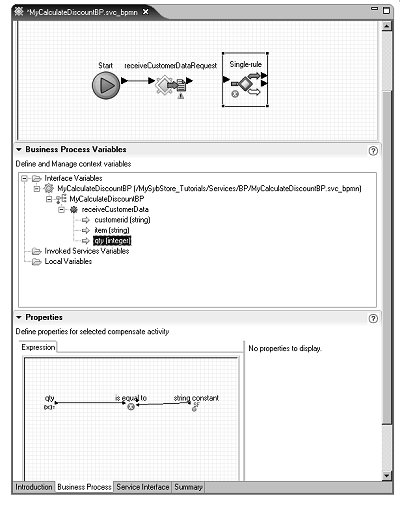
Click in the Expression editor, reselect or reopen the Tool Palette, select the Boolean Functions category, and drag and drop the is greater than item on top of the is equal to item in the Expression editor to replace it.
![]() To redisplay the Tool Palette from the Fast View, right-click
the Tool Palette title tab and select Fast View. You can also right-click
the Tool Palette title tab, select Detached and move the Tool Palette
view anywhere on your screen.
To redisplay the Tool Palette from the Fast View, right-click
the Tool Palette title tab and select Fast View. You can also right-click
the Tool Palette title tab, select Detached and move the Tool Palette
view anywhere on your screen.
Click in the Expression editor, reselect or reopen the Tool Palette, select the Generic Variable and Constants category, and drag and drop the integer constant item on top of the string constant item in the Expression editor to replace it.
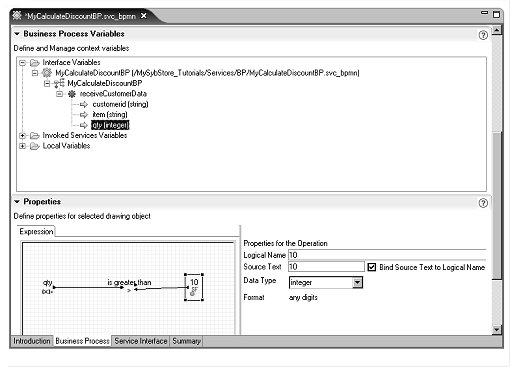
Select the integer constant item
in the Expression editor, and in the Properties
for the Operation section to the right of the Expression editor,
enter 10 in the Logical
Name field and select Bind Source to Logical
Name. The Source Text field
now displays “10.”
The completed single-rule expression should look like this:
In the Business Process Diagram canvas, click the right arrow of receiveCustomerDataRequest and drag and click on the left arrow of Single-rule to connect the logic.
Close the Properties pane, then select File|Save on the WorkSpace main menu bar.
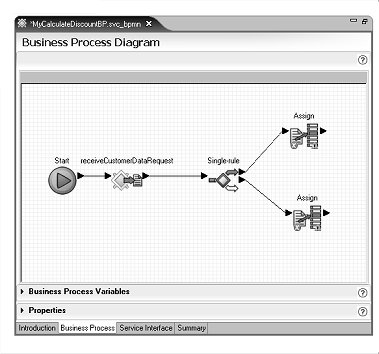
On the Business Process Diagram canvas, reopen the Tool Palette, select the Activities category, then drag and drop two Assign activities to the MyCalculateDiscountBP service.
Connect the two Assign activities to the Single-Rule activity. Rearrange the objects on the canvas as necessary to achieve the look shown in the following graphic.
Click the right top arrow of Single-rule and drag and click on the left arrow of the first Assign to connect those objects.
Click the right bottom arrow of Single-rule and drag and click on the left arrow of the second Assign to connect those objects.
Expand the Business Process Variables pane (below the canvas), right-click the Local Variables folder and select New Variable from the context menu.
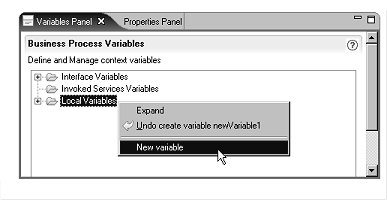
In the Business Process Variables pane, right-click the Local Variables folder and select New Variable from the context menu.
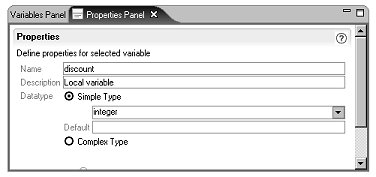
Expand the Local Variables folder, right-click the new local variable, and select Edit Variable from the context menu.
When the Properties section
opens, change the Name to discount and verify
that the Datatype is Simple
Type Integer.
Select File|Save from the WorkSpace main menu bar.
Make the new discount variable the target for each Assign activity:
On the Business Process Diagram canvas, select the top Assign object, expand the Properties pane, then expand the Business Process Variables pane.
Drag Local Variables/discount from the Business Process Variables pane and drop it in the Target column of the top Assign.
Select the bottom Assign object on the canvas, and drag Local Variablesdiscount from the Business Process Variables pane and drop it in the Target column of the bottom Assign
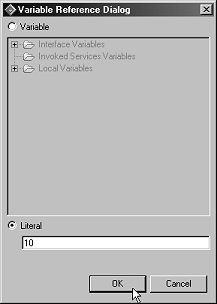
Give the top Assign activity discount a literal value of 10.
Select the top Assign on the canvas and in the Properties pane, click the ellipsis button in the Source column.
When the Variable Reference Dialog window
opens, select the Literal option, enter 10,
and click OK.
Set the bottom Assign activity discount variable a literal value of 0 (zero).
Select the bottom Assign on the canvas and in the Properties pane, click the ellipsis button in the Source column.
When the Variable Reference Dialog window
opens, select the Literal option, enter 0 (zero),
and click OK.
Select File|Save from the WorkSpace main menu bar, then select File|Close to close the editor.
In the WorkSpace Navigator, create the MyCalculateDiscountBP package profile and package, then deploy the service.
![]() Unwired Orchestrator must be running and there must
be a connection established from MyServiceContainer in WorkSpace.
See “Starting and connecting to the Unwired Orchestrator server” for
instructions.
Unwired Orchestrator must be running and there must
be a connection established from MyServiceContainer in WorkSpace.
See “Starting and connecting to the Unwired Orchestrator server” for
instructions.
Expand MySybStore_Tutorials/Services/BP, right-click MyCalculateDiscountBP.svc_bpmn and select Create Sybase Services Package Profile from the context menu. Select File|Close to close the package profile in the editor.
Right-click MyCalculateDiscountBP.svcpkgdef and select Build Package from the context menu. When a message displays stating that the package was built successfully, click OK.
Right-click MyCalculateDiscountBP.svcpkgdef and select Deploy Package from the context menu. When the Select Target Server window opens, select MyServiceContainer and click OK. If a message asks if the current package file can be overwritten, click Yes.
When the Deployment Status window states that deployment to MyServiceContainer was successful, click OK.
The Console view shows the progress of each activity. Click the “X” on the Console title tab to close that window.
![]() See the WorkSpace online help topic WorkSpace Development|Service
Development|Packages for more information about building
and deploying service packages.
See the WorkSpace online help topic WorkSpace Development|Service
Development|Packages for more information about building
and deploying service packages.
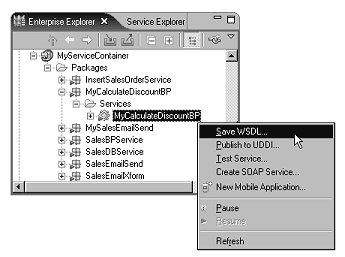
In the Enterprise Explorer, expand Service Containers/MyServiceContainer/Packages/MyCalculateDiscountBP/Services and locate MyCalculateDiscountBP.
Right-click MyCalculateDiscountBP and select Save WSDL from the context menu.
When the Save WSDL Wizard dialog
box opens, select MySybStore_Tutorials/Services/BP in
the tree view, confirm the File Name is MyCalculateDiscountBP,
and click Finish.
In the WorkSpace Navigator, expand MySybStore_Tutorials/Services/BP right-click MyCalculateDiscount.wsdl, and select Create SOAP Service from the context menu.
When the New Service Wizard opens,
select MySybStore_Tutorials/Services/BP as
the parent folder, enter MyDiscountSOAP for
the File Name of the service, and click Next.
In the Service Summary window, click Next.
In the Service Endpoint Creation window, select the option Yes, Create An Endpoint Now, and click Next.
In the Endpoint Name window,
accept the default Name endpoint and click Next.
In the Connection Properties window, click Finish.
The SOAP service is created and opens in the SOAP Service Editor. Select File|Close. You do not need to save the service because you have not made any changes to it.
