![]()
![]()
![]()
![]()
In this lesson, you create a new DataWindow object in the DataWindow library you created in the previous lesson.
Select File|New|Other from the main menu bar to open the New creation wizard.
Select Sybase|DataWindow and click Next.
When the Create DataWindow Object wizard opens, do the following:
DataWindow Library – click Browse to select the library. In the Browse for Library window, go to MySybStore_Tutorials_Web/webroot/WEB-INF/pb/dwlibrary1.pbl and click OK.
DataWindow Name – type Orders.
Presentation Style – select the Tabular icon.
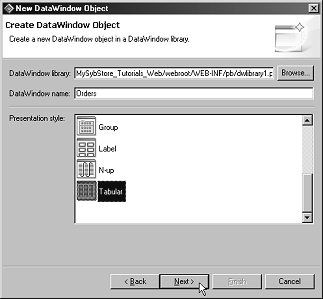
Click Next.
On the Database Connection Profile page, select MySybStore and click Next.
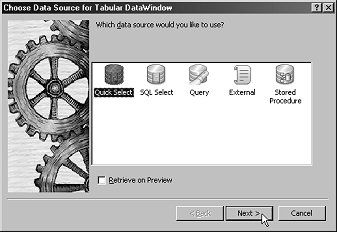
On the Choose Data Source for Tabular DataWindow page select the Quick Select icon and click Next.
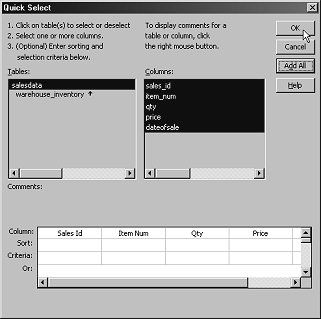
On the Quick Select page, select saledata in the Tables list, click Add All to include all columns in the DataWindow.
The table at the bottom displays the column headings from the Columns list.
Click OK.
When the Select Color and Border Settings dialog box opens, accept the default settings and click Next.
When the Ready to Create Tabular DataWindow dialog box opens, click Finish.
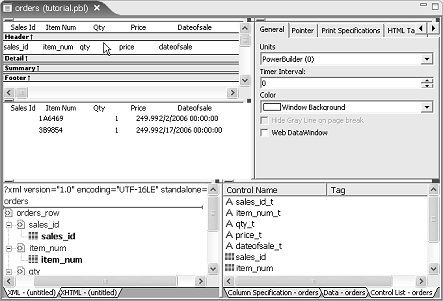
The orders DataWindow is created and opens in an editor.
Select File|Close to close the Orders DataWindow.
The orders DataWindow file appears under MySybStore_Tutorials_Web/webroot/pb/dwlibrary1.pbl in the WorkSpace Navigator.
