![]()
![]()
![]()
![]()
In this lesson, you create a new JSF page and add the DataWindow you created in the previous lesson.
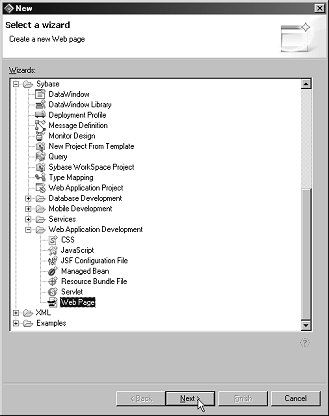
Select File|New|Other from the main menu bar.
When the New wizard opens, select Sybase|Web Application Development|Web Page and click Next.
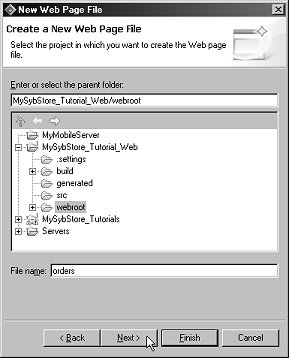
On the New Web Page File page,
select MySybStore_Tutorials_Web/webroot to
populate the Enter or Select the Parent Folder field,
type orders in the File
Name field, and click Next.
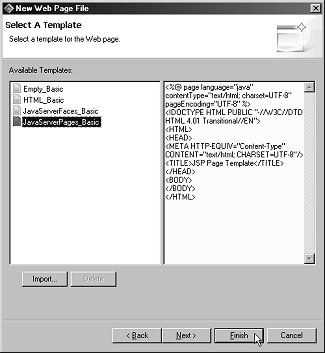
On the Select a Template page, select JavaServerPages_Basic in the Available Templates list, and click Finish to use that template for the Web page you are creating.
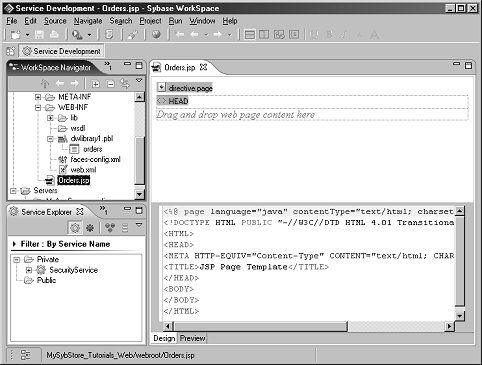
The orders.jsp Java server page is created and opens in the editor.
![]() To close the Properties and Servers views to enlarge
the editor, click the “X” on
the title tabs.
To close the Properties and Servers views to enlarge
the editor, click the “X” on
the title tabs.
Select Window|Show View|Palette from the main menu bar.
![]() If you do not see Palette on
the list, click Other. When the Show
View dialog box opens, select Basic|Palette and
click OK.
If you do not see Palette on
the list, click Other. When the Show
View dialog box opens, select Basic|Palette and
click OK.
Expand JSF HTML, select
the OutputText control, and drag and drop
it onto the text Drag and drop web page content
here.
Right-click in the editor and select Show View|Properties from the context menu.
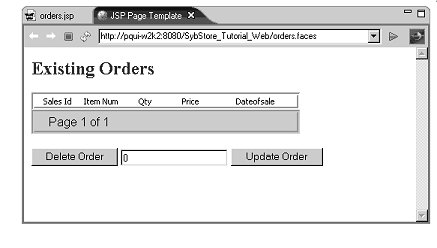
Select Output Text in
the editor, and type Existing Orders in
the Value field of the Properties view. OutputText changes
to Existing Orders on the
Web page.
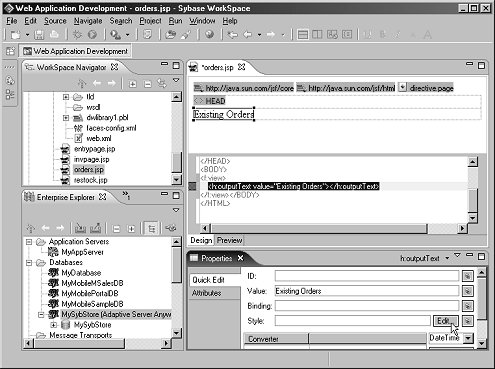
In the Properties view, scroll to the Style field and click Edit to the right of the field.
In the CSS Style Definition dialog box, complete these style options:
Select Text in the left pane, then do the following:
Font – select Times New Roman, Serif.
Size – select 24.
Weight – select bold.
Color – select Blue.
Click OK to save your choices and close the dialog box.
In the WorkSpace Navigator, expand MySybStore_Tutorials_Web/webroot/WEB-INF/.
To display the library’s objects, click the plus sign by the dwlibrary1.pbl.
You see the Orders DataWindow object that you created in a preceding lesson.
To create a DataWindow on the Web page, drag and
drop the Orders DataWindow below the Existing
Orders heading in the graphical section of
the editor.
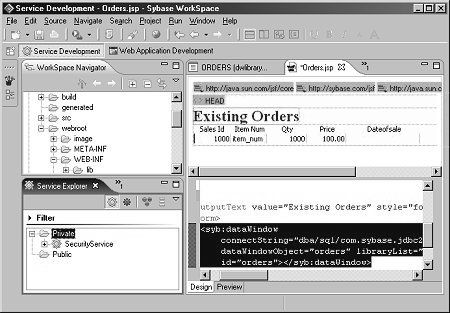
In the source section, find this connection string:
connectString="dba/sql/com.sybase.jdbc2.jdbc.
SybDriver/jdbc:sybase:Tds:localhost:2638"
and change the database port to 2658.
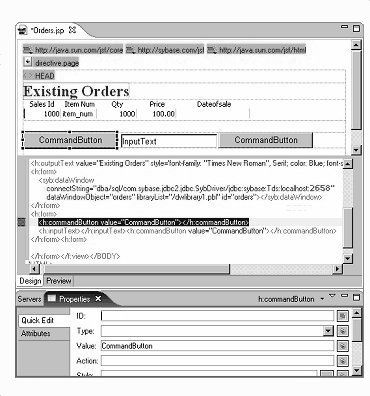
Add two command buttons and an input text field to the Web page:
Select Window|Show View|Palette from the main menu bar to open the Palette view.
![]() If the Palette disappears from view, reselect it from
the menu or click the Palette icon
on the Fast View shortcut bar.
If the Palette disappears from view, reselect it from
the menu or click the Palette icon
on the Fast View shortcut bar. 
For more information, see Sybase WorkSpace Development online help topic Fast View Shortcut Bar.
On the Palette, expand JSF HTML and drag and drop a CommandButton control below the DataWindow.
From the JSF HTML section of the Palette, drag an InputText control and drop it after the command button you just added.
From the JSF HTML section, drag another CommandButton control and drop it after the InputText control you just added.
Now you can add properties to the buttons and field that you added to the page.
Right-click in the editor and select Properties from the context menu.
Select the first CommandButton in the graphical section of the editor.
In the Properties view,
change the Value to Delete
Order.
In the Action field,
type #{dwManagedBean.doDelete}.
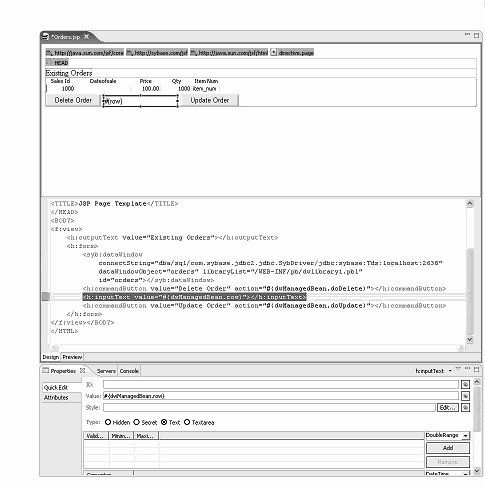
In the editor, select the second CommandButton,
and in the Properties view, change
the Value to Update
Order.
Scroll down to the bottom of the Properties view
and in the Action field, enter #{dwManagedBean.doUpdate}.
Select the InputText field
in the editor, and in the Properties view, type #{dwManagedBean.row} in
the Value field.
Select File|Save from the main menu bar to save the page, then select File|Close to close the page in the editor.
Right-click MySybStore_Tutorials_Web/webroot/orders.jsp in the WorkSpace Navigator and select Run from the context menu.
When the Run On Server dialog box opens, select Choose An Existing Server, select MyAppServer as the server you want to use, then click Finish to test the page in the browser.
Currently there are no existing orders.
Select Window|Close All Perspectives from the main menu bar.
