The Replication Agent ra_admin utility provides the following major functions:
Create, copy, delete, and verify a Replication Agent instance
List all valid Replication Agent instances installed on the Replication Agent host machine
Return the complete path of the Replication Agent base directory
To start the ra_admin utility, invoke the ra_admin command. The ra_admin command has the following syntax:
ra_admin [option [create options]] [inst_name]
![]() You can also invoke the ra_admin command
with no option specified to return command usage information.
You can also invoke the ra_admin command
with no option specified to return command usage information.
The options for the ra_admin command are:
-b
returns the complete path of the Replication Agent base directory.
-c inst_name
where inst_name is a valid name, unique on the host machine, for a new Replication Agent instance. Creates a new Replication Agent instance using the specified name.
When the -c option is used, you must also specify the following create options:
-p port_num
where port_num is a valid client socket port number, unique on the host machine, for the administration port of the new Replication Agent instance.
-t database
where database identifies the type of database server that the primary database resides in. Valid options are:
ibmudb – DB2 Universal Database
informix – Informix Dynamic Server
mssql – Microsoft SQL Server (valid only on Windows NT or Windows 2000)
oracle – Oracle Server
![]() The database option is not case-sensitive.
The database option is not case-sensitive.
When the -c option is used, you also have the option of specifying that the configuration of the new Replication Agent instance should be based on the configuration file for an existing Replication Agent instance. To do this, use the -f option, as shown below:
-f old_inst
where old_inst is the name of an existing Replication Agent instance whose configuration you want to duplicate for the new Replication Agent instance.
When you use the -f option to copy an existing Replication Agent configuration, you need not specify the -t option. The database type is automatically copied when you specify the -f option.
![]() When you invoke the ra_admin command
with the -c option and specify the -f option,
some of the configuration parameters are set to default values.
See “Copying a Replication Agent configuration” for
more information.
When you invoke the ra_admin command
with the -c option and specify the -f option,
some of the configuration parameters are set to default values.
See “Copying a Replication Agent configuration” for
more information.
-d inst_name
where inst_name is the name of an existing Replication Agent instance. Deletes the specified Replication Agent instance.
-l
lists all verifiable Replication Agent instances.
-v inst_name
where inst_name is the name of an existing Replication Agent instance. Verifies the complete installed directory structure for the specified Replication Agent instance.
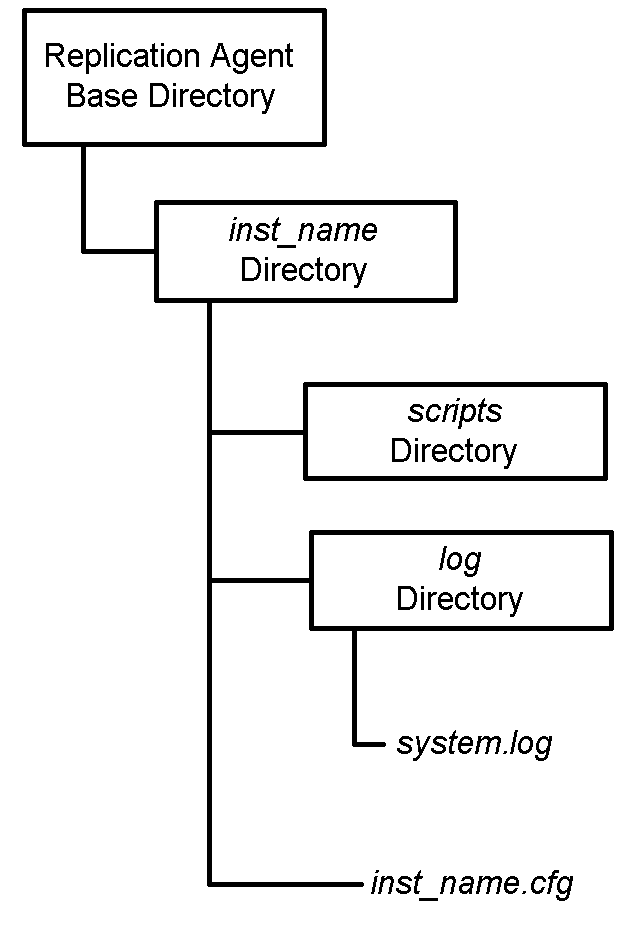
Figure 3-1 shows the directory structure created for each Replication Agent instance.
Figure 3-1: Replication Agent installed directory structure

The Replication Agent base directory (rax-12_5) is created when you install Sybase Replication Agent software on a host machine.
![]() You can install the Replication Agent software more than once
and create multiple independent Replication Agent base directories, however,
a single installation (with a single base directory) can support
multiple Replication Agent instances.
You can install the Replication Agent software more than once
and create multiple independent Replication Agent base directories, however,
a single installation (with a single base directory) can support
multiple Replication Agent instances.
Each time you create a Replication Agent instance by invoking the ra_admin command with the -c option, the ra_admin utility creates the subdirectories for the Replication Agent instance under the Replication Agent base directory.
When you verify a Replication Agent instance by invoking the ra_admin command with the -v option, the ra_admin utility verifies the specified Replication Agent instance by checking for the subdirectory with the specified instance name.
When you delete a Replication Agent instance by invoking the ra_admin command with the -d option, the ra_admin utility deletes from the Replication Agent base directory all the subdirectories associated with the specified instance.
![]() On Windows NT and Windows 2000, if any application or
window is accessing a file or subdirectory associated with a Replication Agent instance
at the time you delete the instance, the “open” file
or subdirectory will not be deleted, and the deletion will be incomplete.
An error message informs you of the file or subdirectory not deleted.
In this event, you must verify that the file or subdirectory is
not open in any application or window, and then manually delete
it.
On Windows NT and Windows 2000, if any application or
window is accessing a file or subdirectory associated with a Replication Agent instance
at the time you delete the instance, the “open” file
or subdirectory will not be deleted, and the deletion will be incomplete.
An error message informs you of the file or subdirectory not deleted.
In this event, you must verify that the file or subdirectory is
not open in any application or window, and then manually delete
it.