

Chapter 4 Building Physical Diagrams
Creating horizontal partitions
Horizontal partitioning consists in segmenting a table into multiple tables each containing a subset of rows and the same columns as the partitioned table in order to optimize data retrieval. You can use any column, including primary keys, as partitioning criteria.
Example
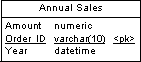
In this example, the table Annual_Sales contains the following columns:
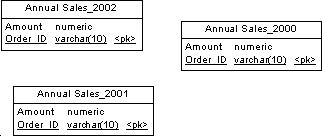
This table may contain a very large amount of data. You could optimize data retrieval by creating horizontal partitions by year. The result is as follows:
Horizontal partitioning has the following pros and cons:
| Pros
|
Cons
|
|---|
| Improve the query response time
|
Requires additional joins and unions to retrieve data from multiple tables
|
| Accelerate incremental data backup and recovery
|
Requires more intelligent queries to determine which table contains the requested data
|
| Decrease time required to load into indexed tables
|
Requires additional metadata to describe the partitioned table
|
Horizontal Partitioning Wizard
You can partition tables horizontally using the Horizontal Partitioning Wizard.
 To partition a table with the Horizontal Partitioning Wizard:
- Select Tools→Denormalization→Horizontal Partitioning, or right-click a table in the diagram and select Horizontal Partitioning from the contextual menu, in order to open the Horizontal Partitioning Wizard:

- Select the table to partition and select the check box if you want to keep the original table after partitioning. Then click Next to go to the Partition Definition page.
- The Partition Definition page allows you to create as many partitions as you need with the Insert and Add a row tools. The name of each partition must be unique in the model. A table will be created for each partition you specify, and will take the name of the relevant partition. Then click Next to go to the Discriminant Column Selection page.
- The Discriminant Column Selection page allows you to specify the columns that will be used as partition criteria using the Add Columns tool. These columns will not be included in the partitions. Then click Next to go to the Partitioning Information page.
- The Partitioning Information page allows you to specify a name and code for the transformation object that will be created together with the partitions. Then click Finish.
The table is partitioned, a horizontal partitioning object is created, and all references to the original table are created on each partition table.
|
Copyright (C) 2008. Sybase Inc. All rights reserved.
|
|