
Chapter 12 Creating Mappings
Creating a data source
You can create a data source in any of the following ways:
- Select Model→Data Sources to access the List of Data Sources, and click the Add a Row tool. The List of Data Sources allows you to create several data sources at once.
- Click the Mapping tab of an object property sheet. When you create a mapping from the Mapping tab, you are prompted to create a data source if no data source is defined for the model. The Data Source Creation Wizard opens automatically. See Creating a mapping for an object.
- Select Tools→Mapping Editor. You are prompted to create a data source if no data source is defined for the model. The Data Source Creation Wizard opens automatically.
The Data Source Creation Wizard allows you to create a data source in your model. It opens automatically when no data source is defined for the model either when you open the Mapping Editor or when you create a mapping from the Mapping tab of an object's property sheet.
You can create additional data sources at any time.
From the Mapping Editor, the Data Source Creation Wizard automatically creates default mappings between source and target objects with the same name. If you do not want the wizard to create these default mappings, you have to deselect the Create default mappings check box on the Options page. Note that you cannot create default mappings between source and target objects with the same name when you open the Data Source Creation Wizard from the Mapping tab of an object property sheet.
 To create a data source using the Data Source Creation Wizard:
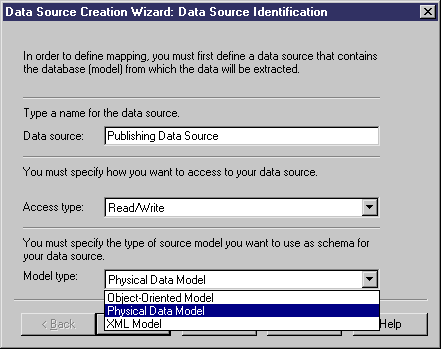
- On the Data Source Identification page, enter a name for the data source, and then specify an access type. The selected type controls which types of queries (for PDM data sources) are available in the Mappings pane, and the existence of forward and reverse mappings. You can choose between:
- Read/Write – Enables Criteria, Select, Insert, Update and Delete queries.
- Read-Only - Enables Criteria and Select queries. You can only create forward (Source > Target) mappings to a read-only data source, and such sources are not displayed during reverse mapping (Target > Source). For more information about forward and reverse mappings, see Creating forward and reverse mappings.
- Write-Only - Enables Criteria, Insert, Update and Delete queries. You can only create reverse mappings to a write-only data source, and such sources are not displayed during forward mapping
- [If required] Select the type of the model you want to use as schema for the data source.

- Click Next to go to the Source Model Selection page.

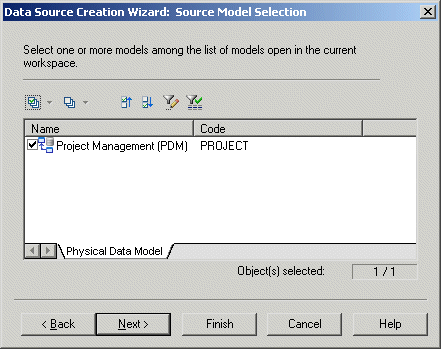
- Select one or more models from the list of open models in the workspace
- Click Next to go to the Options page and clear the Create default mappings check box if you do not want to create default mappings between source and target objects with the same name then click Finish.
or
Click Finish if you want to create default mappings.
The wizard closes and the data source is created in the Source pane of the Mapping Editor. The models you have selected are displayed beneath showing default mappings if any. If you need to create other data sources, you can click the Create Data Source tool in the Source pane toolbar. For more information about the Mapping Editor interface, see Understanding the Mapping Editor interface.
You can add additional models to a data source.
 To add additional models to a data source:
- From the Mapping Editor, click the Add Model to Selected Data Source tool, select a model from the selection box, and then click OK.
If the data source is a PDM, you can click the Database Connection tab to define parameters to connect to a database. See Data source properties.
You can create additional data sources.
 To create additional data sources:
- From the Mapping Editor, click the Create Data Source tool to launch the Data Source Creation Wizard.
|
Copyright (C) 2008. Sybase Inc. All rights reserved.
|

|


![]() To create a data source using the Data Source Creation Wizard:
To create a data source using the Data Source Creation Wizard:

![]() To add additional models to a data source:
To add additional models to a data source:![]() To create additional data sources:
To create additional data sources: