
Chapter 4 Extending your Models with Profiles
Dependency Matrices (Profile)
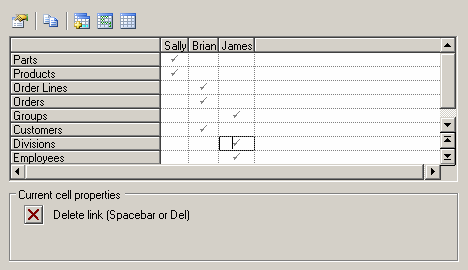
Dependency matrices allow you to review and create links between any kind of objects. You specify one metaclass (with, optionally, a stereotype) for the matrix rows, and the same or another metaclass for the columns. The cells are then calculated from a collection or link object.
For example, you could create dependency matrices that show links between:
- OOM Classes and Classes – connected by Association link objects
- PDM Tables and Users – connected by the Owner collection

- PDM Tables and OOM Classes – connected by extended dependencies
 To create a dependency matrix:
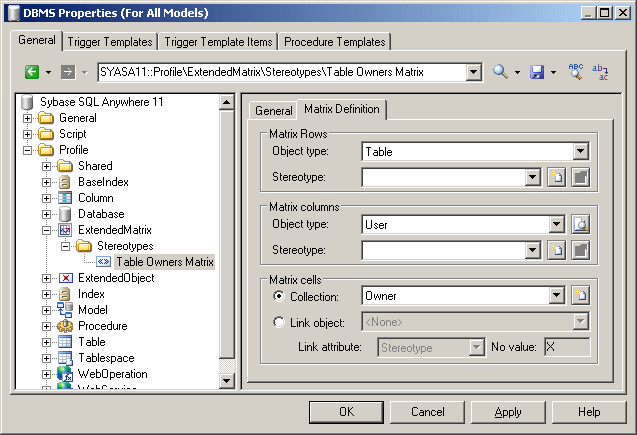
- Right-click the Profile category and select Add Dependency Matrix. This adds the DependencyMatrix metaclass to the profile and creates a stereotype under it, in which you will define the matrix properties.
- Enter a name for the matrix (for example "Table Owners Matrix. This name will be visible in menus in the PowerDesigner interface.
- Click the Matrix Definition tab to specify the rows and columns of your matrix.
- Select an object type from the current model type to populate your matrix rows and an object type from the current or another model type to populate the columns.
- Specify how the rows and columns of your matrix will be associated by selecting one of the Matrix Cells radio buttons:
- Collection – select a collection from the list, which contains all standard and extended collections (but not compositions) defined between the two objects.
- Link object – select a link object from the list, which contains all the kinds of link possible between the objects.

- Click OK to save your matrix and close the resource editor.
You can now create instances of the matrix in your model as follows:
- Select View→Diagram→New Diagram→ Matrix Name
.
- Right-click a diagram background and select Diagram→New Diagram→Matrix Name
- Right-click the model in the browser and select New→Matrix Name
|
Copyright (C) 2008. Sybase Inc. All rights reserved.
|

|


![]() To create a dependency matrix:
To create a dependency matrix:
