
Chapter 3 Building Information Liquidity Diagrams
Creating a column
You can create a column in any of the following ways:
- Select the Columns tab in a article property sheet.
- Right-click an article in the Browser, and select New→Article Column.
For more information about the different ways to create objects, see the "Getting Started with PowerDesigner" chapter in the General Features Guide
.
When you create an article by selecting it from a selection list using the Add Article from Source Database or the Add Article from Remote Database tool in the toolbar, its columns are automatically added to the Columns tab of the article property sheet. You can delete the ones you do not want. The same occurs when you change the source or remote table.
You can nevertheless create an article column in the Columns tab of the article property sheet by:
- Creating an article column in the list, which implies typing a name and a code for the article column
- Selecting from a selection list one or more columns to add in the Columns tab
The selection list can come from:
- The source database, if a PDM is already associated with it to describe its schema. You use the Add Columns from Source Database tool in the toolbar
- The remote databases, if you do not know the schema of the source database or consolidated database, but know the one of the remote database, as a PDM is associated with it. You use the Add Columns from Remote Databases tool in the toolbar
 To create a column from the article property sheet:
- Open an article property sheet and click the Columns tab.
- Click the Add a Row tool and type a name and a code for the article column.
or
[if a PDM is associated with the source database] Click the Add Columns from Source Database tool, select one or more table or view columns from the selection dialog box, and then click OK.
or
[if you do not know the schema of the source or consolidated database but a PDM is associated with at least one remote database] Click the Add Columns from Remote Databases tool, select one or more table or view columns from the selection dialog box, and then click OK.
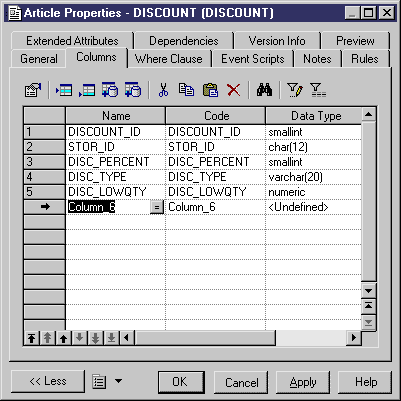
In the following dialog box, Column_6
was created in the list and the others were automatically added when creating the corresponding article.

- Click OK to close the property sheet and return to the model diagram.
|
Copyright (C) 2007. Sybase Inc. All rights reserved.
|

|


![]() To create a column from the article property sheet:
To create a column from the article property sheet:
