![]()
![]()
Chapter 10 Denormalizing a PDM
The Horizontal Partitioning Wizard lets you generate multiple tables from a selected table. The generated tables correspond to partitions of a table; they contain the same columns as the partitioned table apart from those columns used as partitioning criterion.
You can keep or delete the original table used for the partitioning.
The Horizontal Partitioning Wizard is accessible from the Tools menu or the contextual menu of a table. The wizard lets you define the following parameters:
| Wizard page | Description |
|---|---|
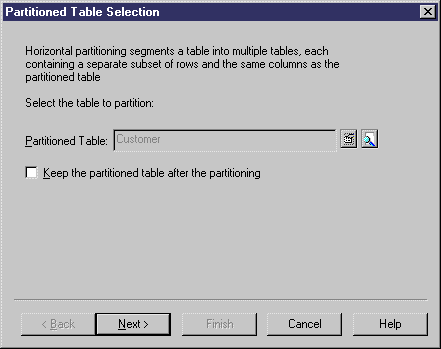
| Partitioned Table Selection | Lets you select the table to partition in any package of the current model. If a table is selected in the diagram, it is displayed in the Partitioned Table box. If you select the Keep the Partitioned Table After the Partitioning check box, you preserve the original table used for the transformation |
| Partition Definition | Lets you define the partitions of the selected table. You can use the Insert or Add a row tools to create as many partitions as needed. The name of each partition is unique in the model. A table will be created for each partition using the partition name |
| Discriminant Column Selection | Lets you define the columns that will not be duplicated in each partition. Such columns are partition criteria. You can use the Add Columns tool to select the columns not to duplicate |
| Partitioning Information | Lets you enter a name and a code for the transformation object that will be created together with the partitions. In this documentation, we shall call this object horizontal partitioning object |
![]() To use the Horizontal Partitioning Wizard:
To use the Horizontal Partitioning Wizard:
After the creation of the partitions and their corresponding tables, all references incoming or outgoing the partitioned table are also created on each partition table.
A horizontal partitioning object is created each time you perform a horizontal partitioning on a table.
| Copyright (C) 2006. Sybase Inc. All rights reserved. |
| |