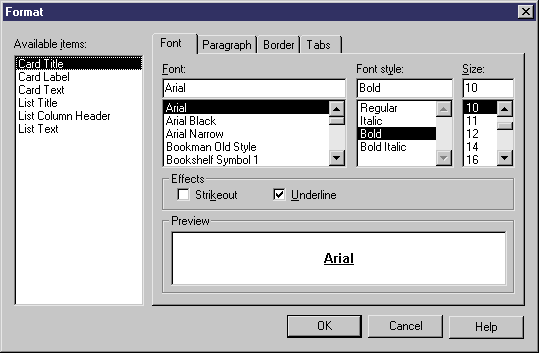
You can access the report items Format dialog in any of the following ways:
-
Select one or more text or list report items in the left-hand Available Items pane, and select in order to set default formatting for them.
Each instance of the item that you subsequently add to the right-hand Report Items pane will have this same formatting, but your changes will not affect any report items already in the Report Items pane.
-
Select one or more text or list report items in the right-hand Report Items pane, and select to change their formatting.

Available Items
Some report items contain more than one text element. You can format each separately or use the ctrl or shift keys to select several at once:
|
Report Item |
Text Selections |
|---|---|
|
Card items |
The following selections are available for card items (lists of properties), which are output in table format: |
|
CRUD Matrix items |
The following selections are available for CRUD Matrix items, which are output in table format: |
|
Model- and object-dependent items |
The following selections are available for model- and object-dependent items, which are output in text format: |
|
List items |
The following selections are available for list items, which are output in table format: |
|
Title page |
The following selections are available for the title page, which is output in text format: For more information about the title page, see Report Properties. |
|
Table of contents |
The following selections are available for the table of contents, which is output in text format: |
Select the levels to display from the Show levels list beneath the Available items pane of the Format dialog box. To define the levels to be shown in the TOC of an HTML report, see Report Properties.
Font Tab
The Format dialog Font tab allows you to specify a font, style, size, and effects for the text elements that you select in the left-hand Available items list.
Paragraph Tab
The Format dialog Paragraph tab allows you to specify indentation, spacing, and alignment for the text elements that you select in the left-hand Available items list.
Border Tab
The Format dialog Border tab allows you to specify elements of a frame around the text elements that you select in the left-hand Available items list. The following border formatting is available:
|
Option |
Description |
|---|---|
|
Left |
Inserts a vertical line to the left of all the occurrences of the selected text elements. |
|
Right |
Inserts a vertical line to the right of all the occurrences of the selected text elements. |
|
Top |
Inserts an horizontal line on top of all the occurrences of the selected text elements. |
|
Bottom |
Inserts an horizontal line at the bottom of all the occurrences of the selected text elements. |
|
Box |
[card and list items only] Inserts a rectangle around all the occurrences of the selected text elements. For card items, inserts a rectangle that groups all the occurrences of Text Label (property names) including Text (corresponding property values). For list items, inserts a rectangle that groups all the occurrences of Column Header (heading of column, example Code), and also a rectangle that groups all the occurrences of Text (value in the column), if you have previously highlighted each of these text selections in the Available Items pane. |
|
Width |
Specifies the line width for the Left, Right, Top and Bottom frame options |
|
Box width |
Specifies the line width of the box frame |
|
From text |
Specifies the amount of space from text to top, bottom, left, and right border |
Tab Tab
The Format dialog Tab tab allows you to specify tab positions and alignment for the text elements that you select in the left-hand Available items list. This formatting is particularly useful for the layout of headers and footers (see Modifying report section headers and footers).
The following tab formatting is available:
|
Option |
Description |
|---|---|
|
Tab stop position |
Specifies the measurement for a tab stop |
|
Default tab stops |
Specifies the default spacing between tab stops |
|
Alignment |
Specifies how text is to be aligned at the tab stop. To change the alignment for an existing tab stop, click it in the Tab Stop Position box, and then click the new alignment option |