![]()
![]()
![]()
![]()
This section describes how to install the Sybase IQ Server Components. To install components required for connection to a network server, see Chapter 2, “Installing Sybase IQ Network Client.”
Enclosed is Sybase® IQ 12.6 is certified with the following platform and operating system configurations:
Microsoft Windows 2000
Microsoft Windows 2003
Windows XP Professional
See the Sybase IQ Release Bulletin for system requirements and required service packs.
If you have a previous 12.x version of Sybase IQ, you need to upgrade your databases as part of installation. See “Upgrading servers and databases to 12.6” for important steps you must complete before installing.
To install Sybase IQ, you run the setup.exe program. This program, along with other installation files, is on the product CD you receive from Sybase.
The program installs:
Sybase IQ 12.6
Sybase Central Java Edition viewer 4.3 (the graphical administration tool) and the latest plug-in for Sybase IQ. For details about using Sybase Central, see its online help or Introduction to Sybase IQ.
Software Developer’s Kit (SDK) version 12.5.1.
The Sybase jConnect JDBC Driver, version 5.5. The installation includes a recent EBF. If you install the jConnect driver, Java classes installed into a database can make JDBC calls to access and modify data. You need TCP/IP to use the jConnect driver.
The Sybase jConnect JDBC Driver version 6.0 is optionally available, but Sybase IQ requires jConnect 5.5 in order to work with Sybase Central and other java components. If you install jConnect 6.0 without installing 5.5, Sybase IQ functionality will be incomplete.
Java Runtime Environment 1.4.2.
ODBC drivers and utilities.
C/C++ development libraries and source files.
![]() Installing Sybase IQ Server
Components
Installing Sybase IQ Server
Components
Sybase IQ Server Components are those required for operation as a network server.
Log into the Windows machine using an account with Administrator privileges.
Exit any Windows programs running on your machine.
Place the CD in the CD drive.
If your system is equipped with autorun, the installation starts immediately and you can skip the next step.
Select Start > Run.
Use Browse to select your CD drive letter, and, in the File Name box, type:
setup.exe
Read the Welcome window and click Next.
Select the location where you are installing the software from the dropdown.
If the country where you are located is not listed, select the most appropriate area (‘Americas (Mid/So.) and Asia Pacific — General’ or ‘Europe, Middle East, and Africa — General’).
If you don’t find a license agreement that matches your location, or if the license agreement is unreadable on your system, you can read all available license agreements at the Sybase website and rerun setup.exe passing it the parameter -I_accept_sybase_license. For example:
H:\>start E:\setup.exe -I_accept_sybase_license
Read the License Agreement. To accept it and continue the install, select the first option button and click Next. To stop the procedure without installing Sybase IQ, select the second option button and click Cancel.
On the Customer Information screen, enter your name and your company name in the text boxes and click Next.
On the Component Keys screen, type the Component name
in the first box and its Key name in the second box. Click Register
Component after entering each pair. When a component is registered,
the text box displays <Component> has been
enabled. When you have entered all components,
click Next.
On the Setup Type screen, choose Complete or Custom install. The Complete install is recommended for most users. The Custom install lets you select components to install.
Sybase IQ and related components are installed in separate folders. The defaults are:
C:\Sybase for Software Developer’s Kit
C:\Program Files\Sybase\Shared\Sybase Central 4.3 for Sybase Central Java Edition
C:\Program Files\Sybase for other products
![]() If you move ahead in the install procedure and return
to this screen, the installer resets target locations to their defaults.
Check locations carefully.
If you move ahead in the install procedure and return
to this screen, the installer resets target locations to their defaults.
Check locations carefully.
Accept the default or click the Browse button (Alt+R) to select another folder. Click Next (Alt+N).
For a Complete install, skip to step 20.
For a Custom install, the Customize Product screen lists components. By default, all products are selected; click any component to deselect it. If a selected product requires a component, you cannot deselect that component.
After choosing desired products, click Next (Alt+N).
Destination folders display beneath the component list. To change the default installation location for any Sybase IQ component, use the Browse button (Alt+R). Click Disk Space (Alt+S) to examine space available on the selected destination disk.
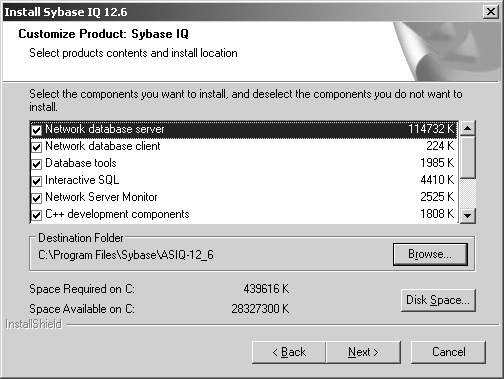
508_alt_textCustomize Product screen from Sybase IQ 12.6 install procedure. This screen lists each Sybase IQ component to be installed, its size in KB, and a checkbox. The destination folder is shown beside a Browse button. Required and available disk space is shown beside a Disk Space button.
When satisfied with locations of IQ components, click Next.
To change the default installation location for any Software Developer’s Kit (Open Client) component, use the Browse button.

Click Disk Space to examine space available on the selected destination disk.
508_alt_textCustomize Product screen from Sybase IQ 12.6 install procedure. This screen lists each Software Developer’s Kit component to be installed, its size in KB, and a checkbox. The destination folder is shown beside a Browse button. Required and available disk space is shown beside a Disk Space button
![]() You must install Software Developer’s Kit 12.5.1
or have 12.5.1 Open Client/Open Server installed on your
system to run Sybase IQ.
You must install Software Developer’s Kit 12.5.1
or have 12.5.1 Open Client/Open Server installed on your
system to run Sybase IQ.
When satisfied with locations of SDK components, click Next.
Examine the locations where the procedure will install the Sybase Central Java Edition components, and change them if desired, using Browse and Disk Space keys.
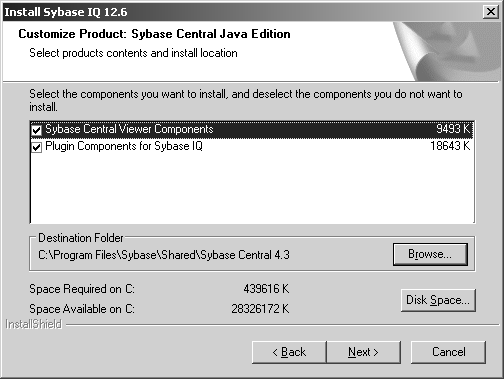
508_alt_textCustomize Product screen from Sybase IQ 12.6 install procedure. This screen lists each Sybase Central component to be installed, its size in KB, and a checkbox. The destination folder is shown beside a Browse button. Required and available disk space is shown beside a Disk Space button
When satisfied with locations of Sybase Central components, click Next.
The default location for log files is C:\Program Files\Sybase\ASIQ-12_6\logfiles. To install log files for the server and the IQ Agent in the default location, click Next. Otherwise, click Browse to specify a new location.
To keep the default login and password for the Utility Database, click Next on the Utility Database Access screen. To change them, type the new login and password, verify the password, then click Next.
The installation procedure displays a list of components to be installed and their locations. Click Next to install, or Back to change the components or locations. During installation, a gauge displays the percentage and names of files installed.
![]() It is best to reboot after any program installation
to ensure that registry and environment settings are correct.
It is best to reboot after any program installation
to ensure that registry and environment settings are correct.
When the installation procedure completes, it prompts you to reboot your system. To reboot your system now, remove the Network Server Components CD from the CD drive, and click Finish. To reboot at a later time, click “No, I will restart my computer later,” then click Finish.
To test Sybase IQ, see “Running Sybase IQ”.
If you installed Sybase Central, see the Sybase IQ System Administration Guide for instructions on configuring and running the IQ Agent. You must run the IQ Agent in order to use Sybase Central.
![]() After installing the software, Sybase strongly recommends
that you check the online support Web site for software updates.
If a software update (EBF) has been released, it contains bug fixes
made after this product shipped.
After installing the software, Sybase strongly recommends
that you check the online support Web site for software updates.
If a software update (EBF) has been released, it contains bug fixes
made after this product shipped.
![]() Accessing the latest information on EBFs and Updates:
Accessing the latest information on EBFs and Updates:
Point your Web browser to Technical Documents
Select EBFs/Maintenance. Enter user name and password information, if prompted (for existing Web accounts) or create a new account (a free service).
Specify a time frame.
Select a product.
Click GO!
Click the document icon under the Info column to the left of a Description to display the report.
