Sybase IQ Network Client for Linux, which can be purchased separately, contains the components required for connection to a network server. It is compatible with IQ servers on all supported server platforms. Sybase IQ Network Client for Linux is certified to run on:
Red Hat Enterprise Linux 2.1 x86 AS and WS Editions
Red Hat Enterprise Linux 3.0 AS and WS Editions
Product and version to install |
Product and version already installed |
Compatibility |
|---|---|---|
12.6 Server |
12.5 Server |
Standalone IQ Agent only |
12.5 Network Client |
Allowed, provided that environment for each is set up for the appropriate version |
|
12.6 Network Client |
Allowed as an upgrade |
|
12.6 Network Client |
12.5 Server |
Allowed, provided that environment for each is set up for the appropriate version |
12.5 Network Client |
Allowed. If one is uninstalled, user must repair remaining one. |
|
12.6 Server |
Prohibited |
The following procedure describes how to install the Sybase IQ Network Client for Linux. To install Sybase IQ Network Client for Windows, see “Installing Sybase IQ Network Client for Windows”. To install the Sybase IQ Server Components, see Chapter 1, “Installing Sybase IQ.”
![]() Running the sybinstall utility
Running the sybinstall utility
If this is the first Sybase product you have installed, see, “Choosing file locations”.
Change directory to the installation directory:
% cd $SYBASE
Start the install utility, sybinstall. You can run this utility as series of menus with prompts or bypass menus using the sybinstall command line parameters.
Parameter |
Function |
|---|---|
-add_agent |
Install standalone 12.6 IQ Agent only |
-autoinstall |
Install all defaults. |
-help |
Display all parameters and usage. |
-I_accept_sybase_license |
Bypass license agreement prompt when using -autoinstall |
-info|version |
Display information about this product. |
-y |
Assume “yes” to all questions, warnings, and errors. |
The following command runs sybinstall with all menus and prompts, so that you can choose the components installed.
% /cdrom/sybinstall
The following command runs sybinstall so that it installs the default products:
% /cdrom/sybinstall -autoinstall -I_accept_sybase_license
The installation procedure log is created in $SYBASE/sybinstall.log. If
the file cannot be created in the $SYBASE directory, it
defaults to /tmp/sybinstall.log.
Avoid installing Sybase IQ Network Client in the same directory as an IQ server. If you attempt to do this, an error like the following displays:
WARNING

The directory ‘/olddev1/users/sybase_scr/ASIQ-12_5’ contains files for the ASIQ server. This install contains only the network client files and should never be installed in the same directory as an existing server.
Please make sure that /remote/ase/linux is set to the correct directory

Do you want to continue <Y/N>?
The following steps show the menus that sybinstall displays by default.
To enter a response, type the desired letter or number, then press Return.
On the Welcome screen, press Return to continue.
Type the number that corresponds to the location where you are installing.
If you don’t find a license agreement that matches your location, or if the license agreement is unreadable on your system, you can read all available license agreements at the Sybase website, and rerun sybinstall passing it the parameter -I_accept_sybase_license. For example:
%/cdrom/sybinstall -I_accept_sybase_license
The first screen of the Software Test and Evaluation License Agreement displays. As you read, hold down the Return key to scroll until you reach the end of the agreement.
At the end of the agreement, a prompt appears. To accept the license terms and continue the installation, enter “Y.” If you disagree with the terms of the license, enter “N.”
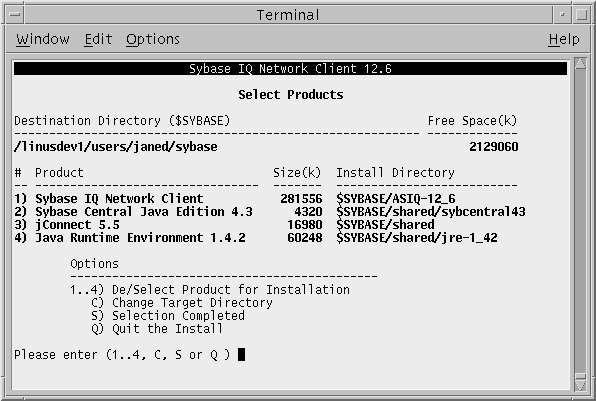
The script next lists the amount of free space available in your $SYBASE directory, and the amount of space required for the three components it installs.

508_alt_textSelect Products screen from Sybase IQ 12.6 sybinstall procedure. This screen lists the destination directory, free space, and products (numbered one to four): Sybase IQ Network Client, Sybase Central Java Edition, jConnect, and Java Runtime Environment. Options are: (1 to 4) De/Select Product for Installation , (C) Change Target Directory, (S) Select Completed, and (Q) Quit the Install
To install all four products, enter “S.” To deselect or change any of the installed products, type the option number at the prompt. For example, to deselect Sybase Central Java Edition, enter “2.”
Deselected product(s) are not installed. You can only deselect one product per screen. When you deselect a product, the screen displays again with the words “Not Selected” under the Install directory for that product.
Numbers 1 through 4 are toggle options. If you change your mind, type the number of a deselected product to reselect it.
After selecting products, enter “S” to start the installation.
As the procedure installs each product selected, it displays a list of the files installed. This may take a few minutes. When the installation completes, a message lists environment setup files created.
You must set certain environment variables to run Sybase IQ. Sybase IQ installs environment files that you can run to set variables.
bash or Korn (ksh) shell users should enter:
%source $SYBASE/ASIQ-12_6/ASIQ-12_6.sh
tcsh or C (csh) shell users should enter:
%source $SYBASE/ASIQ-12_6/ASIQ-12_6.csh