You need an ODBC data source on the client computer for each Windows database you wish to access using ODBC. A data source describes how to get to data on a network. For example, a data source may include the name of a database, the server where it resides, and the network used to access the server.
If you use 16-bit client applications, an odbc.ini file in <WINDIR>\system stores the information used to access each database.
![]() The AUTOSTOP parameter is required in file data sources
and odbc.ini files. It should always be set
to NO.
The AUTOSTOP parameter is required in file data sources
and odbc.ini files. It should always be set
to NO.
On Windows NT and 2000, the ODBC Administrator adds new data sources for you. Each data source allows you to access a database over a network by means of ODBC.
![]() To create an ODBC data source:
To create an ODBC data source:
Start the ODBC Administrator on your Windows client system. On Windows 2000, ODBC Administrator is in the Sybase program group.
To configure a 32-bit ODBC Driver, select Settings > Control Panel > ODBC Data Sources. (This runs odbcad32.exe.)
To configure a 16-bit ODBC Driver, open a command window and type:
odbcadm.exe
In the ODBC Data Source Administrator, click Add on the User DSN tab.
In the Create New Data Source dialog box, select the Adaptive Server IQ driver and click Finish.
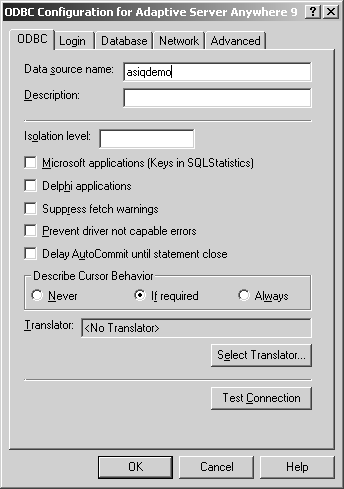
In the ODBC Configuration box, type the Data Source Name in the text box where your cursor is by default (Alt+s).

508_alt_textODBC Configuration screen, ODBC tab with asiqdemo typed in the Data source name box (Alt+s). Cursor Behavior option If required (Alt+f) is checked. Buttons are Select Translator (Alt+e) and Test Connection (Alt+C)
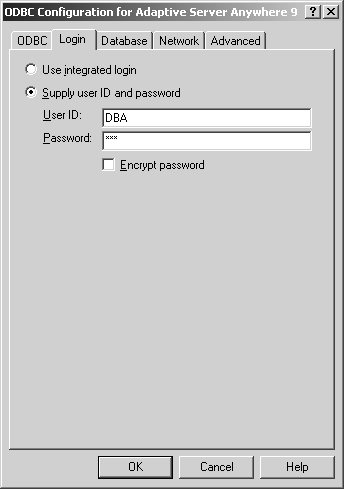
Now click the Login tab. Type the User ID and Password for your database. For the sample database used in this example, use “DBA” and “SQL”.

508_alt_textODBC Configuration screen, ODBC tab with asiqdemo typed in the Data source name box (Alt+s). Cursor Behavior option If required (Alt+f) is checked. Buttons are Select Translator (Alt+e) and Test Connection (Alt+C)
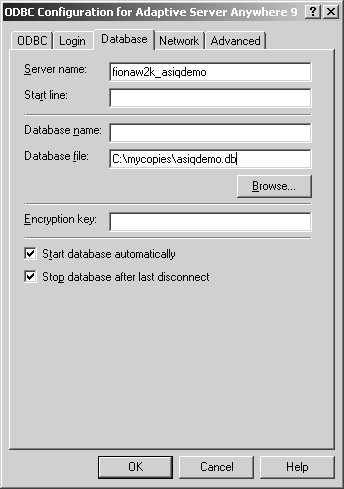
Click the Database tab. If the data source is on a remote machine, type the server name and database file name.

508_alt_textODBC Configuration screen, Database tab with fionaw2k_asiqdemo typed in the Server name box (Alt+S). Start line (Alt+r) and Database name (Alt+n) are blank. Database file box (Alt+f) has C:\mycopies\asiqdemo.db. Encryption key (Alt+E) box is blank. Start database automatically (Alt+t) and Stop database after last disconnect (Alt+p) options are selected
If the data source is on your local machine, type a start line and database name (without the .DB suffix) and skip to Step 8.
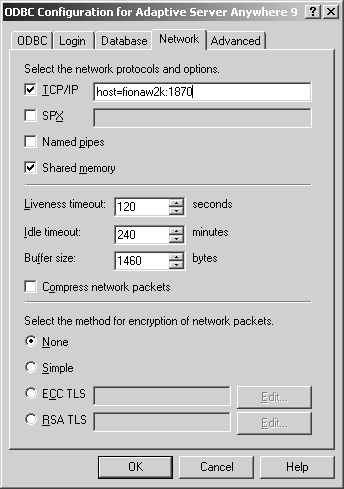
If the
data source is on a remote system, click the Network tab. Click
the box for the appropriate protocol and specify the options beside
the box. For example, to connect to server on system fionaw2k using
TCP/IP protocol and port 1870, you would click TCP/IP
and type host=fionaw2k1870.

508_alt_textODBC Configuration screen, Network tab with TCP/IP option checked (Alt+T) and host-fionaw2k:1870 typed in its box. SPX (Alt+X) and Named pipes (Alt+p) options are unchecked. Shared memory (Alt+m) option is checked. Screen also lists timeout settings, a Compress network packets option, and encryption options for network packets
You could also use the host network address. For example,
host=157.133.66.75:1870
![]() When specifying network connections, you need a different systemname:port# combination
for each database server. The port number must match the one you
use when you start the server.
When specifying network connections, you need a different systemname:port# combination
for each database server. The port number must match the one you
use when you start the server.
Click OK when you have finished defining your data source.
The ODBC Data Source Administrator returns you to the User DSN tab.
You may use files as data sources instead of databases. File data sources are stored as files with the extension.dsn. For information about creating a file data source, see Sybase IQ System Administration Guide.
Start the database. (To start the Sample Database, use Start > Programs > Sybase > Adaptive Server IQ 12.6 > Start Sybase IQ Demo Database.)
In the ODBC Data Source Administrator, select your new data source from the list of User Data Sources.
Click Configure.
On the ODBC Configuration dialog box, click Test Connection.
If you cannot access the data source, check that you have filled out the various tabs with correct file and pathnames.